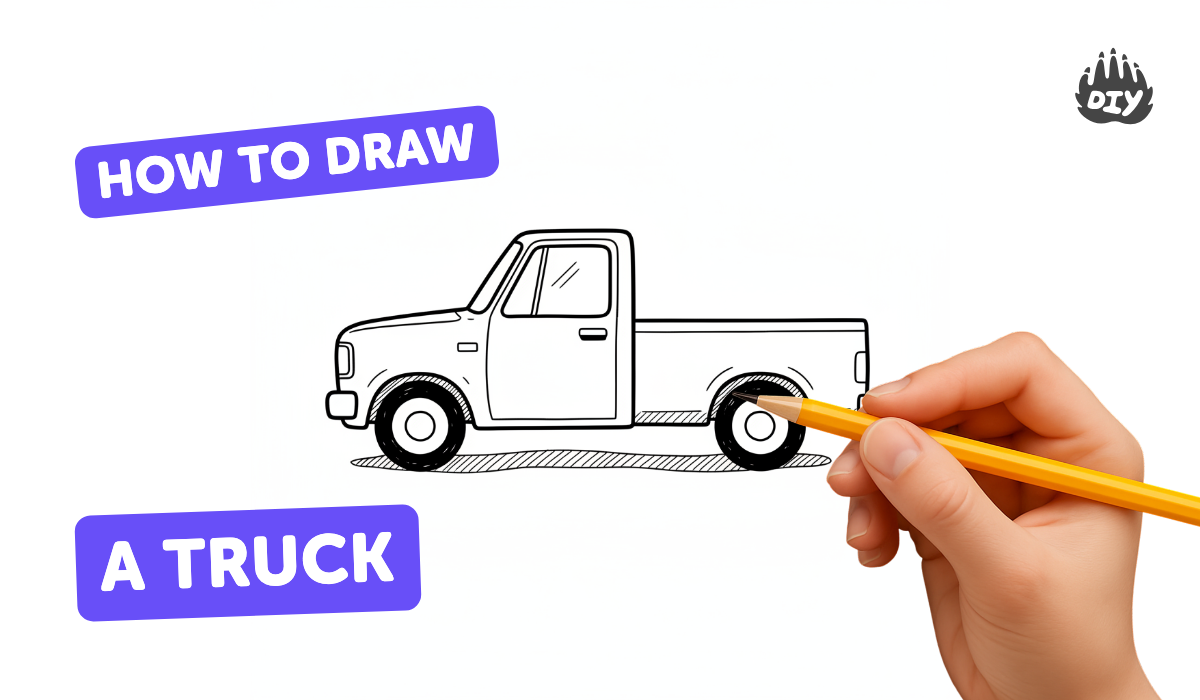
How to draw a truck - a free truck drawing guide
Draw a truck step-by-step using basic shapes, rulers, and colored pencils. Practice proportions, perspective, and shading to create a realistic vehicle drawing.

Drawing Apps
Get inspired with these


Instructions
Drawing a Truck: Step by Step (How to Draw a Truck)
Step 1
Gather all your materials and place them on a clear table so you can reach everything easily.
Step 2
Use your pencil and ruler to draw a faint horizontal baseline where the bottom of the truck's wheels will sit.
Step 3
Lightly mark a small vanishing point on the horizon line to one side to help with perspective.
Step 4
Use the ruler and pencil to draw a large rectangle above the baseline for the truck bed.
Step 5
Slightly tilt the far edges of the rectangle toward the vanishing point so the bed looks like it sits in perspective.
Step 6
Draw a smaller rectangle overlapping the front of the bed to make the cab of the truck.
Step 7
Use the ruler to place two evenly spaced marks on the baseline under the truck for the centers of the wheels.
Step 8
Trace circles around those marks using a round object or compass to make the wheels.
Step 9
Draw curved arcs above each wheel to create the wheel wells and fenders.
Step 10
Draw the windshield roof and hood lines using straight lines that point toward the vanishing point for correct perspective.
Step 11
Add simple shapes for details like the door outlines mirrors headlights a grille and a bumper.
Step 12
Lightly erase the faint construction lines you no longer need to tidy the drawing.
Step 13
Decide where the light is coming from by drawing a small sun or arrow to show the light direction.
Step 14
Shade and color the truck with your colored pencils adding darker tones on the shaded side and light strokes for highlights to make it look realistic.
Step 15
Take a picture or scan your finished truck and share your creation on DIY.org
Help!?
What can I use if I don't have a compass, ruler, or colored pencils?
Trace a coin, jar lid, or cup rim for the wheels instead of a compass, use the straight edge of a hardcover book or a cereal box flap as your ruler, and substitute crayons or markers for the colored pencils when shading and coloring the truck.
My truck looks skewed or the wheels aren't lined up—how can I fix that?
Lightly erase and redraw the rectangle edges and the windshield/hood lines so they point more accurately toward the small vanishing point, then re-measure even spacing on the baseline before tracing the wheel circles to realign the wheels.
How can I adapt this activity for younger children or older kids?
For younger children, simplify by having them trace and color basic rectangles and circles for the bed, cab, and wheels with a cup rim and marker, while older kids should keep the vanishing point and perspective steps and add finer shading with colored pencils as instructed to make the truck realistic.
How can we extend or personalize the truck drawing once it's finished?
Add cargo in the truck bed, draw custom logos on the door outlines, use the drawn light direction to add highlights and deeper shading with colored pencils, and then photograph your finished truck to share on DIY.org as suggested.
Related videos
How to Draw Truck easy for Beginners | Simple Truck Drawing with Step by Step
4 Videos
How to Draw Truck easy for Beginners | Simple Truck Drawing with Step by Step
How to draw a truck easy | Step by step truck drawing, painting and coloring for kids toddlers
How to Draw a Simple Truck - Easy Step by Step
Truck Drawing Tutorial for Kids | Easy & Fun Step-by-Step Guide! 🚚✏️
Fun Facts
🚚 The first gasoline-powered truck was built by Gottlieb Daimler in 1896 — it kickstarted modern motorized freight.
📐 One-point perspective uses a single vanishing point on the horizon, perfect for drawing a truck heading straight toward you.
✏️ Some professional colored-pencil sets include 150+ colors so artists can mix smooth, realistic vehicle paints and finishes.
🎨 Simple shading techniques like gradients, reflections, and small highlights can make a flat truck drawing look shiny and 3D.
🧭 Model scales such as 1:24 and 1:64 are common for toy and model trucks, and artists use those scales to practice accurate proportions.
How do I draw a realistic truck step-by-step?
What materials do I need to draw a truck with rulers and colored pencils?
What ages is this truck drawing activity suitable for?
What are the benefits of teaching kids to draw trucks?


