Draw Nature's Water Cycle!
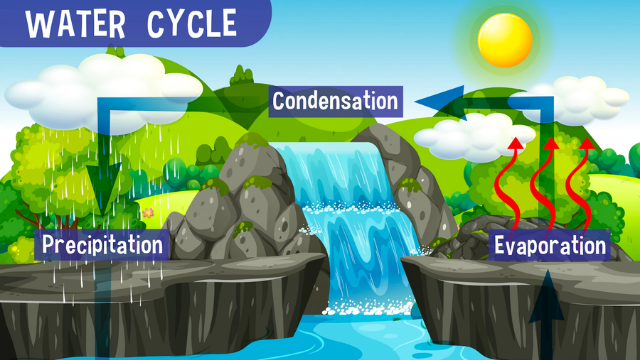
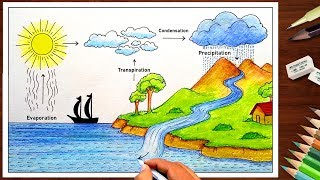
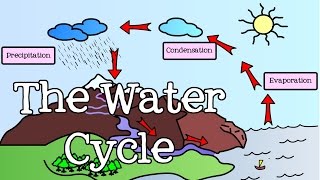
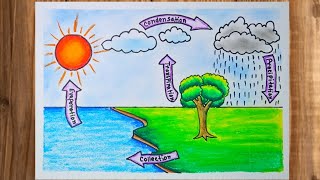
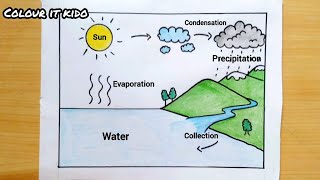
Draw a colorful water cycle diagram showing evaporation, condensation, precipitation, and collection, label parts, add arrows, and explain each step in writing.


Step-by-step guide to draw Nature's Water Cycle
Step 1
Place your paper and pencil on a flat surface.
Step 2
Lightly draw a horizontal line near the bottom of the paper to make the ocean or lake.
Step 3
Draw a big sun above the water to show warmth that causes evaporation.
Step 4
Draw fluffy clouds higher in the sky to show where condensation happens.
Step 5
Draw curved arrows rising from the water up toward the clouds to show evaporation.
Step 6
Draw small raindrops or snowflakes falling from the clouds to show precipitation.
Step 7
Draw arrows from the rain down into the water and along the land to show collection and runoff.
Step 8
Use your black pen or marker to neatly write the labels Evaporation Condensation Precipitation Collection next to each matching part.
Step 9
Under each label write one or two simple sentences that explain what happens in that part of the cycle.
Step 10
Color each part of your diagram with your colouring materials to make the sun clouds water arrows and land bright and clear.
Step 11
Write a short title at the top of the page like Nature's Water Cycle.
Step 12
Write your name and the date in a corner so people know you made it.
Step 13
Share your finished water cycle diagram on DIY.org.
Help!?
If I don't have a black pen or marker, what can I use instead to neatly write the labels and outlines?
If you don't have a black pen or marker, use a dark pencil, a sharp dark crayon, or a fine-tip colored pen to trace your pencil labels and outlines from the step that says 'Use your black pen or marker to neatly write the labels.'
What should I do if my evaporation arrows or labels get smudged while coloring?
If your evaporation arrows or labels smudge when you color, let ink dry before coloring, retrace faint arrows with your pen after coloring, or erase and redraw the affected curved arrows rising from the water and the labels like Evaporation and Condensation.
How can I change the activity to suit different ages?
For younger children, pre-draw the horizontal ocean line, sun, clouds and arrows for them to color and add single-word labels, while older kids can add extra sentences under each label, detailed arrows for runoff and infiltration, and more accurate cloud shapes as they follow the steps to 'write one or two simple sentences' under each label.
What are some fun ways to improve or personalize my water cycle diagram?
To enhance your diagram, add cotton-ball clouds, blue cellophane or glitter for the water, color-code the curved evaporation arrows and runoff arrows, include a small legend or local place names, and then share the finished Nature's Water Cycle on DIY.org as the final step.
Watch videos on how to draw Nature's Water Cycle
How to draw Water Cycle drawing for beginners ( very easy ) step by step diagram
4 Videos
How to draw Water Cycle drawing for beginners ( very easy ) step by step diagram
All About the Water Cycle for Kids: Introduction to the Water Cycle for Children - FreeSchool
How to Draw Water Cycle Easy Way / Water Cycle Drawing Easy
Water cycle drawing l How to draw watercycle for school project | water cycle easydrawinglwatercycle
Facts about water cycle and weather for kids
💧 The water cycle has no true beginning or end — the same water keeps moving around Earth for billions of years!
☀️ Evaporation can happen at everyday temperatures: sun and wind help liquid water become invisible water vapor.
🌫️ Clouds are made of tiny water droplets or ice crystals so small they float — a typical cloud can contain millions of kilograms of water!
🌧️ Precipitation comes in many forms (rain, snow, sleet, hail) depending on temperature and air layers the drops fall through.
🌱 Plants join the cycle through transpiration — they release water vapor from leaves that rises into the air.
How do I draw a nature's water cycle diagram step-by-step?
What materials do I need to draw a colorful water cycle diagram?
What ages is the water cycle drawing activity suitable for?
What are the learning benefits of drawing the water cycle?


