Transform a book into art
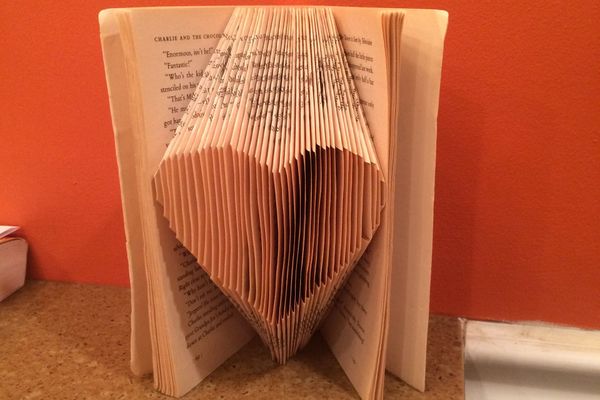
Transform an old paperback into a folded-book sculpture using child-safe scissors, paints, and collage to create a unique, decorative artwork for display.
About this activity
Transform an old paperback into a folded-book sculpture using child-safe scissors, paints, and collage to create a unique, decorative artwork for display.
What you need
Step by step
- 1
Step 1
Spread the protective surface on your table and set out all the materials so everything is easy to reach.
- 2
Step 2
Pick an old paperback with pages you do not need anymore and make sure the spine is unbroken.
- 3
Step 3
Decide on a simple design like a fan pattern heart or star and draw a tiny sketch on scrap paper for reference.
- 4
Step 4
Fold the top right corner of the first page down to meet the spine and press firmly to make a sharp crease.
- 5
Step 5
Fold each following page the same way until you have folded about half the book or the whole book depending on how thick you want your sculpture.
- 6
Step 6
Use child-safe scissors to cut a small window shape near the folded edge on every fifth page to make peek-through shapes.
- 7
Step 7
Paint the folded page edges and the cut windows with colors you like using your brushes.
- 8
Step 8
Let the paint dry completely before touching the painted areas.
- 9
Step 9
Glue collage pieces into some of the cut windows and onto the front cover to add extra color and texture.
- 10
Step 10
Add stickers or small paper decorations to the folded edges and cover to finish the look.
- 11
Step 11
Stand your folded-book sculpture upright on a shelf or table to display your new artwork.
- 12
Step 12
Share your finished folded-book sculpture on DIY.org
Fun facts
How do I transform an old paperback into a folded-book sculpture?
To make a folded-book sculpture, choose a sturdy old paperback and remove any loose pages. Decide on a shape (heart, wave, or abstract) and lightly mark fold lines with a pencil. Fold or carefully cut pages following your pattern, using child-safe scissors with supervision. Add paint, collage papers, stickers, or glued embellishments to page edges or faces. Seal with a thin layer of craft glue if desired and display on a shelf or stand.
What materials do I need to make a folded-book sculpture at home?
You will need an old paperback book; child-safe scissors; a pencil and ruler to mark folds; washable paints, brushes and a palette; a glue stick or non-toxic craft glue; collage papers, magazines, and stickers; small embellishments like buttons or sequins; washi tape; a protective table mat and smock; and optional string, a small stand, and a sponge for texture. Keep wet wipes and a bowl of water handy for cleanup.
What ages is this folded-book sculpture activity suitable for?
This craft suits a range of ages: about 7 and up for independent folding and careful cutting with supervision; ages 4–6 can take part in painting, gluing, and arranging collage elements while an adult handles cutting. Teens and tweens can tackle more intricate folding patterns and mixed-media details. Always match tasks to your child’s fine-motor skills, provide age-appropriate scissors, and supervise when using glue or cutting tools.
What are the benefits of making folded-book sculptures with my child?
Folded-book sculpture builds fine motor control, sequencing, and spatial reasoning as children plan and fold pages. It encourages creativity, problem-solving, patience, and pride in creating a decorative object. The activity promotes recycling and environmental awareness by repurposing old books, and it can link to literacy—decorate sculptures around a favorite story or character. Completing a display-ready piece also boosts confidence and provides a tactile, personal decoration for home.
Watch & Learn
Need help?
What can I use if I can't find an old paperback, child-safe scissors, or collage pieces?
If you don't have an old paperback with an unbroken spine, swap in a thick magazine or a flexible hardcover and, if you lack child-safe scissors or collage papers, use blunt-tip adult scissors with supervision and cut shapes from scrap colored paper or magazine images to glue into the windows.
My folds aren't staying sharp and some pages tear when I fold or cut windows—what should I do?
To keep folds sharp as instructed ('press firmly to make a sharp crease'), run a ruler or the back of a butter knife along each fold, pre-score thin pages with a blunt tool to prevent tearing, and mark every fifth page lightly in pencil before cutting the small window shapes to keep them aligned.
How can I adapt this folded-book sculpture activity for younger or older children?
For younger kids, simplify by folding only a few pages and using pre-cut windows and stickers instead of scissors or glue, while older children can fold the whole book, cut more intricate window shapes every fifth page, and paint detailed designs on the folded edges.
What are some ways to enhance or personalize the finished folded-book sculpture?
After painting the folded page edges and gluing collage pieces into the cut windows and onto the cover, personalize it by adding battery LED tea lights inside the windows, varnishing painted edges for extra shine, or arranging folds into layered fan, heart, or star patterns and attaching a decorated title strip to the front cover.