This Atom is Lit, Literally!
Build a glowing atom model using LEDs, a coin cell, pipe cleaners, and clay to represent nucleus and orbiting electrons while learning simple circuits.


Step-by-step guide to build a glowing atom model
Step 1
Gather all the materials listed and bring them to a clean table.
Step 2
Press a handful of modeling clay into the bottle cap or onto the cardboard to make a flat round base.
Step 3
Ask an adult to help you check the coin cell and then press the battery into the center of the clay with the + side facing up.
Step 4
Tear or cut two thin strips of aluminum foil about as long as the base.
Step 5
Tape one foil strip so one end touches the top (+) of the battery and the rest runs out toward the edge of the base.
Step 6
Tape the second foil strip so one end touches the rim (negative) of the battery and the rest runs out toward the edge of the base.
Step 7
Make two or three pipe cleaner rings by bending pipe cleaners into circles and stick their ends into the clay around the battery to create orbits.
Step 8
Bend the LED legs so the long leg points toward one foil strip and the short leg points toward the other foil strip.
Step 9
Slide the LED so its body sits on an orbit ring and its legs reach down to touch the two different foil strips.
Step 10
Tape each LED leg to the foil strip it touches to secure the connection and avoid the strips touching each other.
Step 11
Check whether the LED lights and if it does not light flip the LED legs so the long leg goes to the + strip then retape if needed.
Step 12
Pinch tiny balls of clay to make extra electrons and press them onto the other orbits to decorate your atom.
Step 13
Take a photo of your glowing atom and share your finished creation on DIY.org.
Help!?
What can we use if we can't find the coin cell battery listed in the materials?
If you can't find a coin cell, use a 3V battery pack or two AA batteries in a holder and have an adult connect wires to the foil strips in place of pressing the coin cell into the clay.
My LED didn't light — what common mistakes should I check and how do I fix them?
If the LED doesn't light, make sure the + side of the coin cell is facing up in the clay, that each aluminum foil strip is taped firmly to the correct + or - rim of the battery without the strips touching, and flip the LED legs so the long leg goes to the + strip then retape the connections.
How can I adapt this activity for younger or older kids?
For younger children have an adult pre-press the battery into the clay and pre-cut and tape the foil strips while they arrange pipe cleaner orbits and LEDs, and for older kids challenge them to add extra LEDs, experiment with series/parallel wiring using additional coin cells, or design a decorated planetary display.
What are simple ways to enhance or personalize our glowing atom project?
To personalize and extend the project, use different colored LEDs as 'electrons', paint the clay base or cover the bottle cap, add tiny clay labels for protons/neutrons, or build a small switch from a paperclip to open and close the foil connection.
Watch videos on how to build a glowing atom model
The Basic Structure of the Atom | Chemistry and Our Universe: How it All Works
3 Videos

The Basic Structure of the Atom | Chemistry and Our Universe: How it All Works

What Is An Atom - Part 1 | Properties of Matter | Chemistry | FuseSchool
Atoms - Basic Introduction
Facts about simple circuits and atomic models
🔬 Atoms are tiny — about 0.1 nanometers (100 picometers) across, so your clay nucleus is a giant model!
💡 LEDs are super-efficient and can last tens of thousands of hours while using much less power than old bulbs.
🔋 Many common coin cells (like the CR2032) provide about 3 volts, and the flat side is the positive (+) terminal.
⚡ LEDs are diodes — they only light when current flows the right way, so correct battery and LED orientation matters.
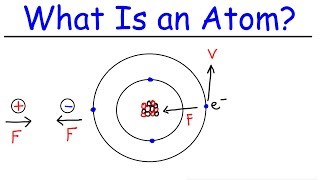
🧪 The Bohr model shows electrons orbiting like planets — a friendly way to build atom models even though real electrons form fuzzy clouds.
How do you build the "This Atom is Lit, Literally!" glowing atom model?
What materials are needed for the glowing atom model activity?
What ages is the glowing atom model suitable for?
What are the benefits, safety tips, and variations for the glowing atom model?
