The Hooting Owl Challenge
Make a hooting owl craft using paper cups, balloons, and straws; decorate it and explore how sound is made and changed.


Step-by-step guide to make a hooting owl craft
Step 1
Gather all the materials and put them on a flat table or desk.
Step 2
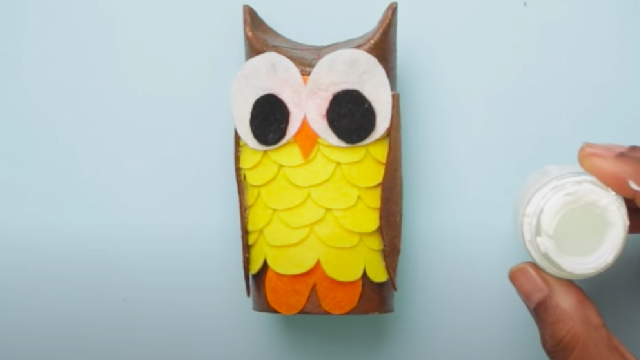
Use colouring materials and scrap paper or stickers to decorate the cup so it looks like an owl.
Step 3
Cut off the narrow neck of one balloon using the scissors.
Step 4
Stretch the round part of the cut balloon over the open top of the cup so the balloon is flat and tight.
Step 5
Tape the balloon to the rim of the cup all the way around to make an airtight seal.
Step 6
Carefully make a very small hole in the center of the stretched balloon membrane using the tip of the scissors or a pencil.
Step 7
Push one end of the straw into the tiny hole until the straw tip just touches the balloon membrane.
Step 8
Tape around the straw where it meets the balloon to seal any air leaks.
Step 9
Blow gently into the straw and listen for the hooting sound your owl makes.
Step 10
Pull the balloon gently tighter to change the membrane tension and prepare to test again.
Step 11
Blow into the straw again and notice how the pitch or loudness changes with the tension.
Step 12
Share your finished hooting owl on DIY.org.
Help!?
What can we use if we don't have the cup, round balloon, or straw called for in the instructions?
Use a clean yogurt pot or small plastic container instead of the cup, a standard party latex balloon for the round balloon you cut in step 3, and a rigid drinking straw or short piece of plastic tubing in place of the straw in step 7, taping around it as directed.
My owl doesn't make a hooting sound—what should I check or fix?
If there's no hoot, re-tape the rim to make the seal airtight (step 5), make the hole smaller or re-poke a very tiny hole (step 6), push the straw tip so it just touches the membrane (step 7), and pull the balloon tighter (step 9) to increase vibration.
How can I adapt the activity for younger or older kids?
For preschoolers have an adult do the cutting of the balloon neck and the tiny hole (steps 3 and 6) while the child decorates the cup (step 2), and for older kids let them change straw length and membrane tension themselves (steps 7 and 9) and measure how pitch or loudness changes.
What are some ways to extend or personalize the hooting owl project?
Decorate the cup with scrap paper and stickers as in step 2, build multiple owls with different balloon sizes or straw lengths to compare pitches (steps 3 and 7), and mount them on cardboard or create an 'owl choir' before sharing on DIY.org as the final step suggests.
Watch videos on how to make a hooting owl craft
Hoot Owl Hoot Gameschool Walkthrough and Review | Secular Homeschooling
4 Videos
Hoot Owl Hoot Gameschool Walkthrough and Review | Secular Homeschooling
Hoot Owl Hoot - Fun Kids Board Game - Review and How to play
Why Do Owls Hoot?: A Fun Explanation
Owls for Kids | Learn fun facts about these cool birds!
Facts about sound and acoustics
🦉 Owls can turn their heads about 270° because they have extra neck vertebrae and special blood vessels that keep circulation steady.
🎵 Sound travels about 343 meters per second in air at 20°C — fast enough to reach a nearby friend almost instantly.
🎈 Stretching or squeezing a balloon changes the tension of its skin, which changes how quickly it vibrates and therefore the pitch you hear.
🥤 A paper cup and straw can channel vibrations like a tiny tube instrument or a cup telephone — simple shapes change how sound moves.
🔊 Acoustics is the science of sound: changing the size, shape, or material of a cavity (like a cup or balloon) changes tone, volume, and resonance.
How do you do The Hooting Owl Challenge?
What materials do I need for The Hooting Owl Challenge?
What ages is The Hooting Owl Challenge suitable for?
What are the benefits and safety tips for The Hooting Owl Challenge?
