The Carbon Sinks Hunt
Go on a local scavenger hunt to find and record carbon sinks like trees, soil, compost, and plants, then map and compare their sizes.


Step-by-step guide to the Carbon Sinks Hunt
Step 1
Ask an adult to join you for the scavenger hunt so you stay safe and have help when needed.
Step 2
Gather your notebook pencil measuring tape ruler clipboard coloring materials plain paper and gloves.
Step 3
Choose a safe nearby outdoor area like a park garden or your backyard and make sure you have permission to explore.
Step 4
Draw a simple base map on your plain paper showing paths streets fences and big landmarks so you know where things are.
Step 5
Make a small legend box on your map and draw a different symbol for each sink type such as tree plant soil and compost.
Step 6
Walk slowly through your chosen area and look for carbon sinks like trees plants soil patches and compost piles.
Step 7
When you find a sink mark its exact spot on your map with the matching symbol from your legend.
Step 8
Measure the sink using a tape measure: for trees wrap at chest height and record circumference for plant beds measure length and width across and for round compost piles measure the distance straight across the middle.
Step 9
Write the measurement and a short description of the sink in your notebook next to the map symbol.
Step 10
Use your ruler and colored pencils to add the measured size numbers next to each symbol on the map so they are easy to compare.
Step 11
Make a simple list in your notebook ordering the sinks from largest to smallest using the numbers you recorded.
Step 12
Wash your hands with soap and water and remove your gloves when you finish exploring.
Step 13
Share your finished map and notes on DIY.org
Help!?
What can we use instead of a measuring tape, clipboard, or colored pencils if we don't have them?
If you don't have a measuring tape, use a length of string and then measure the string with your ruler, use a hardcover book or baking sheet as a clipboard, and substitute crayons or markers for coloring materials when adding sizes and symbols to your plain paper map.
What should we do if we can't tell exactly where to mark a sink on the map or if a measurement seems wrong?
If a spot is hard to mark or a measurement seems off, have an adult help steady the tape at chest height for tree circumferences, measure compost piles straight across for the diameter, take a photo of the sink for reference, and re-record the number in your notebook next to the symbol.
How can we adapt the hunt for younger children or make it more challenging for older kids?
For younger kids, let an adult or older sibling handle the tape measure and have them draw big symbols and color the map while they call out sizes, and for older kids, require precise measurements with the ruler, calculate areas from length and width, and add species or carbon-storage notes to the notebook.
How can we extend or personalize the Carbon Sinks Hunt after finishing the map and measurements?
To enhance the activity, glue or tape photos next to each matching symbol on your plain paper map, create a color-coded largest-to-smallest chart in your notebook using the measured numbers, and post the expanded map and notes on DIY.org.
Watch videos on how to do the Carbon Sinks Hunt
What Is A Carbon Sink In The Environment? - Ecosystem Essentials
3 Videos
What Is A Carbon Sink In The Environment? - Ecosystem Essentials
What are carbon sinks? | Sustainability for all - ACCIONA

How Do Carbon Sinks Help Regulate Earth's Carbon Cycle? - Ecosystem Essentials
Facts about carbon sinks and ecosystems
🌳 A mature tree can absorb about 48 pounds (22 kg) of CO₂ each year — over decades that adds up to a lot!
🌱 Composting food scraps keeps them out of landfills and cuts methane emissions while making rich soil.
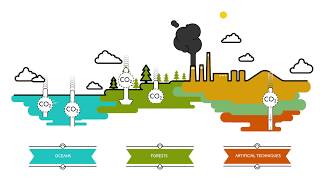
🌿 Soils store more carbon than all the world's plants and the atmosphere combined — they're a huge underground bank.
📏 You can estimate a tree's carbon by measuring trunk circumference and height — simple measurements help real science!
🗺️ Kids mapping local trees, gardens, and compost piles can contribute to citizen-science projects that track urban carbon sinks.
How do I organize a Carbon Sinks Hunt for kids?
What materials do I need for a Carbon Sinks Hunt?
What ages is a Carbon Sinks Hunt suitable for?
What safety tips and variations are there for a Carbon Sinks Hunt?
