Take the Fingerprint Challenge!
Collect and lift fingerprints using pencil shading and clear tape, compare whorls, loops, and arches, and create simple fingerprint ID cards.


Step-by-step guide to the Fingerprint Challenge
Step 1
Wash your hands with soap and water to remove dirt and oils.
Step 2
Dry your hands completely with a towel so prints come out clear.
Step 3
Shade a small square on the white paper with the pencil until it looks dark.
Step 4
Rub one fingertip gently over the shaded square to pick up graphite on your finger.
Step 5
Press a piece of clear tape sticky-side down onto the graphite-covered fingertip and smooth it so the tape picks up the print.
Step 6
Peel the tape off carefully and stick it sticky-side down onto a blank spot on an index card to transfer the print.
Step 7
Repeat Steps 3 to 6 for each finger you want to record so you have one fingerprint per spot.
Step 8
Use the magnifying glass to look closely at each transferred fingerprint.
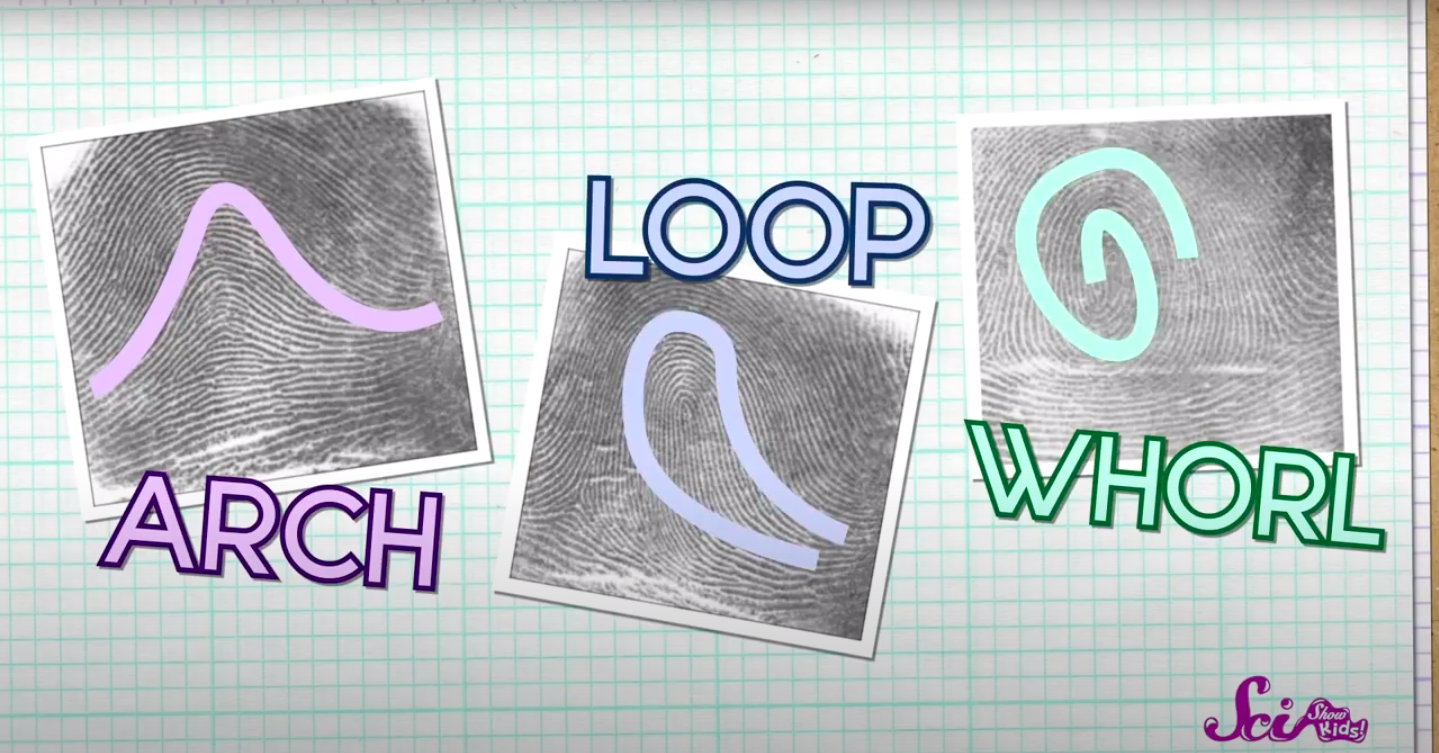
Step 9
Decide if each print is a whorl loop or arch by using these clues: whorl looks like circles or a spiral; loop curves and comes in and out the same side; arch makes a hill shape with ridges flowing across.
Step 10
Write the finger name and the pattern type (whorl loop or arch) next to each fingerprint using the black pen.
Step 11
Decorate your fingerprint ID card and add a title using colouring materials.
Step 12
Share a photo of your finished fingerprint ID card on DIY.org.
Help!?
What can I use instead of clear tape or a magnifying glass if I don't have them?
If you don't have clear tape, use cellophane kitchen tape or a transparent address label to lift the graphite in step 5, and if you lack a magnifying glass use a smartphone camera zoom to inspect prints in step 8.
My tape didn't pick up the print or the prints look blurry — what should I do?
If prints are faint or smudged, redo steps 1–4 making sure hands are completely dry (step 2), darken the shaded square in step 3 with a softer pencil and rub your fingertip longer in step 4, then smooth the tape firmly in step 5 to avoid air bubbles.
How can I adapt the activity for younger or older children?
For younger kids, have an adult help with step 5 (pressing and peeling the tape) and focus on sticking prints and decorating in step 11, while older kids can use the magnifying glass in step 8 to study ridge details and write detailed notes by each finger name in step 10.
How can we extend or personalize the fingerprint ID card once it's done?
To enhance the project, create fingerprint ID cards for each family member by repeating steps 3–10, laminate the index cards, add a handedness or birthdate note next to each fingerprint, and then share a photo on DIY.org as directed in step 12.
Watch videos on how to Take the Fingerprint Challenge
Let's Talk Science - Fingerprinting || Science Activity
4 Videos

Let's Talk Science - Fingerprinting || Science Activity
Everything you need to know about FINGERPRINTS | Cool Facts | Science Video for Kids

FingerPrint ACTIVITY | Fun experiment for kids

See Your Own Fingerprints!
Facts about forensic science for kids
🔎 No two people — not even identical twins — have the same fingerprints.
👶 Fingerprint patterns begin forming in the womb around the 10th to 16th week of pregnancy.
🌀 Scientists group prints into three main types: loops, whorls, and arches.
🩹 Small cuts or scars can change parts of a fingerprint, but the overall pattern stays the same for life.
💾 Modern fingerprint ID systems store millions of prints digitally for quick matches.
How do I do the Fingerprint Challenge using pencil shading and clear tape?
What materials do I need for the Fingerprint Challenge?
What ages is the Fingerprint Challenge suitable for?
What are the benefits of doing the Fingerprint Challenge with kids?
