Take a custom flash photo
Make a simple flash diffuser or colored gel, attach it to a camera or phone, and take custom-lit photos to explore light and color.


Step-by-step guide to make a simple flash diffuser or colored gel and take custom-lit photos
Flash Professional CC - Tutorial for Beginners [+ General Overview]
Step 1
Find a clear flat workspace and lay out all your materials so you can reach them easily.
Step 2
Cut a square of translucent plastic or wax paper about 3 inches by 3 inches to make your diffuser.
Step 3
Cut two small squares of colored cellophane about the same size as the translucent square.
Step 4
Tape one colored cellophane square to the edge of the translucent square so it can flip over the diffuser.
Step 5
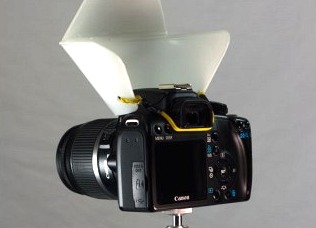
Hold the taped diffuser over your phone or camera flash and position it so the colored part covers the flash area.
Step 6
Check carefully that the diffuser does not cover the camera lens and only sits over the flash.
Step 7
Secure the diffuser in place by stretching a rubber band around the phone or camera body so it holds the diffuser steady.
Step 8
Open your camera app and set the flash to ON or AUTO so the flash will fire with each photo.
Step 9
Take a test photo with the diffuser attached to see the soft or colored light effect.
Step 10
Flip the colored cellophane to a different color or swap in another color square to change the light color.
Step 11
Take another photo to compare the new color and see how light and color change your picture.
Step 12
Share your favorite custom-lit photo and a short note about your diffuser on DIY.org.
Help!?
What can we use instead of translucent plastic, wax paper, or colored cellophane if those are hard to find?
Use a 3×3-inch square of tracing paper or thin parchment as the diffuser and replace colored cellophane with tissue paper or colored clear plastic wrap, taping the color to the edge and securing with the rubber band as the instructions say.
My photos are blurry or too dark—what might be going wrong and how do I fix it?
Make sure the diffuser is covering only the flash and not the camera lens as the instructions warn, and if the light is too dim try a thinner translucent square, move the diffuser slightly farther from the flash, or tighten the rubber band so the diffuser doesn't sag.
How can we adapt the activity for younger kids or make it more challenging for older kids?
For younger children have an adult pre-cut the 3×3-inch squares and attach the cellophane with tape or a clothespin during the rubber-band step, while older kids can layer colors, change the distance from the flash, or swap multiple colored squares to compare photos.
How can we extend or personalize the custom flash photos to make them more creative?
Personalize the diffuser by drawing small patterns on the translucent square with a permanent marker or cutting shapes into the cellophane before taping so the colored patterns appear in the photos, then share favorite results and notes on DIY.org as suggested.
Watch videos on how to make a simple flash diffuser or colored gel and take custom-lit photos
Photopea - Tutorial for Beginners in 13 MINUTES! [ COMPLETE ]
4 Videos
![Photopea - Tutorial for Beginners in 13 MINUTES! [ COMPLETE ]](https://img.youtube.com/vi/a3aPaTNV5g4/mqdefault.jpg)
Photopea - Tutorial for Beginners in 13 MINUTES! [ COMPLETE ]
![Photopea - Tutorial for Beginners in 11 MINUTES! [ UPDATED 2025 ]](https://img.youtube.com/vi/VgWNC08W5W0/mqdefault.jpg)
Photopea - Tutorial for Beginners in 11 MINUTES! [ UPDATED 2025 ]
Learn 15 Easy Flick Up Skills | Tutorial
HOW TO TAKE PERFECT PHOTO EASILY || Instagram Star Camera Tricks And Tutorials
Facts about photography for kids
📸 Camera flashes can fire for as little as 1/20,000 of a second — much faster than a blink!
🌈 Colored gels change the hue of light so a single light can look warm like sunset or cool like moonlight.
☁️ A diffuser (like baking parchment or a softbox) spreads light and makes shadows much softer.
✂️ DIY gels are easy and safe: use cellophane, translucent folder plastic, or colored tissue taped over a flash or phone light.
🎨 Light mixes additively — red plus green light makes yellow, which is different from mixing paint.
How do I make and use a simple flash diffuser or colored gel to take custom-lit photos?
What materials do I need to make a flash diffuser or colored gel for phone or camera photos?
What ages is making a flash diffuser and taking custom-lit photos suitable for?
What are the benefits of making flash diffusers and colored gels with kids?
