Stitch pleats, darts, tucks and ruffles
Sew pleats, darts, tucks, and ruffles on fabric to create a decorative pillow cover with adult help, practicing measuring, pinning, and hand-stitching skills.


Step-by-step guide to sew pleats, darts, tucks, and ruffles
How To Sew Darts | Everything You Need To Know!
Step 1
Spread your pillow cover fabric flat on a clean work surface.
Step 2
Press the fabric smooth with an iron to remove wrinkles.
Step 3
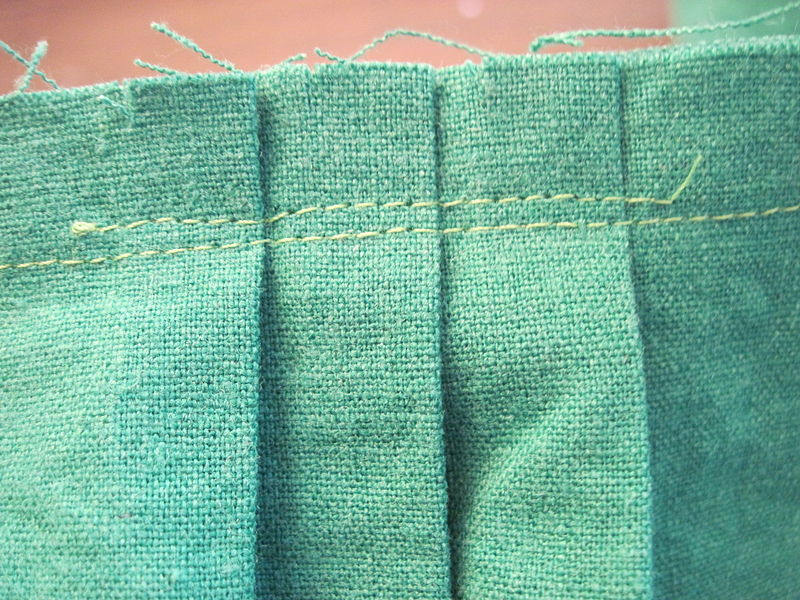
Measure and mark the pleat lines on the fabric with your ruler and fabric chalk.
Step 4
Fold the fabric along the pleat marks and pin the pleat in place.
Step 5
Sew the pleat by hand along the folded edge using a running stitch and secure the thread.
Step 6
Measure and mark a dart shape on another area of the fabric with fabric chalk.
Step 7
Fold the fabric along the dart lines so the chalk marks meet and pin the dart.
Step 8
Sew the dart from the wide end toward the tip by hand and knot the thread to secure it.
Step 9
Measure and mark a tuck line where you want a decorative tuck.
Step 10
Fold the fabric to form the tuck and pin it flat.
Step 11
Sew the tuck by hand with small stitches and press the tuck flat with the iron.
Step 12
Cut a long strip of scrap fabric for a ruffle and sew a basting (running) stitch along one long edge.
Step 13
Pull the basting thread to gather the strip into a ruffle then pin the ruffle to the pillow edge and hand-stitch it securely.
Step 14
Insert the pillow form into your finished cover and share your decorative pillow cover on DIY.org
Help!?
What can I use instead of fabric chalk or scrap fabric if I can't find them?
If you don't have fabric chalk, use a water-soluble fabric marker or a soft pencil to mark pleat and dart lines, and use an old cotton sheet or t-shirt cut into a long strip as the scrap fabric for the ruffle.
My pleats and darts won't stay flat—what step am I missing or how can I fix them?
If pleats or darts won't lie flat, re-press them with the iron while removing pins and baste a few long stitches along the folded edge before doing the running stitch to hold everything in place.
How can I adapt this stitching activity for different age groups?
For younger children (4–7) have them help press the fabric and pin pre-folded pleats, ages 8–11 can measure, mark, and pin pleats/darts with supervision, and teens (12+) can hand-sew the running stitches, sew the tuck, gather the ruffle, and insert the pillow form themselves.
What are easy ways to enhance or personalize the finished pillow cover?
To personalize your pillow cover, sew a contrasting thread when stitching pleats and tucks, embroider along marked pleat lines before folding, or layer a second fabric ruffle when pinning the ruffle to the pillow edge for extra texture.
Watch videos on how to sew pleats, darts, tucks, and ruffles
How to Make and Sew Pleats and Box Pleats | DIY Tutorial
4 Videos

How to Make and Sew Pleats and Box Pleats | DIY Tutorial

How to Sew a Pleat - Overview of Most Common Types of Pleats
Your guide to pleats: Learn all about sewing pleats.
How to Sew Ruffles: 4 Easy Methods for Sewing Beginners
Facts about hand-sewing and basic sewing techniques
🪡 The running stitch and backstitch are classic hand stitches beginners learn first—they're strong and easy to practice.
🧵 Pleats have been used for thousands of years to add shape and style to garments and home textiles.
✂️ Darts turn flat fabric into curves, helping covers and clothes fit snugly without extra bulky seams.
📏 Tucks are tiny folded stitches that add texture and detail—some historical garments used hundreds for decoration.
🎀 Ruffles began as fancy frills in the 1500s and are still used today to make pillows and clothing look playful and cozy.
How do you sew pleats, darts, tucks, and ruffles to make a decorative pillow cover with a child?
What materials and tools do I need to sew pleats, darts, tucks, and ruffles with a child?
What ages is this sewing activity suitable for, and how much adult supervision is needed?
What are the benefits and safety tips for teaching children to sew pleats, darts, tucks, and ruffles?
