Start a rock collection
Collect and classify rocks from your neighborhood, clean and label specimens, create a display box, and learn about rock types and features.


Step-by-step guide to start a rock collection
Gem Collecting for Beginners! | Quartz, Crystals, and more!
Step 1
Ask an adult to come outside with you so you can collect rocks safely.
Step 2
Gather your materials and put the notebook pencil magnifying glass and empty bag into your hands or backpack.
Step 3
Walk around your neighborhood and pick up up to twelve rocks that look interesting and put them in your bag.
Step 4
For each rock you collected write the place you found it in your notebook on a new line.
Step 5
At the sink rinse one rock at a time under water while brushing gently with the small brush to remove dirt.
Step 6
Dry each cleaned rock by patting it with a paper towel and set it aside to finish air drying.
Step 7
Look at one rock at a time with your magnifying glass and write its color texture and any sparkles or layers in your notebook.
Step 8
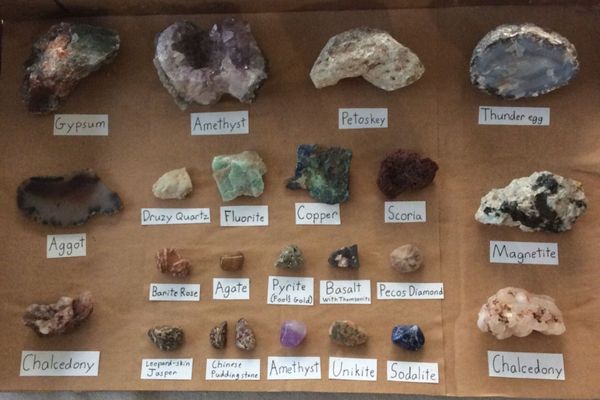
Use a kid rock ID chart or ask your adult for help to decide if each rock is igneous metamorphic or sedimentary and write your guess next to your notes.
Step 9
Sort your rocks into groups that look similar or have the same type and give each group a short name in your notebook.
Step 10
Make dividers for your display box by folding cardstock or paper and place each rock group into its own section.
Step 11
Write each rock’s group name and where you found it on a sticky label and stick the label next to the rock in the display box.
Step 12
Share a photo and description of your finished rock collection and what you learned about the rocks on DIY.org.
Help!?
What can we use if we don't have a magnifying glass, small brush, or cardstock for the display?
If you don't have a magnifying glass use a smartphone camera zoom to inspect rocks, replace the small brush with an old toothbrush for the 'rinse one rock at a time' and 'brush gently' step, and make dividers from folded paper or a shoebox lid instead of cardstock for the display box.
What should we do if a rock stays dirty or the labels keep falling off?
If dirt won't come off during the 'rinse one rock at a time' and 'brush gently' step, soak the rock briefly in warm water and gently re-brush before patting dry on a paper towel to finish air drying, and secure labels by folding a sticky label around the edge of the rock's section or using tape next to the rock in the display box.
How can we adapt this activity for younger or older children?
For preschoolers, collect only 3–4 rocks and have an adult hold the notebook and write the place and basic color notes, while older kids can collect up to twelve, use the magnifying glass and kid rock ID chart to decide igneous/metamorphic/sedimentary, and make detailed cardstock dividers and sticky labels themselves.
How can we make the rock collection more special or creative before sharing it on DIY.org?
Enhance the display by photographing each cleaned rock (including a magnified close-up), gluing the photo and the notebook notes to the divider beside each rock, decorating the display box with colored cardstock, and writing the group name and location on sticky labels before posting on DIY.org.
Watch videos on how to start a rock collection
33. How to Identify Rocks
3 Videos
33. How to Identify Rocks
10 Playful Ideas with Stones | 10 Ideas with Rocks for Kids | DIY Stone Craft Ideas for Kids

Rock ID With Willsey, Ep #1: Intro to Rock Types and Useful Tips
Facts about rocks and basic geology
🪨 Rocks are grouped into three big families — igneous, sedimentary, and metamorphic — based on how they formed.
🔬 Quartz is one of the most common minerals and makes up about 12% of the Earth's continental crust.
🌋 Igneous rocks form from molten rock: slow cooling underground makes big crystals, fast cooling at the surface makes tiny crystals.
🕰️ Sedimentary rocks often contain fossils and layers that record events from millions of years ago.
🧭 You can do quick field tests: a fingernail (~2.5), a penny (~3.5) or a steel nail (~5.5) help estimate a rock's hardness.
How do I start a rock collection with my child?
What materials do I need to start a kid's rock collection?
What ages is rock collecting suitable for?
What are the benefits and safety tips for a child's rock collection?
