Stack Your Paper Buildings!
Cut, fold, and decorate simple paper buildings, then stack and balance them to build a mini city while learning about stability and design.


Step-by-step guide to Stack Your Paper Buildings
Step 1
Gather all your materials and place them on a clear table so you can reach everything easily.
Step 2
Use the ruler and pencil to draw several rectangles and squares on the paper for different building sizes.
Step 3
Cut out each rectangle and square carefully with scissors.
Step 4
Fold each paper rectangle along its long edges to form a tube or box shape.
Step 5
Secure the folded seam of each tube or box with tape or glue so it holds its shape.
Step 6
Cut small triangles or flat rectangles from extra paper to make roofs for your buildings.
Step 7
Attach one roof to each building using tape or glue.
Step 8
Decorate your buildings by drawing windows doors and patterns with your coloring materials.
Step 9
Place the cardboard base flat on the table to be your city ground.
Step 10
Arrange the largest buildings on the cardboard base first to create a strong foundation.
Step 11
Stack smaller buildings on top of the larger ones to build upward.
Step 12
Test stability by gently pushing each stack and watch for wobble.
Step 13
Stick small pieces of tape under wobbly buildings to make them more stable.
Step 14
Take a photo of your finished mini city and share it on DIY.org.
Help!?
What can we use instead of a cardboard base, tape, or a ruler if we don't have them?
If you don't have a cardboard base, use a flattened cereal box or a stiff book cover as the city ground (step 9), swap tape with a stapler or paper clips for seams (step 5), and use the straight edge of a book instead of a ruler when drawing rectangles (step 2).
My buildings keep toppling—what should I try to make them more stable?
If stacks wobble, reinforce the folded seams with extra tape or glue so tubes hold their shape (step 5), place the largest buildings on the cardboard base first for a stronger foundation (step 10), and stick small pieces of tape under wobbly buildings as suggested (step 13).
How can I adapt this activity for younger toddlers or older kids?
For toddlers, pre-cut the rectangles and roofs (steps 3 and 6) and let them fold (step 4) and decorate with chunky crayons (step 8), while older kids can measure precisely with the ruler (step 2), build taller stacked towers (step 11), and design detailed roofs and facades (steps 6 and 8).
How can we extend or personalize our mini city before sharing it on DIY.org?
Extend and personalize your mini city by drawing roads and parks on the cardboard base (step 9), adding tiny paper furniture or LED tea lights inside taller tubes after decorating (steps 7 and 8), and labeling buildings before taking the photo to share on DIY.org (step 14).
Watch videos on how to Stack Your Paper Buildings
HOW TO MAKE A ORIGAMI PYRAMID INSTRUCTION | ORIGAMI PAPER PYRAMID INCL ART
4 Videos

HOW TO MAKE A ORIGAMI PYRAMID INSTRUCTION | ORIGAMI PAPER PYRAMID INCL ART
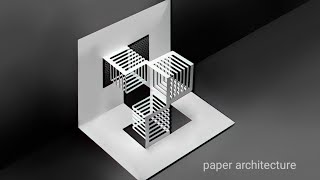
3D geometrical paper architecture | paper folding architecture step-by-step| kirigami paper model
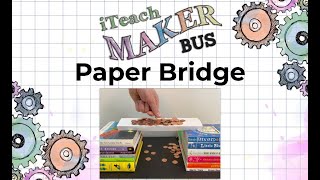
How to make a PAPER BRIDGE!
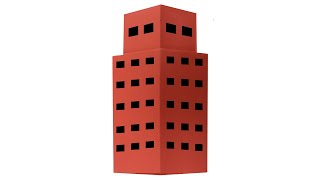
Easy Origami Building - How to Make Origami Paper Building - DIY Origami Paper Building - Craft
Facts about paper engineering and structural stability
🧩 Once folded, a flat sheet of paper becomes much stronger — origami folds can turn flimsy paper into stiff, beam-like shapes.
🏗️ Architects and designers often build papercraft scale models to test form, balance, and how light and shadow fall on buildings.
⚖️ Stability is all about the center of mass — if it moves outside a building’s base, the whole stack will tip over.
📰 A single sheet rolled into a tube can support surprising weight because the cylindrical shape spreads out forces.
🌆 Mini city models let planners and kids see how streets, parks, and buildings fit together and affect each other.
How do you do the Stack Your Paper Buildings! activity?
What materials do I need for Stack Your Paper Buildings!?
What ages is Stack Your Paper Buildings! suitable for?
What are the benefits of doing Stack Your Paper Buildings!?
