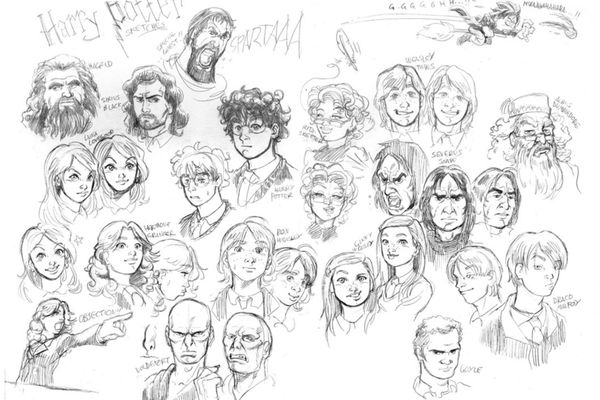
Sketch book characters
Design and draw original sketchbook characters using pencils, pens, and color. Practice faces, expressions, poses, costumes, and short backstories to develop creativity.

Drawing Apps
Step-by-step guide to design and draw sketchbook characters
I'll teach you to draw! How to Draw #1: The Essential First Steps Most Beginners Miss
Step 1
Gather your materials.
Step 2
Find a comfy well-lit spot to work.
Step 3
Write one short sentence at the top of the page that describes your character idea.
Step 4
Make three small thumbnail sketches to explore different body shapes and poses.
Step 5
Choose the thumbnail you like best.
Step 6
Lightly sketch a full-size version of your character using the chosen thumbnail as a guide.
Step 7
Lightly sketch the character’s head on the full-size drawing.
Step 8
Draw three small face variations beside the head to practice different expressions.
Step 9
Sketch the body pose and basic clothing shapes on the full-size drawing.
Step 10
Add costume details and accessories that show your character’s personality.
Step 11
Trace your favorite pencil lines with a black pen or fineliner to make clean outlines.
Step 12
Erase the leftover pencil marks after the ink is completely dry.
Step 13
Color your character using your coloring materials.
Step 14
Write a short backstory of two to four sentences beside the drawing.
Step 15
Share your finished creation on DIY.org
Help!?
What can I use if I don't have a black pen or fineliner to make the clean outlines?
If you don't have a black pen or fineliner to trace your favorite pencil lines, substitute a thin-tipped permanent marker, dark gel pen, or fine felt-tip marker and test it on scrap paper before inking.
My pencil marks smudge or won't erase after I ink—what should I do?
If pencil marks won't erase cleanly after tracing with your black pen or fineliner, wait until the ink is completely dry, use a soft white eraser in light strokes, and use lighter pencil lines next time before you trace.
How can I adapt the steps for different ages?
For ages 4–6 let them choose and color one of the three small thumbnail sketches and add simple costume details, for 7–10 follow all steps but keep the backstory short, and for 11+ require the three face variations, a detailed full-size sketch, and a 2–4 sentence backstory.
How can we extend or personalize this character activity after finishing the drawing?
To extend the activity, make a two-page character sheet that includes the colored full-size drawing, the three face variations, alternate costume accessories, a 2–4 sentence backstory, and then photograph and share it on DIY.org.
Watch videos on how to design and draw sketchbook characters
8 Tips to Make Your Sketchbook Great by Design
4 Videos

8 Tips to Make Your Sketchbook Great by Design

10 tips for starting your sketchbook — and keeping it going!
How to Start a Sketchbook in 4 Easy Steps
BOOST Your Sketchbook with These Essential Pen and Marker Tips!
Facts about character design and drawing for kids
✏️ Many artists begin characters with tiny thumbnail sketches — 30–60 seconds each — to explore dozens of ideas fast.
🎨 Famous artists like Leonardo da Vinci and Michelangelo filled sketchbooks with character studies that inspired major works.
😄 Psychologists find basic facial expressions (happy, sad, angry, surprised, disgusted, scared) are recognized across cultures — great for clear emotions.
🧥 A single costume detail (a patch, a badge, or a unique hat) can tell a character’s story instantly without words.
🧠 Writing a one-sentence backstory helps keep poses, expressions, and costumes consistent while designing characters.
How do you do the sketchbook characters activity?
What materials do I need for sketchbook characters?
What ages is the sketchbook character activity suitable for?
What are the benefits of making sketchbook characters?
