Sketch a plan for a Rube Goldberg machine
Sketch a simple Rube Goldberg machine plan using household materials, drawing each step and explaining how each part triggers the next.


Step-by-step guide to sketch a plan for a Rube Goldberg machine
Easy Rube Goldberg Ideas: Easy Rube Goldberg Machine for Kids
Step 1
Gather all the Materials Needed and put them on a table so you can reach them easily.
Step 2
Pick 3 to 6 small household objects that could move or knock things over and place them in a line of ideas.
Step 3
Decide what will start your machine and what simple final action will happen at the end.
Step 4
Turn your paper so it is wider than tall and place it in front of you to draw the flow.
Step 5
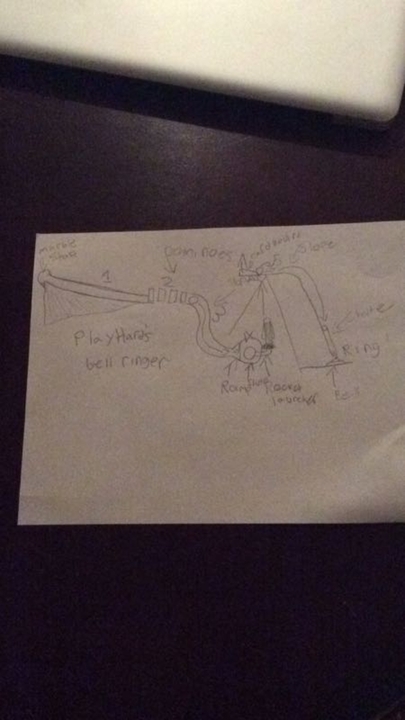
Draw a clear Start box on the left and a Finish box on the right and label them Start and Finish.
Step 6
Sketch the first component of your machine near the Start box and write the number 1 beside it.
Step 7
Draw an arrow from component 1 pointing to the right to show movement toward the next part.
Step 8
Sketch the second component where the arrow points and write the number 2 beside it.
Step 9
Draw another arrow from component 2 pointing to the right to show how it triggers the next part.
Step 10
Sketch a third component where that arrow points and write the number 3 beside it (add more components the same way if you want).
Step 11
Write one short sentence beside each numbered component explaining how that part moves or makes the next part happen.
Step 12
Share your finished Rube Goldberg machine plan on DIY.org.
Help!?
What can we use if we don't have typical small moving objects like marbles or toy cars?
Use coins or bottle caps as rolling pieces, paper cups or a tilted textbook as ramps, and rubber bands or string as connectors to meet the 'pick 3 to 6 small household objects' step.
What should we do if one component doesn't trigger the next when we test the plan?
Re-draw or shift that numbered component, change the arrow direction or angle, and use tape or a small tilt (as in steps 6–9 where you sketch components and draw arrows) until the movement consistently goes to the right toward the next part.
How can we change the activity for younger or older kids?
For younger children, limit the plan to 3 large, soft objects with big drawings and one-sentence labels beside each number, while older kids can use 5–6 smaller items, precise arrows and angles, and a more complex final action as they follow the 'pick 3 to 6' and 'write one short sentence beside each numbered component' steps.
How can we improve or personalize the Rube Goldberg plan before sharing it on DIY.org?
Color-code arrows, decorate and label the Start and Finish boxes, add a brief note about the chosen simple final action, and include a photo or plan for building the real version using the specific household objects you listed.
Watch videos on how to sketch a plan for a Rube Goldberg machine
How To Build a Rube Goldberg Machine | STEM Lesson Plan
4 Videos
How To Build a Rube Goldberg Machine | STEM Lesson Plan
Simple Steps to Create a Rube Goldberg Machine | Kids Teaching Kids

How to Make a Rube Goldberg Machine | easy Rube Goldberg machines for kids | my school project |
DIY Rube Goldberg machine | STEM Session
Facts about engineering and simple machines for kids
🖼️ Rube Goldberg (1883–1970) was an American cartoonist whose funny drawings of overcomplicated machines made his name famous.
🏆 The Rube Goldberg Machine Contest challenges students to build playful chain-reaction machines that complete a very simple task.
🎯 A true Rube Goldberg design uses a chain of triggers — one action starts the next, often in surprising and creative ways.
🔧 Everyday items like cups, books, marbles, toy cars, string, and clothespins are classic parts for machine steps.
♻️ Sketching and reworking a plan first is how builders spot mistakes and make their machine more reliable before building.
How do I sketch a simple Rube Goldberg machine plan?
What materials do I need to sketch a Rube Goldberg machine plan?
What ages is sketching a Rube Goldberg machine plan suitable for?
What are the benefits of sketching a Rube Goldberg machine plan with my child?
