Sketch, ink, color
Sketch a simple scene, trace ink lines over pencil marks, then color using markers or colored pencils to learn drawing and shading techniques.


Drawing Apps
Step-by-step guide to sketch, ink, and color
How to sketch a PORTRAIT for beginners (Step-by-step ink & watercolor TUTORIAL)
Step 1
Gather your materials and set them on a clean flat surface so everything is easy to reach.
Step 2
Pick a simple scene to draw such as a house a tree or a friendly animal.
Step 3
Choose where the light is coming from in your scene (for example top-left).
Step 4
Lightly sketch the big basic shapes of your scene with your pencil.
Step 5
Add smaller details like windows leaves or facial features using light pencil lines.
Step 6
Use scrap paper to practice drawing steady ink strokes before you ink the final drawing.
Step 7
Carefully trace over your final pencil lines with the fine-tip black marker or pen using steady strokes.
Step 8
Wait for the ink to dry completely so it won’t smudge.
Step 9
Gently erase the remaining pencil lines to leave clean inked outlines.
Step 10
Choose a color palette of two to four main colors to keep your picture simple and bright.
Step 11
Fill in the main shapes with light even layers of color using your markers or colored pencils.
Step 12
Add darker tones by layering or pressing a little harder where shadows would be based on your light source.
Step 13
Add small highlights by leaving tiny paper areas white or using a light-colored pencil to show shiny spots.
Step 14
Share your finished drawing on DIY.org
Help!?
What can I use if I don’t have a fine-tip black marker, colored pencils, or scrap paper?
If you don't have a fine-tip black marker use a sharpened graphite pencil or ballpoint pen for inking, swap markers for crayons or colored pencils for color, and use any scrap paper (printer paper or newspaper) to practice steady strokes.
My ink keeps smudging or my inked lines look shaky—what should I do?
Follow the step to practice steady ink strokes on scrap paper, rest your drawing hand on the table and trace slowly, and be sure to wait until the ink is fully dry as instructed before erasing pencil lines to prevent smudging.
How can I adapt this sketch, ink, and color activity for different age groups?
For preschoolers simplify to drawing big basic shapes and use washable markers without inking, for elementary kids keep the inking step and a two-to-four color palette, and for older kids add detailed shading by layering darker tones and fine highlights as described.
How can we extend or personalize the finished drawing beyond the basic steps?
Personalize the piece by adding patterned textures with colored pencils, emphasize the small highlights step using a light-colored pencil or white gel pen, create a series with different light directions, and photograph the final drawing to share on DIY.org.
Watch videos on how to sketch, ink, and color
Inking Techniques: Hatching, Stippling, Scumbling Tutorial
4 Videos
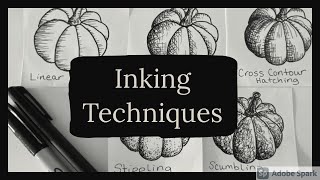
Inking Techniques: Hatching, Stippling, Scumbling Tutorial
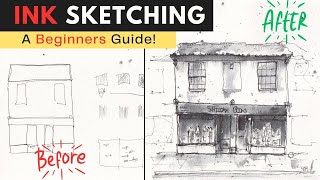
Pen and Ink Sketching for Beginners - Step by Step - Drawing Tutorial

Pen and Ink Sketching - 7 KEY Tips for Beginners
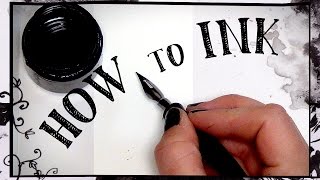
Beginners guide to inking - HOW TO INK
Facts about drawing and shading for kids
🎨 Leonardo da Vinci filled notebooks with thousands of sketches — great art often starts with lots of practice doodles!
✏️ Artists commonly use a light H-family pencil for sketching because it’s easy to erase and won’t smudge under ink.
🖊️ Professional comic artists usually ink over pencil lines and then erase the pencils to make crisp, lasting artwork.
🖍️ Markers blend smoothly and give bold color, while colored pencils let you build layers and tiny textures for realism.
🌗 Shading with different values (from light to dark) is what makes flat drawings look three-dimensional and lifelike.
How do I teach my child to sketch, ink, and color a simple scene?
What materials do I need for a sketch, ink, and color activity at home?
What ages is sketching, inking, and coloring suitable for?
What are the benefits of the sketch-ink-color drawing activity for kids?
