Show your cooking work station
Organize and photograph your safe cooking workstation: arrange utensils, ingredients, and cleaning supplies neatly, then explain the setup for a safe cooking activity.


Step-by-step guide to organize and photograph a safe cooking workstation
Step 1
Wash your hands with soap and water for 20 seconds.
Step 2
Put on your apron so your clothes stay clean.
Step 3
Clear a space on the counter or table so you have room to work.
Step 4
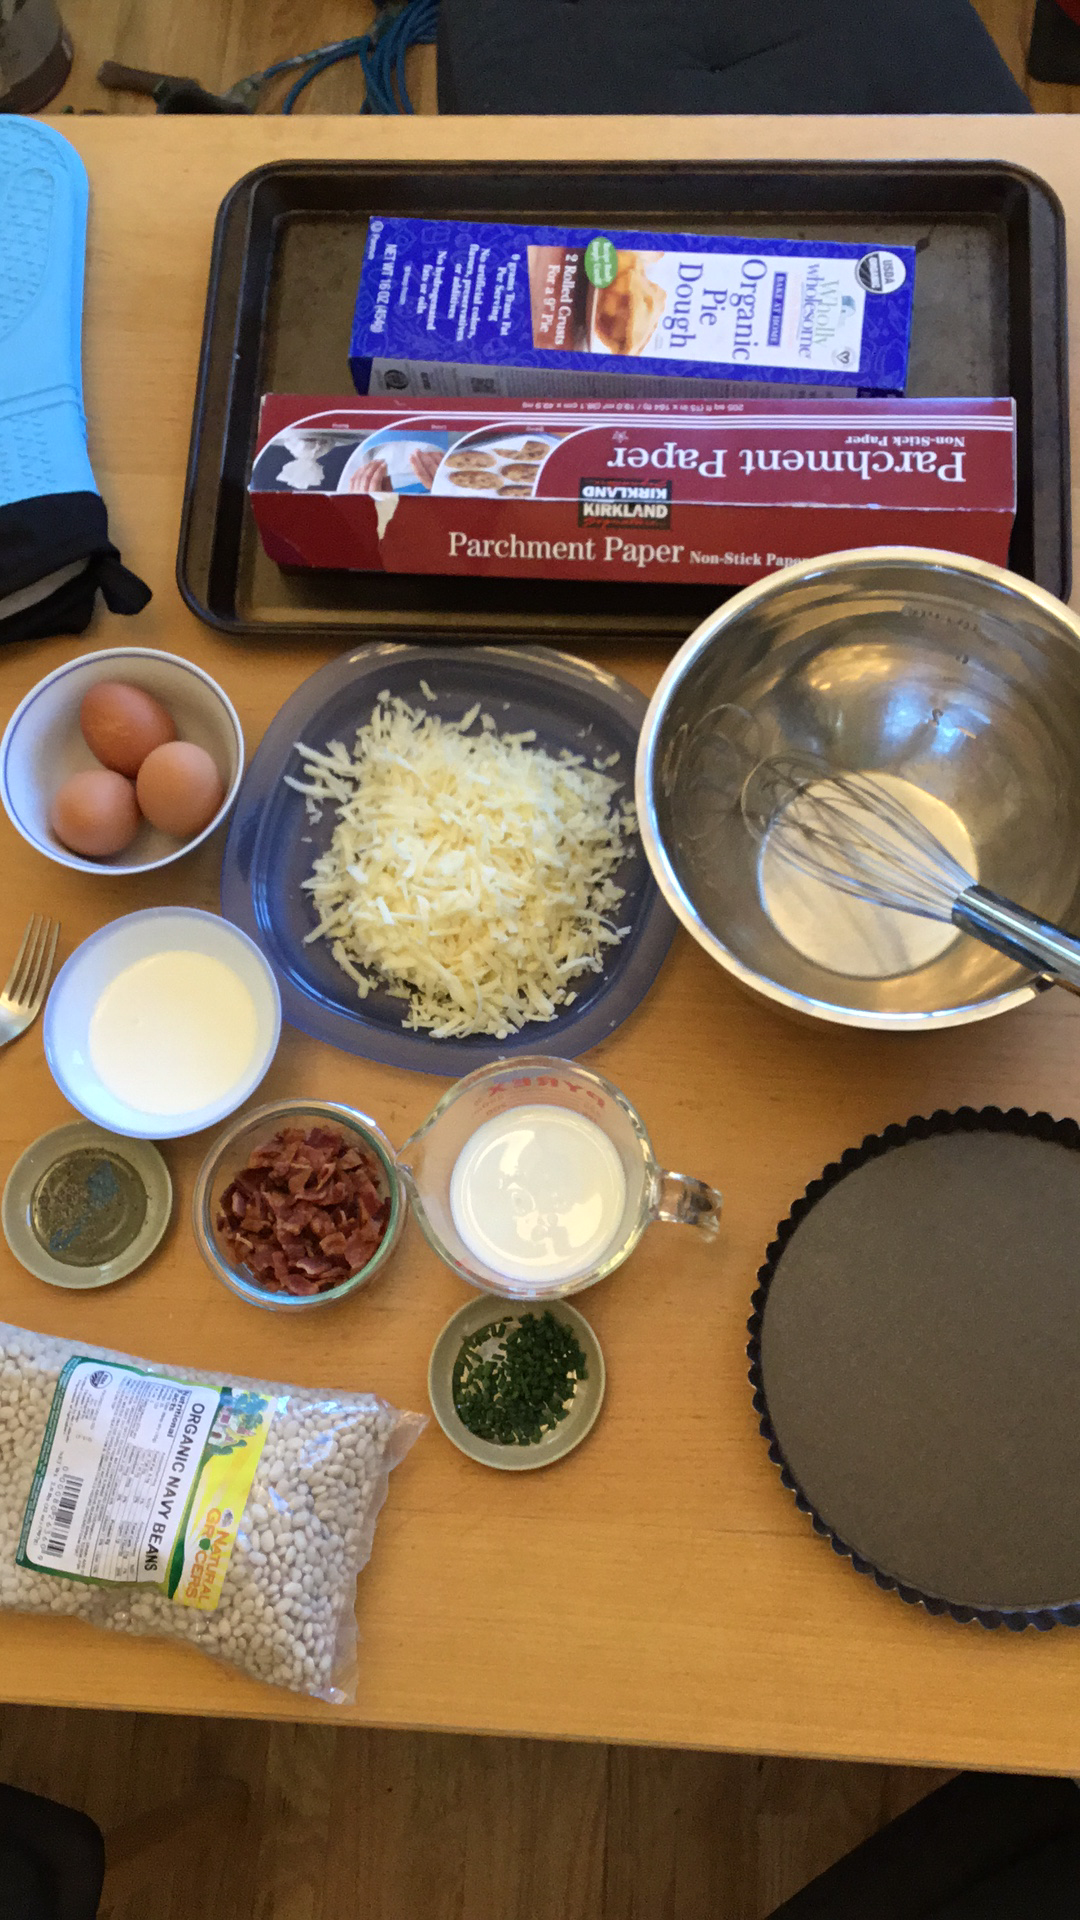
Place a tray or placemat in the middle of the cleared space.
Step 5
Gather the utensils you will use and bring them to the tray.
Step 6
Arrange the utensils neatly on the left side of the tray with handles pointing out.
Step 7
Put each ingredient into its own small bowl or container.
Step 8
Label each bowl with a sticky note or small paper so you know what is inside.
Step 9
Place your measuring cups and spoons next to the ingredients.
Step 10
Put cleaning supplies on the right side of the tray away from the food area.
Step 11
Store any knives or sharp tools at the back with blades covered or facing away.
Step 12
Make sure the stove is off and all pans are cool before you start.
Step 13
Move any cords or trip hazards away from your workstation so the area is safe.
Step 14
Ask an adult to take a clear photo of your tidy and safe cooking workstation from above.
Step 15
Share your finished creation on DIY.org
Help!?
What can I use instead of a tray, small bowls, or sticky notes if I don't have them?
Use a clean baking sheet or large plate as the tray, mugs or ramekins for small bowls, and tape or folded paper instead of sticky notes for labeling.
My sticky notes keep falling off and ingredients get mixed up—what should I do?
If labels fall off and bowls tip, tape labels to each small bowl and space bowls on the tray or placemat to prevent spills while you 'Put each ingredient into its own small bowl'.
How can I change the steps for younger children or make it more challenging for older kids?
For preschoolers, have them wash hands, put on the apron, and arrange utensils while an adult handles knives and ensures the stove is off, and for older kids have them use the measuring cups and spoons, label each bowl, and take the overhead photo to share on DIY.org.
How can we extend or personalize the tidy cooking workstation activity?
Decorate the apron or placemat, color-code or add picture labels to each bowl, make a safety checklist that includes 'Place cleaning supplies on the right side of the tray' and 'Store knives at the back', and time who can take the clearest overhead photo to share on DIY.org.
Watch videos on how to organize and photograph a safe cooking workstation
Kitchen Safety for Kids - Camp Galileo Anywhere: Chefology
3 Videos
Kitchen Safety for Kids - Camp Galileo Anywhere: Chefology
Best Activities For Independent Work Stations in Kindergarten and First Grade
Food Safety & Hygiene for Kids! | Food Safety for Kids
Facts about kitchen safety for kids
🍽️ Mise en place is a French cooking term meaning "putting in place" — chefs use it to set out ingredients and tools before cooking.
🧼 Washing hands for at least 20 seconds (two rounds of "Happy Birthday") is one of the simplest ways to stop germs in the kitchen.
🔪 Keeping knives in a block or on a magnetic strip prevents accidents and helps you find the right tool quickly.
🧊 Bacteria grow fastest between 40–140°F (4–60°C), so keeping perishable food hot or cold is key to safety.
📸 For simple, great-looking workstation photos, use soft natural side light and turn off the camera flash.
How do I organize and photograph a safe cooking workstation with my child?
What materials do I need to arrange and photograph a safe cooking workstation?
What ages is this activity suitable for?
What are the benefits and safety tips for organizing and photographing a child's cooking workstation?
