Share Favorite Leaf Paper Cut Out
Make paper leaf cut-outs inspired by real leaves, decorate and label favorite designs, then share and compare them with friends to learn about shapes.


Step-by-step guide to Share Favorite Leaf Paper Cut Out
Step 1
Gather all the materials and put them on a clean table.
Step 2
Go outside and collect several different real leaves to study.
Step 3
Choose one leaf that you like best to copy.
Step 4
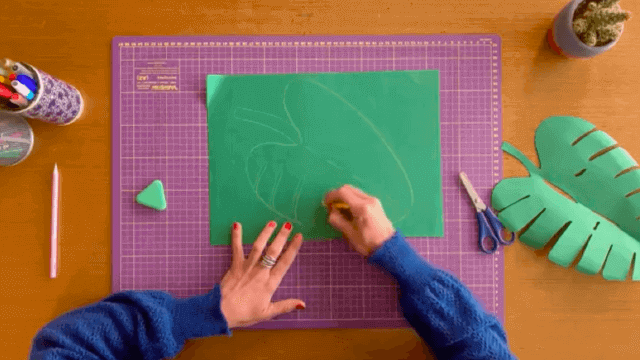
Place the chosen leaf flat on a sheet of paper.
Step 5
Trace around the leaf slowly with your pencil to capture its outline.
Step 6
Carefully cut out the traced shape with scissors while an adult watches.
Step 7
Decorate your paper leaf using your coloring materials to add veins patterns or colors.
Step 8
Write a name for your leaf and one word that describes its shape on the paper leaf.
Step 9
Pick a second different leaf and trace its outline on another sheet of paper.
Step 10
Cut out the second traced shape with scissors while an adult watches.
Step 11
Decorate and then label the second paper leaf with a name and a shape word.
Step 12
Arrange your finished leaves side by side and show them to a friend or family member.
Step 13
Share photos of your leaf cut-outs and what you learned about their shapes on DIY.org
Help!?
What can we use if we don’t have real leaves, a pencil, or coloring materials?
If you can’t find real leaves, use printed leaf templates or fabric leaves for the 'Place the chosen leaf flat' step, swap a pen or marker for the pencil when you 'Trace around the leaf slowly with your pencil,' and use crayons, colored pens, or natural paints (tea or crushed berries) for the 'Decorate your paper leaf using your coloring materials' step.
My leaf moves while I trace or the paper tears when I cut — how do I fix that?
Gently tape the leaf to the paper before 'Trace around the leaf,' trace with a sharper pencil for a clear guideline, and use heavier paper or take slow small snips while an adult supervises the 'Carefully cut out the traced shape with scissors while an adult watches' step to prevent tearing.
How can I adapt this activity for different ages?
For toddlers, give pre-cut leaf shapes to color and name instead of tracing and cutting; preschoolers can trace simple leaves and decorate veins; school-age children can carefully 'Trace around the leaf,' add detailed vein patterns and write a descriptive sentence, and older kids can measure leaf dimensions or identify species before arranging and sharing them.
What are some ways to extend or personalize the finished paper leaves?
You can laminate decorated leaves, attach a short fact about the real leaf next to each cut-out, create a seasonal collage from the 'Arrange your finished leaves side by side' step, or turn them into a matching game and photograph the results to 'Share photos of your leaf cut-outs' on DIY.org.
Watch videos on how to Share Favorite Leaf Paper Cut Out
🌿 DIY Paper Leaf #4 | Easy Leaf Craft 🌿 paper leaf making | leaf cutting| paper craft
3 Videos
🌿 DIY Paper Leaf #4 | Easy Leaf Craft 🌿 paper leaf making | leaf cutting| paper craft

🌿 Easy Paper Leaf Craft Tutorial | How to make Leaves of Paper
How to Make Paper Leaves | Easy Paper Leaf Craft for School Projects | Pallavi's Art Space
Facts about leaf shapes and paper crafts
🍃 Leaves come in many shapes — simple, lobed, serrated, or compound with several leaflets.
🎨 Autumn colors appear when green chlorophyll fades and carotenoids or anthocyanins make other hues visible.
📏 Leaf sizes vary a lot — tiny moss leaves are millimeters long while banana and palm leaves can be several feet long.
🧭 Vein patterns (pinnate, palmate, parallel) are a handy clue people use to identify plants.
✂️ Paper cutting is an ancient craft: Chinese jianzhi and Mexican papel picado are traditional ways people make decorative paper shapes.
How do you do the Share Favorite Leaf Paper Cut Out activity?
What materials do I need for Share Favorite Leaf Paper Cut Outs?
What ages is the Share Favorite Leaf Paper Cut Out activity suitable for?
What are the benefits of doing Share Favorite Leaf Paper Cut Outs?
