Share a time lapse of your procreate canvas
Create a time lapse video of your Procreate canvas, edit clips and add captions, then safely share your creative process with friends or family.


Step-by-step guide to create and share a Procreate time-lapse
Step 1
Open Procreate and tap the + to make a new canvas for your artwork.
Step 2
Turn on Time-lapse Recording by tapping the wrench icon then Canvas then toggle Time-lapse Recording on.
Step 3
Start drawing your artwork while Procreate records the time-lapse of your process.
Step 4
Keep drawing until your artwork is finished so the whole process is captured.
Step 5
Close the canvas to stop recording and return to the Gallery.
Step 6
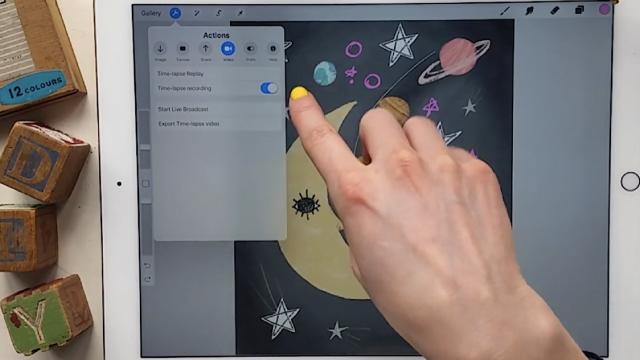
Tap your finished canvas in the Gallery then tap Share and choose Time-lapse Video to export the recording.
Step 7
Open the exported time-lapse video in your video editing app or Photos app.
Step 8
Trim the beginning and end of the clip to remove any blank recording time.
Step 9
Add short captions to the video to explain cool steps you did using big clear text.
Step 10
Optionally add background music or stickers if you want to make the video more fun.
Step 11
Watch the edited video and remove any frames or captions that show your full name address or other private information.
Step 12
Ask an adult to review the final video and give permission to share it.
Step 13
Export or save the final edited video to your device.
Step 14
Share your finished time-lapse creation on DIY.org.
Help!?
What can we use if we don't have Procreate or an iPad to make a time-lapse?
If you don't have Procreate on an iPad, use Procreate Pocket on an iPhone, Adobe Fresco or Autodesk SketchBook which also record time-lapses, or use your device's built-in Screen Recording and then trim and export the clip from the Photos or video editing app.
My time-lapse is empty or didn't save—what should I check?
Confirm you turned on Time-lapse Recording via wrench > Canvas before drawing, close the canvas to stop and send the recording to the Gallery, and when exporting choose Share > Time-lapse Video rather than exporting a single image so the clip isn't blank.
How can I adapt this activity for younger or older kids?
For younger kids have an adult create the canvas, toggle Time-lapse Recording, and handle the Gallery export and trimming while the child draws, and for older kids let them add captions, background music, stickers, and remove private info themselves before asking an adult to review.
How can we enhance or personalize the final time-lapse video?
Make the time-lapse more fun by adding big clear text captions to explain steps, recording a short voiceover, inserting background music or stickers in your video editor, and trimming or removing any frames that reveal your full name or address before sharing on DIY.org.
Watch videos on how to create and share a Procreate time-lapse
Learn Procreate FAST: A Guide for Beginners in 2025
4 Videos
Learn Procreate FAST: A Guide for Beginners in 2025
PROCREATE Drawing Made EASY - Beginner Step-by-Step Tutorial
Procreate for Kids Tutorial // How to Use Procreate for Kids!
Procreate for Beginners: The Ultimate Introduction to Procreate
Facts about digital art and video editing for kids
🎨 Procreate can automatically record a time-lapse of your canvas so you can export the whole drawing process as a video.
⏱️ Artists often compress hours of work into short time-lapses—many sessions become 30–90 second clips that show the whole process.
💾 High-resolution time-lapse exports can be large; lowering resolution or frame rate when exporting reduces file size for easy sharing.
🔒 Always check privacy settings and get permission before sharing videos that show other people or private details—share with trusted family or friends.
✂️ Simple mobile editors like iMovie or InShot let you trim clips, speed up or slow down parts, and add captions to tell your art's story.
How do I create and share a time-lapse video of my Procreate canvas?
What materials and apps do I need to make and edit a Procreate time-lapse?
What ages is making a Procreate time-lapse suitable for?
What are the benefits and safety tips for sharing kids' Procreate time-lapse videos?
