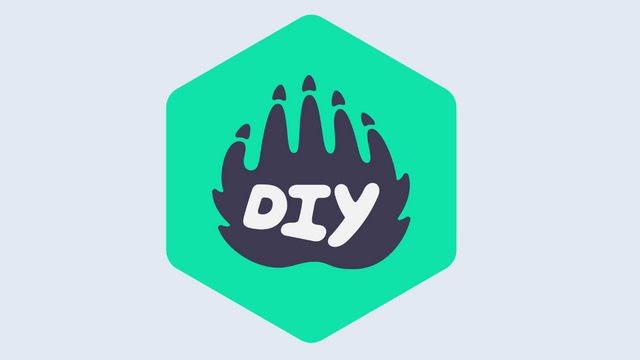
Recreate the DIY Logo
Recreate the DIY logo by drawing, cutting, and assembling paper shapes; learn about symmetry, color choice, and layout while following step-by-step instructions.


Step-by-step guide to Recreate the DIY Logo
Step 1
Clear a flat workspace and lay out all your materials where you can reach them.
Step 2
Find a clear picture of the DIY logo on a screen or a printed copy to use as your reference.
Step 3
Decide how big you want your logo and lightly draw a bounding box on the white base paper with your pencil and ruler.
Step 4
Look at the reference image and name the main shapes you see like circles rectangles or letters so you know what to make.
Step 5
Pick 2 or 3 colours for the different shapes to match the logo or make your own colour twist.
Step 6
Fold a sheet of coloured paper in half to prepare for cutting a symmetrical shape.
Step 7
Draw one half of a shape along the folded edge with your pencil so it will be symmetrical when cut.
Step 8
Cut carefully along your pencil line while the paper is folded then open the paper to reveal the full shape.
Step 9
Repeat steps 6 to 8 until you have cut out all the shapes you need for the logo.
Step 10
Arrange all your cut shapes inside the bounding box on the base paper without gluing so you can test the layout.
Step 11
Adjust the positions of the shapes using your ruler to make sure they are centered and evenly spaced.
Step 12
Glue each shape in place one at a time starting with the background pieces and pressing gently to stick.
Step 13
Add small details or colour accents with your colouring materials to match the logo or make it pop.
Step 14
Let the glue dry for a few minutes so everything stays neat and flat.
Step 15
Take a photo and share your finished DIY logo creation on DIY.org
Help!?
What can I use if I don't have coloured paper, scissors, or glue?
Color plain printer or scrap paper with markers or paint and fold it for cutting (steps 5–7), carefully tear along your pencil line or use a rounded craft knife with adult help if you don't have scissors, and use a glue stick or clear tape to attach shapes in step 12.
My cut shapes aren't symmetrical or keep shifting while I glue—how do I fix that?
Make a sharp crease along the fold before drawing and use sharper scissors when cutting folded paper (steps 6–8), test and center pieces without glue first (step 9) and press gently or use small dots of glue so shapes don't shift when you press them in step 12.
How can I adapt this activity for younger children or older kids wanting a challenge?
For younger kids, pre-draw or pre-cut the folded shapes and let them arrange and glue inside a large bounding box (steps 3, 6–12), while older kids can add precise measurements with the ruler (step 11), use a craft knife under supervision for crisp cuts, and create layered pieces for more detail.
What are some ways to personalize or enhance the finished logo before taking a photo?
Add texture by gluing felt, fabric, or foil onto cut shapes (steps 9–12), raise elements with foam tape for a 3D effect, add metallic or glitter accents with your colouring materials in step 13, and stage the logo on a patterned background before photographing in step 14.
Watch videos on how to Recreate the DIY Logo
How to Make Logo in Canva | Without TEMPLATE | From Scratch😲
4 Videos
How to Make Logo in Canva | Without TEMPLATE | From Scratch😲
How To Make Your Own LOGO With Canva (Easiest Way) (2025 Guide)

How to design a LOGO *from start to finish*
How to Make Logo in Canva for Free (2025) | Design a Business Logo (Easy Step-by-Step Tutorial)
Facts about paper crafts and basic design
🎨 Colors can boost brand recognition by up to 80% — choosing the right hues makes a logo more memorable!
🔁 Symmetrical designs are often judged as more attractive and are easier for the brain to process — perfect for logos.
✂️ Paper crafting has roots over 2,000 years ago with early paper in China and later folding traditions like origami in Japan.
🧩 Simple, bold shapes are recognized faster than complex ones, so clean cut-paper shapes help your logo read clearly at small sizes.
📝 DIY stands for “do it yourself” — the movement celebrates learning by making and has inspired makers for decades.
How do you recreate the DIY logo using paper shapes?
What materials do I need to recreate the DIY logo?
What ages is the DIY logo activity suitable for?
What are the benefits of recreating the DIY logo with my child?
