Recreate Bird With Negative/Positive Paper Cutting Technique
Make a paper bird using positive and negative paper cutting techniques, sketching shapes, cutting safely with child safe scissors, and arranging contrasting pieces.


Step-by-step guide to Recreate Bird With Negative/Positive Paper Cutting Technique
Step 1
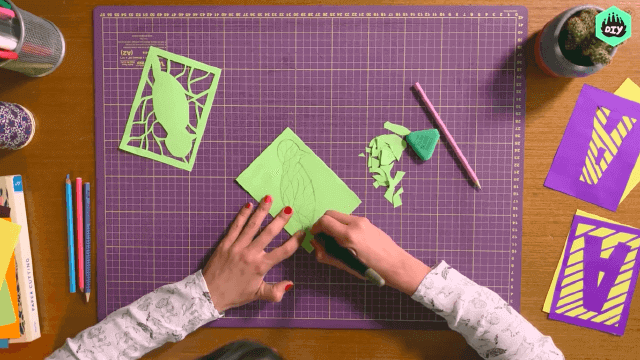
Gather all Materials Needed and put them on a flat clean work surface.
Step 2
Choose a simple bird silhouette you like by looking at pictures or imagining one.
Step 3
Lightly sketch the bird silhouette on the first sheet of colored paper with your pencil.
Step 4
Ask an adult to supervise before you use the scissors.
Step 5
Carefully cut out the sketched bird shape from the first sheet using child safe scissors.
Step 6
Place the cut-out bird onto the second contrasting sheet and trace around it with your pencil.
Step 7
Cut out the traced bird-shaped area from the second sheet to create a negative space window.
Step 8
Lay the negative sheet flat and place the positive bird cut-out over the negative window to check how the colors contrast.
Step 9
Apply glue to the back of the positive bird cut-out using the glue stick.
Step 10
Press the glued positive bird onto the negative sheet slightly offset so both positive and negative shapes show a strong contrast.
Step 11
Use your eraser to gently clean any leftover pencil lines around your bird.
Step 12
Share a photo of your finished positive and negative paper bird on DIY.org
Help!?
What can we use if we don't have child-safe scissors or colored construction paper?
If child-safe scissors or colored construction paper aren't available, have an adult carefully pre-cut the sketched bird with regular scissors or let the child tear the sketched bird from printer paper and then continue to trace and glue as described.
What should we do if the cut-out bird doesn't fit the traced negative window?
If the cut-out bird doesn't fit the traced negative window, re-position the positive bird on the second sheet and retrace slightly larger or carefully trim the edges of the negative window so the positive bird can be offset as instructed.
How can I adapt this activity for toddlers versus older kids?
For toddlers, use a pre-drawn or pre-cut simple bird silhouette and let them press and glue the positive bird onto the negative sheet, while older kids can sketch more detailed silhouettes, use finer scissors for intricate cuts, and experiment with color contrast before gluing.
How can we extend or personalize the finished positive/negative paper bird?
To extend or personalize the project, try using patterned scrapbook paper for the positive bird, add a painted or collage background before pressing the glued bird, or create a series of offset birds to make a mobile or gallery to photograph for DIY.org.
Watch videos on how to Recreate Bird With Negative/Positive Paper Cutting Technique
How to Make a Paper Hummingbird 🐦 | Easy Origami Tutorial for Kids and Beginners
4 Videos
How to Make a Paper Hummingbird 🐦 | Easy Origami Tutorial for Kids and Beginners
How to Make an Easy Origami Bird - Paper Bird instructions for Beginner

How to Make Paper Birds | Easy Paper Bird Craft | DIY Colourful Birds with Paper | origami birds
HOW TO MAKE A PAPER BIRD EASY - ORIGAMI BIRD TUTORIAL INCLART
Facts about paper cutting and positive/negative space
🐦 Birds are a classic papercutting subject because their simple shapes read clearly as positive and negative forms.
✂️ Child-safe scissors have rounded tips and blunt blades so kids can practice cutting with much lower risk of pokes.
🔲 Playing with positive and negative space can make an image appear even when only the silhouette or the gap is shown.
🎨 High-contrast color pairs (like black and white) make positive/negative paper-cut designs pop and easier to arrange.
🧩 Papercutting is an ancient craft — decorative cut paper has been made in China since at least the 6th century.
How do you make a paper bird using negative/positive cutting?
What materials do I need for a negative/positive paper cutting bird?
What ages is this negative/positive paper cutting activity suitable for?
What safety tips and creative variations can we try with this paper bird craft?
