Make Your Sprite Talk
Program a sprite to speak and animate using simple block coding. Learn dialogue, timing, and basic sound recording to create interactive stories.

Step-by-step guide to Make Your Sprite Talk
Step 1
Open Scratch or your block-coding app and start a new project.
Step 2
Pick a fun sprite from the library or draw your own character.
Step 3
Click the Sounds tab and press the record button to record a short voice line for your sprite.
Step 4
Give your recording a name so you can find it easily later.
Step 5
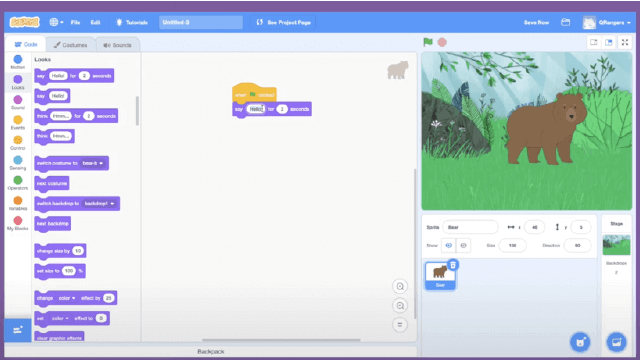
Switch to the Code tab and drag a "when green flag clicked" block into the workspace.
Step 6
Attach a "play sound (your recording)" block under the green flag block.
Step 7
Attach a "say [ ]" block under the play sound block.
Step 8
Type the same words you recorded into the say block so viewers can read along.
Step 9
Attach a "wait [ ] seconds" block under the say block.
Step 10
Change the number in the wait block to match how long your recording plays.
Step 11
Create an animation loop by adding a "repeat" block and putting "next costume" and a short "wait 0.2 seconds" inside it.
Step 12
Click the green flag to test your sprite speaking and animating.
Step 13
Save your project and give it a fun name so you can find it again.
Step 14
Share your finished talking sprite story on DIY.org.
Help!?
What can we use instead of the Scratch record button if the computer doesn't have a microphone?
Record the voice on a smartphone or the computer's Voice Recorder app and import that audio file into the Sounds tab instead of using the record button.
My sprite's text disappears before the sound finishes—how do I fix that?
Open the Sounds tab to check the recording length and set the wait block under the say block to that same number (or slightly longer) so the play sound and say block finish together.
How can I adapt this project for different ages or skill levels?
For younger kids use only the play sound and a single say block with an adult choosing the sprite, while older kids can add the repeat animation loop with next costume, extra waits, longer scripts, or branching code.
How can we make the talking sprite more advanced or personal?
Add more recordings in the Sounds tab, create multiple sprites or backdrops, and use broadcast blocks with matching play sound, say, and wait blocks while adjusting the repeat/next costume timing for better lip-sync and pacing.
Watch videos on how to Make Your Sprite Talk
HOW TO MAKE A SPRITE AND MAKE WORDS IN SCRATCH: EASY 3 MINUTE SCRATCH TUTORIAL
4 Videos

HOW TO MAKE A SPRITE AND MAKE WORDS IN SCRATCH: EASY 3 MINUTE SCRATCH TUTORIAL

How to Make a Sprite Ask for Your Name in Scratch | Fun Tutorial for Beginners in 2024
How to Make a Sprite Talk in Scratch (Easy Tutorial for Beginners)
Scratch - How To Make Sprites Talk
Facts about block-based coding and animation
🎮 Scratch was created at MIT and has inspired millions of kids to build and share playful projects since 2007.
🧩 Block-based coding uses colorful, snap-together pieces so beginners can focus on ideas instead of typing syntax.
🎙️ You can record voices right inside many sprite editors — short clips make dialogue feel lively and keep file sizes small.
🎬 Traditional film animation often uses ~24 frames per second, but simple sprite animations look great with just 6–12 frames.
⏱️ Good dialogue timing matters: adding 0.5–1 second pauses between lines makes conversations feel natural and clear.
How do you make a sprite talk and animate using block coding?
What materials do I need to make a sprite talk?
What ages is programming a talking sprite suitable for?
What are the benefits of making a sprite talk?
