Make your own screw or marble ramp
Build a cardboard Archimedes screw or marble ramp, test marbles rolling at different angles, and observe how slope and shape affect speed.

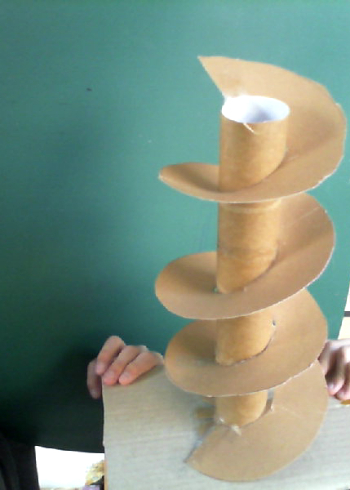

Step-by-step guide to make a cardboard Archimedes screw or marble ramp
Step 1
Gather all the materials listed and bring them to a clear workspace.
Step 2
Use the ruler and pencil to draw a long rectangle about 60 cm by 10 cm on the cardboard.
Step 3
Cut out the rectangle from the cardboard with scissors while an adult helps.
Step 4
Mark fold lines 1.5 cm in from each long edge using the ruler and pencil.
Step 5
Fold up both long edges along the lines to create raised rails for the ramp.
Step 6
Tape along the folded edges so the ramp keeps its chute shape.
Step 7
Prop one end of the ramp on a low stack of books to make a shallow slope.
Step 8
Place a marble at the top edge of the ramp and let it go without pushing.
Step 9
Time the marble by counting “one-one-thousand” until it reaches the bottom.
Step 10
Write the counted time on your scrap paper and label it “shallow angle.”
Step 11
Raise the top of the ramp higher by adding more books until the angle increases by about 10–20 degrees using the protractor if you want a measured change.
Step 12
Repeat placing the marble at the top and counting “one-one-thousand” until it reaches the bottom, then write this new time and label it “steeper angle.”
Step 13
Make a shape change by cutting a small curved strip of cardboard and taping it inside the chute to add a bump or curve.
Step 14
Test the ramp with the new shape by rolling the marble, timing it the same way, and writing the result labeled with the shape you made.
Step 15
Share photos and what you learned about slope and shape affecting speed by posting your finished ramp and notes on DIY.org.
Help!?
What can we use if we don't have a glass marble or a protractor for measuring the 10–20° change?
Use a small bead, washer, or ping-pong ball instead of a marble and use a printed protractor, a protractor app on a phone, or a ruler and known-height stack of books to estimate the 10–20° increase.
The marble keeps falling out or the ramp flattens—how do we fix that so the marble rolls straight down the chute?
Re-fold the 1.5 cm long edges carefully, press the tape firmly along the folded edges, and stabilize the base by widening the stack of books under the ramp so the taped chute keeps its shape and the marble stays between the rails.
How can we adapt this activity for younger kids or make it more challenging for older kids?
For younger children, have an adult cut the 60 × 10 cm cardboard and let them fold, tape, and roll a larger ball while older kids can use the protractor to set precise 10–20° changes, record times on scrap paper, and compare results.
What are simple ways to extend or personalize the ramp after the basic tests?
Tape in different small curved cardboard strips to create multiple bumps or curves, run and record timed trials on your scrap paper for each shape, decorate the ramp, photograph it, and post the comparisons to DIY.org.
Watch videos on how to make a cardboard Archimedes screw or marble ramp
Easy Marble Run Ideas for a DIY STEM Project
4 Videos

Easy Marble Run Ideas for a DIY STEM Project

DIY Cardboard Marble Run fun for kids Simple Easy - How to Make Simple Easy STEM project

DIY Marble Run Ideas for Kids
I Built the Ultimate DIY Marble Run… And It Actually Works!
Facts about simple machines and motion for kids
🌀 Archimedes' screw was invented in ancient Greece and was used to lift water — the same spiral trick you'll build!
📐 An inclined plane turns gravity into forward motion, so steeper ramps make marbles speed up faster.
⚙️ Friction and tiny bumps can slow marbles more than slope does, so smoothing the track really matters.
📦 Corrugated cardboard is lightweight, easy to cut, and recyclable — perfect for quick marble-ramp prototypes.
🎯 Small changes in marble size, track curve, or launch angle can make big differences — great for fun experiments!
How do I build a cardboard Archimedes screw or marble ramp to test slopes?
What materials do I need to make a cardboard Archimedes screw or marble ramp?
What ages is building a cardboard Archimedes screw or marble ramp suitable for?
What are the benefits and safety tips for doing a marble ramp or Archimedes screw project?
