Make bike fenders
Make bike fenders from recycled plastic or foam, measure and cut pieces, then attach with zip ties or straps to reduce splashes, with adult help.


Step-by-step guide to make bike fenders
How were bicycles invented?
Step 1
Gather all the materials on a table so everything is easy to reach.
Step 2
Put on your safety goggles and gloves before you start working.
Step 3
Secure the bike so the wheel you will work on cannot roll away.
Step 4
Wrap the string around the top half of the wheel from where the fender should start to where it should end and mark the string at the ends.
Step 5
Measure the marked string with your ruler to get the curved length you need for the fender.
Step 6
Measure the tire width with the ruler and add about 1 centimeter to that number for clearance and write it down.
Step 7
Lay your recycled plastic or foam flat on the table and use the marked string and the width number to draw the curved fender shape with the marker.
Step 8
With adult help cut out the traced fender shape using scissors or the utility knife held by the adult.
Step 9
Smooth all cut edges with sandpaper or a file so the fender is safe to touch.
Step 10
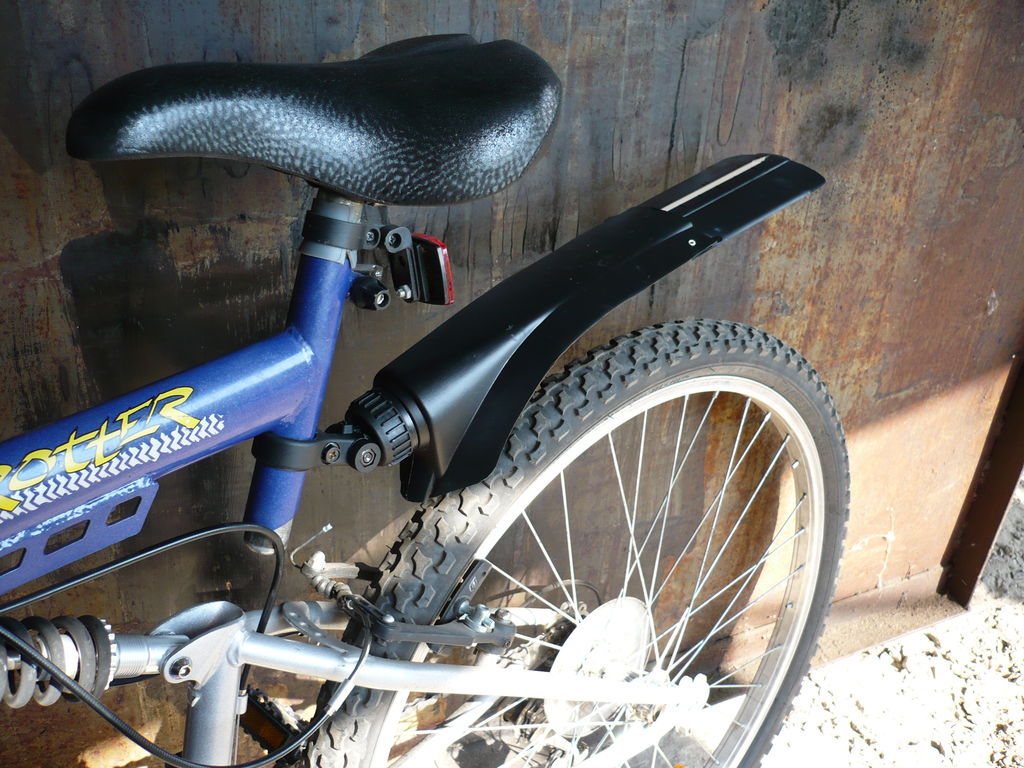
Hold the fender against the wheel where it will sit and secure it temporarily with clothespins or small clamps.
Step 11
Mark the spots on the fender where you want to attach zip ties so the fender stays in place.
Step 12
With adult help make small holes at your marks using a drill bit or an awl so the zip ties can pass through.
Step 13
Thread zip ties or straps through the holes and around the bike frame then tighten them and trim off the extra tie ends.
Step 14
Spin the wheel slowly to check there is at least a centimeter of clearance all around and move or retighten the ties if needed.
Step 15
Share a photo and a short description of your finished fender on DIY.org.
Help!?
What can we use if we can't find recycled plastic or foam for the fender?
Use a sheet of corrugated plastic (signboard), a flattened milk jug or thick cardboard sealed with duct tape so it can be cut in step 7, sanded in step 8, and drilled for zip ties in step 11.
The fender is rubbing the tire after we attached it—what should we do?
Loosen the zip ties, move the fender outward, re-check your tire width plus the extra 1 cm from step 5, then retighten and spin the wheel (step 13) until there is at least 1 cm clearance.
How can we change this activity for younger or older kids?
For younger kids (4–6) have an adult handle the cutting (step 7) and drilling (step 11) while the child helps gather materials (step 1), wrap the string (step 4) and mark the shape (step 6), and for older kids (10+) let them measure (step 5), cut with supervision, drill the holes, and tighten the zip ties (step 12) themselves.
How can we improve or personalize the finished fender?
After smoothing edges (step 8) paint or decorate the fender, add reflective tape or a small reflector through the zip-tie holes (steps 11–12), or glue a second plastic layer before final attachment to increase durability.
Watch videos on how to make bike fenders
Recreating the World’s Earliest Motorcycles
4 Videos
Recreating the World’s Earliest Motorcycles

How To Draw A Motorcycle
How Steel Bicycles Are Made | How It's Made
Awesome DIY Bike || How To Make Toy Motorcycle At Home || Mini Toy Bike
Facts about bicycle maintenance for kids
🚲 The bicycle mudguard (fender) was invented to keep riders cleaner and became common on commuter bikes in rainy countries.
♻️ Only about 9% of all plastic ever produced has been recycled — upcycling plastic into fenders helps reduce waste.
🔗 Cable ties (zip ties) were invented in 1958 and are a fast, tool-free way to hold parts together securely.
✂️ EVA foam (ethylene-vinyl acetate) is lightweight, flexible, and easy to cut, making it popular for DIY fenders and crafts.
🌧️ A simple, well-placed fender can stop most road spray from reaching your back and shoes, making wet rides much more comfortable.
How do I make bike fenders from recycled plastic or foam for my child's bike?
What materials do I need to make recycled plastic bike fenders with my child?
What ages is making bike fenders from recycled materials suitable for?
How can I safely help my child make and attach DIY bike fenders?
