Make a solar water heater
Build a simple solar water heater using black-painted bottles, tubing, and insulation to warm water with sunlight, with adult supervision.


Step-by-step guide to make a solar water heater
Solar Water Heater Working Model | School Science Projects
Step 1
Put all materials on a clean outdoor table so you have room to work.
Step 2
Paint the outside of each plastic bottle black and set them aside to dry fully.
Step 3
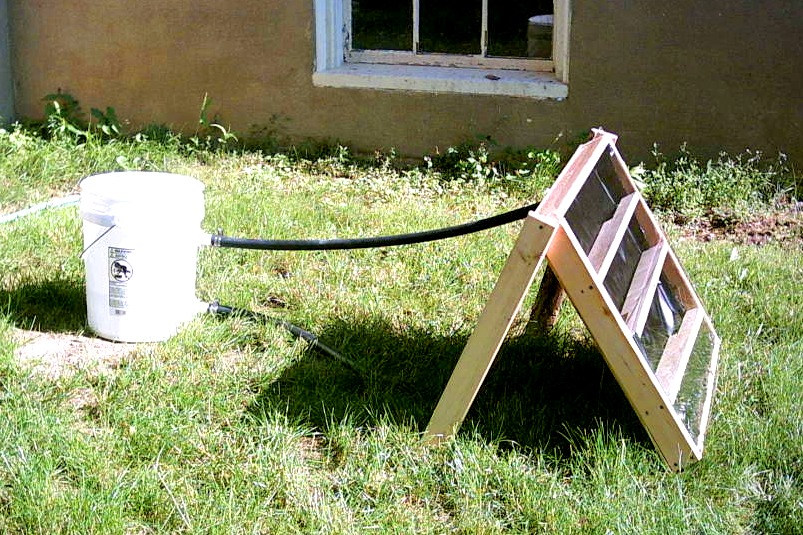
Lay the board or cardboard flat and place the black bottles in a single row touching each other.
Step 4
Cut one long length of clear tubing that will snake around all the bottles plus extra for the inlet and outlet.
Step 5
Starting at one end of the row, wrap the tubing in a serpentine pattern around each bottle until you reach the other end.
Step 6
Secure the tubing to the bottles with tape or zip ties every few turns so the tubing stays tight against the bottles.
Step 7
Tape foam pipe insulation to the back and underside of the bottles to reduce heat loss.
Step 8
Attach one end of the tubing to a water source such as a jug and the other end to an empty collection container.
Step 9
With an adult’s help slowly fill the tubing by pouring water into the inlet until water flows out of the outlet to remove air pockets.
Step 10
Place the whole board with bottles in direct sunlight and make sure the inlet stays connected to the cold water source.
Step 11
Wait 30 to 60 minutes in the sun so the water inside the tubing warms as it flows around the warm black bottles.
Step 12
With adult help carefully collect a small cup of outlet water and check how warm it is using touch or a thermometer.
Step 13
Take photos or a video of your solar water heater and share your finished creation on DIY.org
Help!?
What can we use instead of the clear tubing, foam pipe insulation, or black paint if we can't find them?
Substitute aquarium or vinyl tubing for the clear tubing, use black duct tape or wrapped black garbage bags instead of painting the bottles, and replace foam pipe insulation with pool noodle slices or bubble wrap taped under the bottles.
If the water isn't warming or there are leaks and air pockets, what should we check and do?
Make sure the tubing is tightly taped or zip-tied against each black bottle, slowly refill the inlet as instructed to purge air pockets, and fix any leaks at the jug or collection container connections with waterproof tape or hose clamps.
How can this activity be adapted for younger children or made more challenging for older kids?
For younger children have an adult cut the tubing and pre-paint or pre-dry the bottles while the child assembles, tapes tubing, and pours water, and for older kids have them design the serpentine layout, cut and secure the tubing themselves, time the 30–60 minute sun exposure, and measure temperature changes with a thermometer.
What are simple ways to extend or personalize the solar water heater to make it work better or look nicer?
Improve performance by taping reflective aluminum foil or an emergency blanket behind the row of black bottles and covering the setup with clear plastic to trap heat, add a valve at the outlet to control flow, and take photos or decorate the bottles before painting for personalization as suggested in the final step.
Watch videos on how to make a solar water heater
How to make a Solar Water Heater | Science Fair Ideas
4 Videos
How to make a Solar Water Heater | Science Fair Ideas
School Science Projects | Solar Water Heater
How The $50 Solar Water Heater Works And How To Build It

Solar Water Heater | How to Make Tutorial
Facts about solar energy
☀️ The sun delivers more energy to Earth in just one hour than the whole world uses in a year — lots of clean power to tap!
🖤 Black surfaces absorb more sunlight and heat up faster than light-colored ones — that’s why we paint the bottles black.
💧 A simple bottle-and-tubing solar heater can warm water enough for washing hands, rinsing dishes, or filling a pet bowl on sunny days.
🧊 Good insulation traps heat so the warmed water stays hot for hours instead of cooling down quickly.
♻️ In sunny places, solar water heating can supply a large share of a home’s hot water needs, cutting electricity or gas use.
How do you build a simple solar water heater with bottles?
What materials do I need to make a bottle solar water heater?
What ages is the solar water heater activity suitable for?
What safety tips and benefits should parents know about this DIY solar heater?
