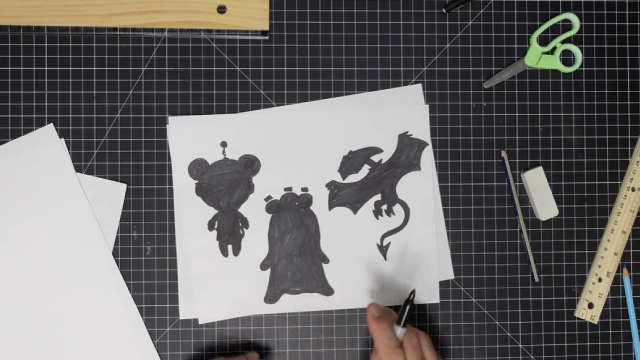
Make a silhouette sheet of all the characters in your comic
Create a silhouette sheet of every comic character by tracing, cutting, and filling shapes on paper; label poses and sizes to organize your cast.


Step-by-step guide to make a silhouette sheet of all the characters in your comic
Step 1
Choose the comic page or character sketch you want to start with and lay it flat on your table.
Step 2
Cut a piece of tracing paper so it fits over one character area.
Step 3
Place the tracing paper over the character you picked.
Step 4
Trace the outer outline of the character with your pencil and skip small interior details.
Step 5
Put the tracing paper onto plain white paper and retrace the outline to copy it onto the white paper.
Step 6
Cut out the copied outline from the white paper carefully with your scissors.
Step 7
Fill in the cut paper shape completely with your black marker to make a solid silhouette.
Step 8
Use your ruler to measure the silhouette height and write the size next to it in centimeters or inches.
Step 9
Write the character name and a short pose label like "running" or "thinking" beside the silhouette.
Step 10
Repeat Steps 3 to 9 for every character and pose you want to include on your sheet.
Step 11
Arrange all your finished silhouette cutouts on a clean large sheet of paper until the layout looks good to you.
Step 12
Glue or tape each silhouette in place on the large sheet to create your full silhouette cast sheet.
Step 13
Share your finished silhouette sheet of characters on DIY.org
Help!?
What can I use if I don't have tracing paper, a black marker, or plain white paper?
If you don't have tracing paper use baking parchment or thin wax paper to trace over the character in Step 3, substitute a black crayon or acrylic paint for the marker in Step 6, and use light-weight cardboard or printer paper instead of plain white paper for Steps 5–6.
My tracing paper keeps sliding and the outline won't copy well onto the white paper—how do I fix that?
Secure the tracing paper with small pieces of tape at the corners as you position it in Step 3 and strengthen the transfer in Step 5 by shading the back of the traced outline with pencil graphite and retracing firmly.
How can I adapt this silhouette activity for different age groups?
For younger children skip cutting and Step 6 and let them glue pre-cut shapes and color around them, while older kids can add precise measurements in Step 7, include multiple poses in Steps 3–9, or digitize their silhouettes before arranging in Step 11.
How can we enhance or personalize the finished silhouette cast sheet?
After arranging and gluing the silhouettes in Steps 11–12, personalize the sheet by adding colored or patterned background paper behind each silhouette, laminating the full sheet, and attaching small character bio cards with the name and pose from Step 8 before sharing on DIY.org.
Watch videos on how to make a silhouette sheet of all the characters in your comic
How I 'Design Characters' for my Comics? - The Process (PART 2)
4 Videos
How I 'Design Characters' for my Comics? - The Process (PART 2)
How To Make Comic Book Characters
How To Make A Comic from Start to Finish
Step-by-Step Guide from How to Draw Comics The Marvel Way | Comic Drawing Tips - Mastering Superhero
Facts about comic character design
🎭 Silhouettes are a go-to test for character readability — studios like Disney and Pixar use silhouette checks to make sure characters read clearly at a glance.
✂️ Papercutting and paper crafts date back centuries (early examples in China), so making silhouette sheets joins a very old creative tradition.
🖍️ Tracing is a helpful learning tool: many artists trace shapes to study proportions and then refine them freehand.
📏 Labeling poses, sizes, and heights on a silhouette sheet keeps your cast visually consistent and speeds up drawing every panel.
🕵️♀️ Tiny silhouette details (a spiky shoulder, a tall hat, a unique hairstyle) are often all it takes for viewers to instantly recognize a character.
How do I create a silhouette sheet of all the characters in my comic?
What materials do I need to make a comic character silhouette sheet?
What ages is this silhouette sheet activity suitable for?
What are the benefits of making a silhouette sheet for my comic?
