Make a scale model building
Build a scale model building using cardboard, rulers, glue, and safe scissors; measure, draw scaled plans, cut pieces, assemble, and decorate your mini structure.

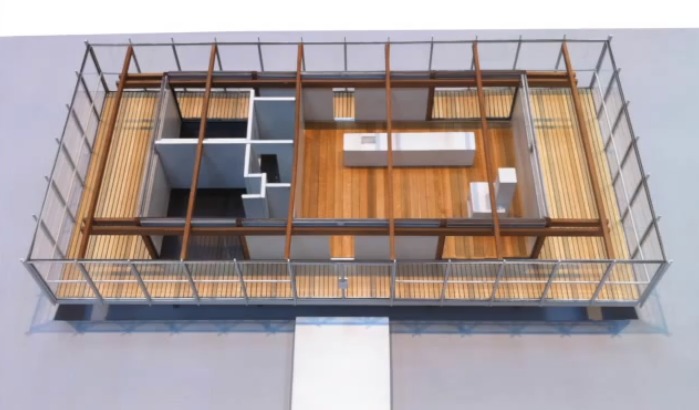

Step-by-step guide to make a scale model building
23 EASY CRAFTING IDEAS FOR KIDS AND ADULTS
Step 1
Choose one building or house you want to make a tiny model of
Step 2
Measure the real building's height width and depth in centimeters or decide the full size you want your model to be
Step 3
Pick a scale of 1:10 so every 10 centimeters of the real thing becomes 1 centimeter on your model
Step 4
Convert each real measurement to model size by dividing by 10 and write down the model dimensions in centimeters
Step 5
Draw a scaled plan on paper showing each wall and the roof using your ruler and pencil
Step 6
Label each drawn piece on the plan with its model dimensions and name like Front Wall or Left Side
Step 7
Place each drawn piece onto your cardboard and trace around it with your pencil
Step 8
Cut out the cardboard pieces carefully with safe scissors following the traced lines
Step 9
Score clear fold lines on edges that need to bend by pressing a ruler and pencil gently to make a light groove
Step 10
Fold along the scored lines so the walls stand up straight
Step 11
Glue the wall edges together to build the box shape and hold them until the glue sets
Step 12
Attach the roof and base pieces with glue and tape if needed for extra hold
Step 13
Cut and glue small cardboard shapes for doors and windows and place them on your model
Step 14
Decorate the outside and inside with coloring materials stickers or extra cardboard details and let everything dry
Step 15
Share your finished scale model building on DIY.org
Help!?
What can we use instead of cardboard, glue, or safe scissors if we can't find them?
If you don’t have corrugated cardboard, substitute sturdy cereal boxes or poster board for tracing and cutting, and use double-sided tape or school glue in the step 'Glue the wall edges together' and blunt craft scissors or adult-assisted craft knives instead of 'safe scissors' for cutting.
My cut pieces don't fit together or the walls are crooked — how can we fix that?
If walls don't fit after cutting because of measuring or trimming errors, recheck your divided-by-10 model dimensions from the 'Convert each real measurement' step, trim edges slowly with a ruler-guided cut, score clearer fold lines per 'Score clear fold lines', and add small cardboard tabs to 'Glue the wall edges together' to align seams while the glue sets.
How should we adapt the project for younger children or older kids?
For younger children, have an adult pre-measure, draw, and pre-cut the cardboard pieces from the plan and let them decorate with stickers and crayons during the 'Decorate the outside and inside' step, while older kids can keep the 1:10 scale, use a craft knife to score precise fold lines, and add detailed doors, window frames, and layered roofing.
What are some ways to make the model more detailed or personal?
To enhance the model, add interior walls and tiny cardboard furniture before you 'Attach the roof', glue LED lights near window cutouts from 'Cut and glue small cardboard shapes for doors and windows', and make the roof removable so you can open it when you 'Share your finished scale model building on DIY.org'.
Watch videos on how to make a scale model building
Easy and Fun Crafts for Kids | Handmade Picture Frame | Simple Handmade Gifts
4 Videos
Easy and Fun Crafts for Kids | Handmade Picture Frame | Simple Handmade Gifts
Let's Make Paper Building Blocks | Crafts for Kids | STEM Project

20 DIY IDEAS FOR LITTLE KIDS

Arts and Crafts for Kids and Adults | Twinkl Crafts
Facts about scale modeling and basic architecture
📏 Architects often use scales like 1:50 or 1:100, so 1 cm on a model can stand for 50–100 cm in real life.
📦 Corrugated cardboard has a fluted middle layer sandwiched between liners, making it lightweight, strong, and recyclable—perfect for mini buildings.
✂️ Using blunt-tip, child-safe scissors helps little builders cut paper and thin cardboard safely while learning fine motor skills.
🔢 At 1:50 scale, a 1 mm measurement on your plan equals 5 cm (50 mm) in the real building—tiny mistakes can scale up!
🏠 For realistic mini furniture, a 1:100 scale chair for a 180 cm person would be about 1.8 cm tall—mini math makes details pop.
How do you make a scale model building with cardboard step by step?
What materials do I need to build a cardboard scale model building?
What ages is a cardboard scale model building suitable for?
What are the benefits and safety tips for making a scale model building?
