Make a Fancy Notebook
Decorate and assemble a personalized fancy notebook using paper, cardboard, glue, and embellishments. Practice cutting, binding, and creative design skills.


Step-by-step guide to make a fancy notebook
Step 1
Gather all your materials and clear a flat workspace so you can work comfortably.
Step 2
Decide how big you want your notebook and draw its outline on a sheet of paper to make a cutting template.
Step 3
Use the template to cut several sheets of paper to the same size for the notebook pages.
Step 4
Fold each cut sheet in half neatly along the center crease to make individual pages.
Step 5
Stack all the folded pages together inside each other to form the booklet core.
Step 6
Cut two pieces of cardboard the same size as your folded pages to be the front and back covers.
Step 7
Fold each cardboard cover along the center so the fold lines up with the pages' fold.
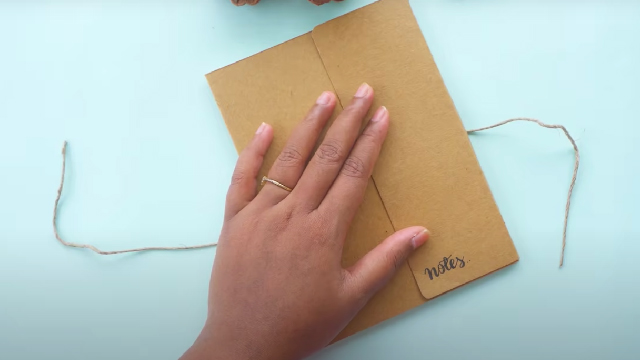
Step 8
Place the stacked pages between the two folded cardboard covers and align all edges neatly.
Step 9
Mark three evenly spaced points along the folded spine using your pencil and ruler for the binding holes.
Step 10
Carefully punch holes through the spine at your marks using a hole punch or awl with adult supervision.
Step 11
Thread yarn or ribbon through the holes to bind the notebook and tie a secure knot to hold the pages together.
Step 12
Sketch a cover design lightly with your pencil to plan how you want it to look.
Step 13
Use colouring materials and glue on stickers ribbons or other decorations to finish your fancy cover.
Step 14
Share a photo of your finished fancy notebook on DIY.org.
Help!?
I can't find cardboard or a hole punch — what can I use instead?
Use flattened cereal boxes or heavy cardstock cut to the same size as your folded pages for the two covers, and replace a hole punch or awl by carefully making holes with a thick sewing needle or small nail under adult supervision or by stapling the spine instead of threading yarn.
The pages move around and the binding feels loose after I thread the yarn—how do I fix it?
Realign and clamp the stacked pages and cardboard covers with binder clips before marking and punching the three spine holes, then use a double-length yarn, sew a backstitch through each punched hole, and tie a tight knot to secure the pages.
How can I adapt this notebook project for different ages?
For younger children have an adult pre-cut the pages and covers and pre-punch the three spine holes so they can fold, thread yarn, and decorate with crayons and stickers, while older kids can cut their own template, fold multiple signatures, sew the binding with embroidery floss, and add glued-in pockets or decorative stitched spines.
What are some ways to make the fancy cover even more special or add extra features?
Following the 'sketch a cover design' step, personalize the cover by gluing patterned paper, ribbons, stickers, adding laminated corners, an elastic closure or ribbon bookmark, numbering pages inside, and then photograph the finished notebook to share on DIY.org.
Watch videos on how to make a fancy notebook
How to Make an Easy DIY Mini Notebook | Cute Paper Craft for Kids & Beginners
4 Videos
How to Make an Easy DIY Mini Notebook | Cute Paper Craft for Kids & Beginners

DIY Cute Mini Notebook Making Ideas | Easy Paper Craft for School & Gift | Aesthetic Notebook
Creative Notebook Art Ideas ✨ | Easy DIY Drawing Tutorial (Subscribe for More!)
15 AMAZING DIY NOTEBOOKS - Cute School Supplies - Extraordinary Notebook Decor and Cover Ideas
Facts about paper crafts and bookbinding
📚 Bookbinding goes back nearly 2,000 years — the codex (bound book) replaced scrolls in the early centuries AD.
✂️ Papercrafting includes cutting, folding, scoring and gluing — it's how people make everything from simple cards to detailed 3D models.
📒 Different notebook bindings (spiral, saddle-stitch, casebound) change how flat the pages lie and how easy it is to add or remove pages.
🎨 Scrapbooking became a popular hobby in the 1800s when people started collecting printed mementos and pasting them into albums.
♻️ Cardboard is one of the most recycled materials — recycled cardboard can make sturdy, eco-friendly notebook covers.
How do I make a fancy notebook with my child?
What materials do I need to make a fancy notebook?
What ages is this activity suitable for?
What safety tips should I follow when making a fancy notebook?
