Make a DIY Hummingbird Feeder with DIY Star @Catmonkey
Make a simple DIY hummingbird feeder using recycled plastic bottles, paint, and sugar water; assemble safely and observe visiting hummingbirds from a window.


Step-by-step guide to make a DIY hummingbird feeder from recycled plastic bottles
Step 1
Gather all materials and bring them to a clean workspace where an adult can help.
Step 2
Rinse the recycled plastic bottle and the shallow lid with soap and water to remove dirt.
Step 3
Dry the bottle and lid completely with a towel or let them air dry.
Step 4
Decorate the bottle with red paint or red stickers to make a bright target for hummingbirds.
Step 5
Let the paint or glue dry completely before you touch the bottle again.
Step 6
Measure 4 cups of water and 1 cup of white sugar using measuring cups.
Step 7
With adult help bring the measured water to a boil on the stove.
Step 8
With adult help stir the sugar into the hot water until it dissolves and then let the sugar water cool to room temperature.
Step 9
With adult help make a very small hole in the center of the bottle cap using an awl or nail so nectar can drip slowly.
Step 10
Use a funnel or steady pour to fill the bottle with the cooled sugar water.
Step 11
Screw the cap back onto the bottle tightly so the tiny hole is sealed except for the drip.
Step 12
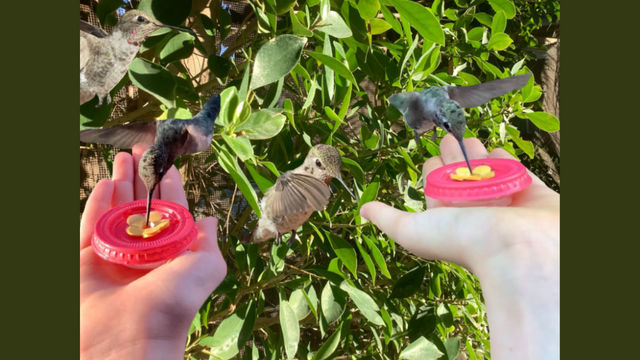
Turn the filled bottle upside down and place the cap into the shallow lid so a tiny steady drop of nectar collects in the lid.
Step 13
Tie string around the bottle neck or set the lid on a stable spot 3 to 5 feet from a window so birds can see it and avoid collisions.
Step 14
Watch quietly from the window and enjoy seeing any hummingbirds that come to sip.
Step 15
Take a photo and share your finished hummingbird feeder on DIY.org.
Help!?
What can we use if we don't have an awl or nail to make the tiny hole in the bottle cap?
Use a heated sewing needle, thumbtack, or carefully warmed metal pin with adult help to make the very small hole in the center of the bottle cap as instructed.
If nectar is dripping too fast from the cap into the lid, how can we fix it?
Tighten the cap and reduce the hole size by covering part of it with a tiny piece of clear tape or a dab of hot glue, then re-test so the cap only produces a slow steady drop into the shallow lid as the instructions require.
How can we adapt this feeder project for toddlers, school-age kids, and older children?
Have toddlers help rinse and decorate the bottle while an adult boils and cools the sugar water, let school-age kids measure the 4 cups water and 1 cup sugar and stir with supervision, and let older kids handle filling with a funnel, making the cap hole with adult help, and tying the string 3 to 5 feet from a window.
What are simple ways to improve or personalize the feeder after it's finished?
Enhance it by painting bright red flowers or adding red stickers as in the decorate step, gluing a small twig or toothpick as a perch near the cap, adding an ant moat on the hanging string, and planting hummingbird-friendly flowers near the viewing window before you take a photo to share on DIY.org.
Watch videos on how to make a DIY hummingbird feeder from recycled plastic bottles
Make a DIY Hummingbird Feeder From Recycled Materials
4 Videos

Make a DIY Hummingbird Feeder From Recycled Materials
How to Make Hummingbird Feeder DIY EASY Dot *Tips on Feeding Recipe Nectar to Attract Hummingbirds
DIY Hummingbird Feeder Recycling Food Containers to Bring Joy to Hummingbirds
5 EASY DIY Homemade Hummingbird Feeders
Facts about bird feeding and backyard wildlife
🐦 Hummingbirds can beat their wings up to 80 times per second, which lets them hover midair like tiny helicopters.
🧪 Make safe nectar with 1 part white granulated sugar to 4 parts water — never use honey or red dye, which can harm birds.
♻️ Upcycling a plastic bottle into a feeder gives the bottle a second life and keeps it out of the trash.
🪟 To reduce window collisions, place feeders either within 3 feet of a window or more than 30 feet away.
🌺 Hummingbirds are important pollinators and have amazing memories for which flowers and feeders have food.
How do I make a DIY hummingbird feeder with recycled bottles?
What materials do I need for a DIY hummingbird feeder?
What ages is this hummingbird feeder activity suitable for?
What are the benefits and safety tips for making a hummingbird feeder?
