Make a bowstring
Make a strong, safe bowstring for a toy bow using braided cord or paracord, learn measuring, knotting, and tension basics while staying supervised.


Step-by-step guide to make a bowstring
How to Make a SIMPLE Bowstring?
Step 1
Gather all materials and sit at a clear table with your toy bow and an adult.
Step 2
Lay the toy bow flat and measure the distance from one tip to the other with the ruler.
Step 3
Subtract 2 inches from that measurement to get your target string length.
Step 4
Multiply the target string length by 1.5 and round up to get the length for each braid strand.
Step 5
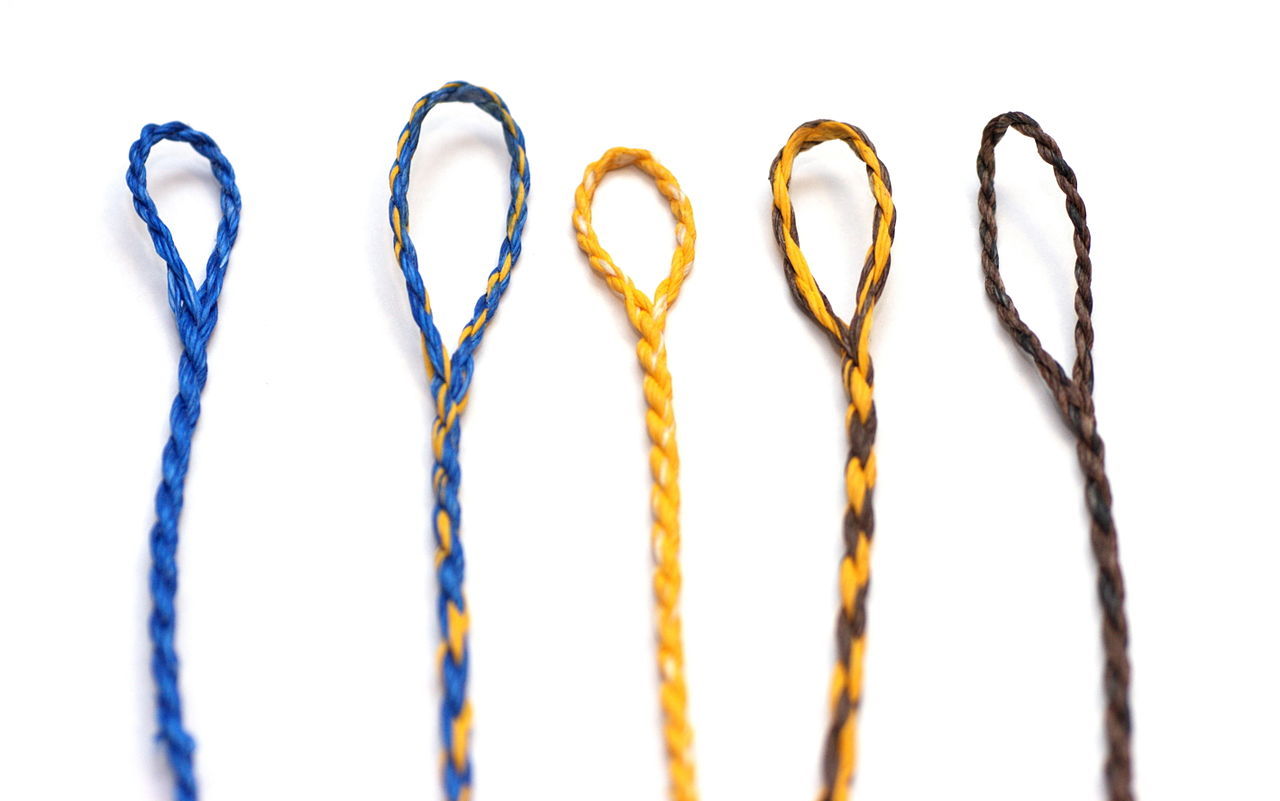
Use the scissors to cut three equal strands of cord to the length you just calculated.
Step 6
Align the three strands and tie a tight overhand knot about 1 inch from one end leaving a small loop above the knot for a bow nock.
Step 7
Wrap tape around the knot and the top part of the strands to hold them firmly while you braid.
Step 8
Tape the knotted end down to the table so the cord stays still while you work.
Step 9
Braid the three strands tightly until the braided section measures your target string length.
Step 10
Remove the tape from the braid end.
Step 11
Fold the extra cord at the braid end to form a small loop and tie a tight overhand knot to make the second bow nock.
Step 12
Trim any excess cord close to each knot and smooth the cut with tape wrapped around the knot.
Step 13
Attach one loop to a bow tip then, with an adult, carefully bend the bow and fit the other loop onto the opposite tip to check tension.
Step 14
Adjust knot positions slightly with an adult until the string has a gentle safe tension for your toy bow.
Step 15
Take a photo of your finished bowstring and share your creation on DIY.org.
Help!?
What can I use if I don't have the specific cord, ruler, or tape listed in the instructions?
If you don't have cord, use a thin shoelace, paracord, or strong yarn for the three braid strands, substitute a measuring tape or kitchen ruler for the ruler in step 2, and use masking or duct tape in place of the tape called for in steps 6 and 7, always with an adult nearby.
My braid is coming out loose or the knots keep slipping — how can I fix this?
Retie the overhand knots from step 5 more tightly, wrap extra tape around the knot and top strands as in step 6, and use a binder clip or a heavy object instead of just taping in step 7 so the strands stay taut while you braid in step 9.
How can I adapt this activity for younger kids or make it more challenging for older kids?
For younger children, have an adult pre-measure (step 2), cut the three strands (step 4), and pre-tie and tape the first knot (steps 5–7), while older kids should do the subtraction and multiplication (steps 2–3), choose stronger cord like paracord, and experiment with tension adjustments in steps 11–13.
What are simple ways to personalize or improve the bowstring before taking the final photo on DIY.org?
Personalize the string by using colored cords or adding beads as you braid in step 9, wrap decorative tape around the finished knots in step 14, and write your name or measurements on the cord before photographing in step 15.
Watch videos on how to make a bowstring
The easiest way to make a bow string by far! (No jig and no tools)
4 Videos
The easiest way to make a bow string by far! (No jig and no tools)
How to Build your own Bow String
How to Make a Simple Bow | Perfect for Beginners | Step-by-Step Tutorial @cutinkcreate
How to make a Mini Bow and Arrow - Craft For Kid
Facts about cordcraft and knot-tying for kids
🪢 Paracord Type III (often called 550 cord) contains 7 inner strands and is rated to hold about 550 pounds — super strong for small projects!
🏹 People have made bowstrings for thousands of years using materials like animal sinew, plant fibers, and modern synthetics.
📏 Measure twice, cut once — and add extra for knots: plan about 10–15 cm (4–6 in) of spare cord for tying secure loops.
🧵 Simple knots such as the double overhand or a well-dressed figure-eight grip paracord tightly and are great for beginners.
⚠️ Even toy bows store energy — always test tension gently, wear eye protection, and have an adult supervise tightening and first use.
How do I make a safe bowstring for a toy bow at home?
What materials do I need to make a bowstring for a toy bow?
What ages is making a toy bowstring suitable for?
What safety tips and benefits come from making a toy bowstring?
