Lineless Art Portrait with DIY Star Craftyunicorn10
Create a lineless art portrait and a DIY paper star ornament, practicing color blending, shape composition, safe cutting, and simple gluing techniques.


Step-by-step guide to Lineless Art Portrait with DIY Paper Star
Step 1
Clear a flat workspace and lay out your materials so everything is easy to reach.
Step 2
Lightly sketch the whole head hair neck and shoulders using simple rounded shapes with your pencil.
Step 3
Add soft patches for the eyes nose and mouth without drawing dark outlines.
Step 4
Fill each large shape with a light base color using your colouring materials.
Step 5
Layer a second color on each area and blend gently with small strokes to make smooth color transitions.
Step 6
Add darker tones where shadows fall and lighter strokes where you want highlights to show depth.
Step 7
Gently erase any visible pencil guide lines so your portrait looks lineless.
Step 8
Apply a soft background color in big shapes around your portrait to make it stand out.
Step 9
Draw and cut out a five point star from stiff paper using your ruler to keep points even.
Step 10
Make a second identical star by drawing and cutting another star.
Step 11
Fold each point of both stars slightly toward the center so the points become raised 3D peaks.
Step 12
Glue the two stars together aligning all the points so they form a sturdy 3D star ornament.
Step 13
Cut a small strip of paper fold it into a loop and glue it to the top of the star to make a hanger.
Step 14
Decorate your star with stickers glitter or extra color and place it next to or lightly glued onto your portrait if you like.
Step 15
Share your finished lineless portrait and DIY star ornament on DIY.org
Help!?
If I don't have stiff paper or a ruler for the star, what can I use instead?
Use cardboard from a cereal or shipping box as stiff paper and a straight edge like a hardcover book, a long ruler from another kit, or the edge of a cutting board when drawing the five-point star.
My colors aren't blending smoothly and the portrait still looks outlined — how can I fix it?
Follow the instructions to lay a light base color, add the second color in small strokes and blend gently using a blending stump, cotton swab, or light circular pencil strokes, then softly erase pencil guide lines with a soft eraser so the face looks lineless.
How can I adapt this project for younger children or older kids?
For younger children, simplify by using large pre-cut stars, washable markers for big color blocks, and skipping fine blending, while older kids can use colored pencils or paints for layered blending, a ruler for precise star points, and more detailed shading on the head, hair, neck, and shoulders.
What are some ways to personalize or make the star and portrait more special?
Decorate the glued 3D star with metallic paint, sequins, or stickers, attach it as a crown or hanger to the portrait, write the child's name and date, or make a hanging mobile of several decorated stars to display and share on DIY.org.
Watch videos on how to create a Lineless Art Portrait and DIY Paper Star
1st Grade Girl Self-Portrait Art Tutorial Inspired by Frida Kahlo - Art With Trista
4 Videos
1st Grade Girl Self-Portrait Art Tutorial Inspired by Frida Kahlo - Art With Trista
How to Make a Silhouette Portrait from a Photo: Inkscape Beginner Tutorial
How to Create a Pop Art Inspired Portrait | MAKE ART
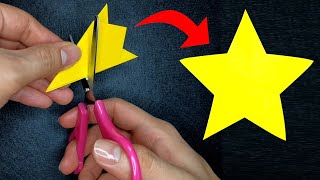
How To Cut a Perfect Star | Make a Perfect Star with Just One Cut
Facts about lineless drawing and paper crafts for kids
🎨 Lineless art defines shapes using color and value instead of outlines, giving portraits a soft, painted look.
🌈 Color blending uses tints, shades, and tones—mixing a tiny bit of a color's complement quickly dulls it, which helps create natural skin tones.
✂️ Children's safety scissors have blunted tips and specially shaped blades so they cut paper well but reduce the chance of cuts.
⭐ Paper star ornaments can be made from folded modules or glued points; the Moravian star is a famous multi-point decorative design.
🖌️ Doing a small color study (a quick test of your palette) before the final portrait helps you pick harmonious colors and avoid surprises.
How do I make a lineless art portrait and DIY paper star ornament?
What materials do I need for the Lineless Art Portrait with DIY Star Craftyunicorn10?
What ages is the Lineless Art Portrait with DIY Star Craftyunicorn10 suitable for?
What are the benefits of making a lineless portrait and DIY paper star?
