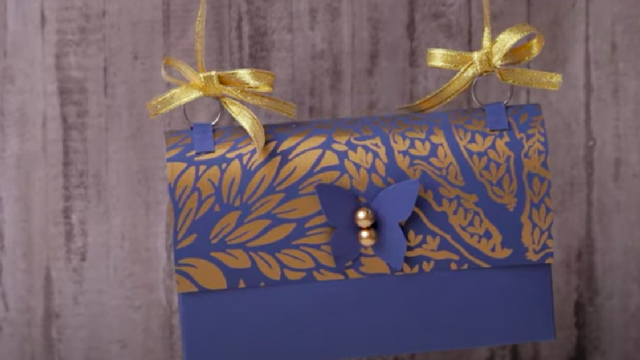
Learn to Make a Flap Over Bag
Make a flap over bag from paper or felt using simple measuring, cutting, folding, and gluing or hand sewing, then decorate it with safe materials.


Step-by-step guide to make a flap over bag
Step 1
Pick whether you want to make your bag from paper or felt and choose how big you want it to be.
Step 2
Use the ruler and pencil to draw a rectangle 20 cm wide and 22 cm tall and draw a horizontal line 7 cm from the top for the flap.
Step 3
Cut out the rectangle carefully along your pencil lines.
Step 4
Fold the paper or felt down along the 7 cm flap line so the flap folds over the front.
Step 5
Fold the bottom edge up to meet the flap fold to make the pocket of the bag.
Step 6
Decide if you will join the sides with glue or with simple hand sewing and get your glue or needle ready.
Step 7
If you chose glue apply glue along the inside of each side edge of the pocket and press to stick closed and if you chose sewing stitch a straight running stitch up each side edge from bottom to the flap.
Step 8
If you used glue press the sides for a minute and let them dry fully or if you sewed tie off the thread and trim any extra ends.
Step 9
Cut a long strip 3 cm wide from spare paper or felt to make the strap.
Step 10
Attach the strap by gluing or sewing each end to the inside top sides of the bag so it sits securely.
Step 11
Decorate your flap over bag with colouring materials stickers buttons ribbons or pom poms however you like.
Step 12
Take a photo and share your finished flap over bag on DIY.org
Help!?
What can we use instead of felt or paper if we can't find them?
If you don't have felt or paper you can use thin fabric, craft foam, or sturdy cardstock to cut the 20 cm by 22 cm rectangle and follow the same 7 cm flap fold and assembly steps.
My glued sides won't stay closed — how can we fix that?
If the glued sides don't stick, apply glue along the inside edges again, press and hold with clothespins or binder clips for a few minutes, or switch to sewing a running stitch up each side as described in the instructions.
How can we adapt this project for younger or older kids?
For younger children have an adult pre-cut the 20×22 cm rectangle, pre-fold the 7 cm flap, and use glue and stickers, while older kids can sew the side seams, make the 3 cm strap longer, and add a button or stitched buttonhole to secure the flap.
How can we personalize or improve the flap-over bag once it's made?
Personalize the bag by stitching or gluing on a pocket inside before joining the sides, adding a button or Velcro to the flap, and decorating with ribbons, pom poms or painted designs.
Watch videos on how to make a flap over bag
How To Make A Gift Bag Easy Origami Tutorial Step by Step Bag Box Guide For Kid / バッグ ボックスの折り紙簡単な作り方
4 Videos
How To Make A Gift Bag Easy Origami Tutorial Step by Step Bag Box Guide For Kid / バッグ ボックスの折り紙簡単な作り方
How to Print Your Own Bag | Tate Kids
How To Make Your Own Zipper
How To Make Your Own Makeup Bag
Facts about sewing and fabric crafts for kids
🧵 Hand sewing has been used for tens of thousands of years — people stitched clothes long before sewing machines existed!
🐑 Traditional felt is made by matting wool fibers together, so you don't need to weave to make fabric.
✂️ Paper bags were mass-produced in the 1800s and are great for folding into flap-over shapes without sewing.
✉️ Envelope-style flaps are a simple way to keep things inside — the same idea powers many clutch and flap bags.
🎨 You can decorate a bag with safe materials like buttons, fabric scraps, stickers, or washable fabric markers.
How do I make a flap over bag with my child?
What materials do I need to make a flap over bag?
What ages is this flap over bag activity suitable for?
What are the benefits, safety tips, and variations for making a flap over bag?
