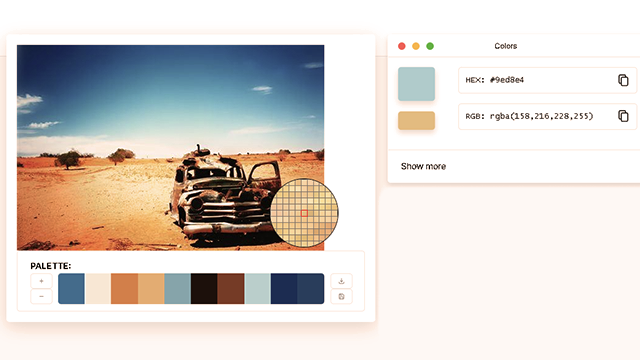
Identify the color palettes of the picture you see.
Look at a picture and identify its color palettes by selecting main hues, creating swatches, and arranging them to learn about color mixing.

Step-by-step guide to identify color palettes in a picture
Step 1
Place your picture where you can see it clearly.
Step 2
Look at the whole picture for 30 seconds.
Step 3
Point out the biggest color areas you noticed in the picture.
Step 4
Pick three to six main hues from the picture.
Step 5
Draw one rectangle or square on your paper for each hue.
Step 6
Color each rectangle to match one of the hues you picked.
Step 7
Write the color name or note where each color appears in the picture next to its swatch.
Step 8
Choose two swatches that are next to each other in the picture.
Step 9
Create a new rectangle that shows a mix of those two colors using layered strokes or blending.
Step 10
Repeat steps 8 and 9 for one or two more color pairs to see new hues.
Step 11
Arrange your colored swatches and mixed samples on a clean sheet into a palette layout you like.
Step 12
Attach the swatches to the clean sheet with glue or tape so your palette stays neat.
Step 13
Share your finished color palette creation on DIY.org.
Help!?
What can I use if I don't have colored pencils, paint, or glue listed in the instructions?
If you don't have colored pencils or paint for step 6, use markers, crayons, or glued torn color from magazines, and if you lack glue or tape for step 12, secure swatches with a stapler or paper clips on the clean sheet.
My blended swatches look muddy or uneven—how can I get a smoother mix when following step 9?
To avoid muddy or uneven blends in step 9, test layered strokes on scrap paper first, start with light pressure and build up small layers, or mix paint on a palette before applying to the new rectangle.
How can I adapt this activity for different age groups?
For younger children simplify steps 3–6 to find 2–3 big color areas and color large rectangles together, while older kids can follow step 4 to pick 3–6 hues, practice precise swatches and step 9 blending, and add detailed notes in step 7.
What are ways to extend or personalize the finished palette beyond the basic instructions?
To extend the project, repeat steps 8–10 to create additional blended gradients, add hex or paint-mix notes next to each swatch from step 7, mount the arranged palette from step 11 in a frame, or photograph and edit it digitally before sharing on DIY.org in step 13.
Watch videos on how to identify color palettes in a picture
CHOOSING COLORS: How to Use Color Palettes for Coloring Pages
4 Videos
CHOOSING COLORS: How to Use Color Palettes for Coloring Pages

Primary and Secondary Colours - How are they made? | Color Theory | The Color Wheel | Art School
The Color Wheel! | Educational Lesson for Kids and Beginners | Elements of Design
From 4 Seasons to 16! The 16-Color Palette REVEALED! Color Palette Secrets You NEED to Know!
Facts about color theory for kids
🎨 Isaac Newton created the first circular color wheel after splitting white light with a prism in 1666.
🌈 Humans can see millions of colors—roughly between one and ten million shades depending on the person.
🎛️ Screens mix light using RGB (additive), while paints mix pigments subtractively (cyan, magenta, yellow) to make new hues.
✨ Complementary colors—opposite on the color wheel—make each other appear brighter when placed side-by-side.
🖌️ Many artists use a small swatch palette (often 5–7 colors) to keep color mixing consistent and the design harmonious.
How do I identify the color palettes in a picture step by step?
What materials do I need to identify color palettes from a picture?
What ages is this color palette activity suitable for?
What are the benefits of identifying color palettes for kids?


