How to make slime
Make stretchy slime using white glue, baking soda, and contact lens solution with adult supervision; mix, knead, and explore colors and chemistry.


Step-by-step guide to make stretchy slime
How to Make Slime at Home - Easy Step-by-Step DIY Slime Tutorial for Kids & Beginners
Step 1
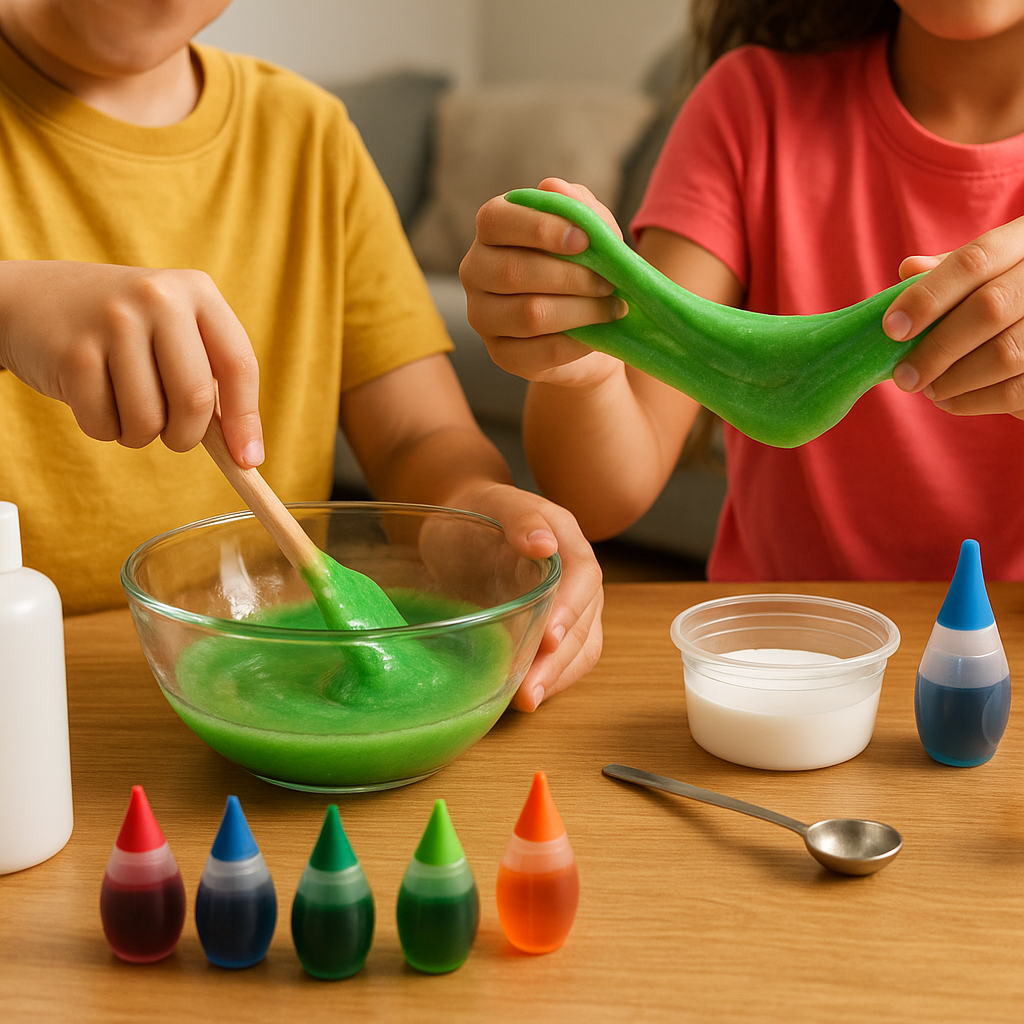
Gather all the materials and set them on a clean table with adult supervision.
Step 2
Pour 1/2 cup of white glue into the mixing bowl.
Step 3
Measure and add 1/2 teaspoon of baking soda into the glue.
Step 4
Stir the glue and baking soda together until the mix looks smooth.
Step 5
Add a few drops of your chosen coloring to the bowl.
Step 6
Stir the mixture until the color looks even.
Step 7
Measure and add 1 tablespoon of contact lens solution to the bowl.
Step 8
Stir the mixture until it starts to pull away from the sides and form slime.
Step 9
Take the slime out of the bowl and knead it with your hands for 2 minutes.
Step 10
If the slime is still sticky add up to 1/2 teaspoon more contact lens solution and knead again.
Step 11
Stretch the slime to test how far it stretches and how bouncy it is.
Step 12
Clean up your workspace and wipe any spills with the paper towel.
Step 13
Wash your hands with soap and water.
Step 14
Share your finished slime on DIY.org
Help!?
What can we use if we don't have contact lens solution or white glue?
If you don't have contact lens solution for the step that activates the slime, substitute 1 tablespoon of liquid starch or, with adult supervision, add small amounts of a borax solution (about 1/4 teaspoon borax dissolved in 1/2 cup warm water) while using PVA school glue in place of the 1/2 cup white glue.
My mixture won't pull away from the bowl or is too sticky—what should I do?
If the mixture doesn't pull away after adding 1 tablespoon of contact lens solution, add an extra 1/4 teaspoon of contact lens solution at a time and knead for the 2-minute kneading step until it stops sticking, and if it becomes too stiff soften it with a few drops of white glue.
How can I adapt this slime activity for different age groups?
For younger children, have an adult pre-measure the 1/2 cup glue, 1/2 teaspoon baking soda, and 1 tablespoon contact lens solution and let them do the stirring and kneading in a shallow tray, while older kids can vary activator amounts, try different color mixes, and measure how far the slime stretches and bounces after the kneading step.
How can we extend or personalize the slime after making it?
After you knead and test stretch and bounce, personalize the finished slime by folding in glitter, foam beads, or a drop of scented oil, try glow-in-the-dark paint for nighttime play, and preserve it in an airtight container before sharing on DIY.org.
Watch videos on how to make stretchy slime
HOW TO MAKE SLIME! 💦 *EASY Slime Tutorial* With Ingredients at Home! ✨ Updated 2025
3 Videos
HOW TO MAKE SLIME! 💦 *EASY Slime Tutorial* With Ingredients at Home! ✨ Updated 2025
HOW TO MAKE SLIME For Beginners! NO FAIL Easy DIY Slime Recipe!
EASY Slime Recipe for Beginners: 3 Ingredients, NO FAIL!
Facts about kid-friendly chemistry
🧪 Slime toys became a hit in the 1970s when companies like Mattel first sold gooey putty for kids to squish and stretch.
🧴 White school glue is usually made from polyvinyl acetate (PVA), a polymer whose long chains give slime its stretchiness.
🧂 Baking soda is sodium bicarbonate — in slime recipes it helps change the mixture’s pH so the cross-linking works better.
🔬 Many contact lens solutions contain boric acid or borate salts that act as cross-linkers, turning glue into slime by linking polymer chains.
⚠️ Always make slime with adult supervision—some ingredients can irritate skin or eyes and should never be tasted or swallowed.
How do you make stretchy slime using white glue, baking soda, and contact lens solution?
What materials do I need to make stretchy slime with glue, baking soda, and contact lens solution?
What ages is this slime activity suitable for?
What safety tips and benefits should I know when making and playing with slime?


