How to make a dam
Build a small model dam from clay, rocks, sand, and sticks, then test water flow to learn how barriers stop erosion and hold back water.

Step-by-step guide to make a small model dam
How to make dam working model for school Project
Step 1
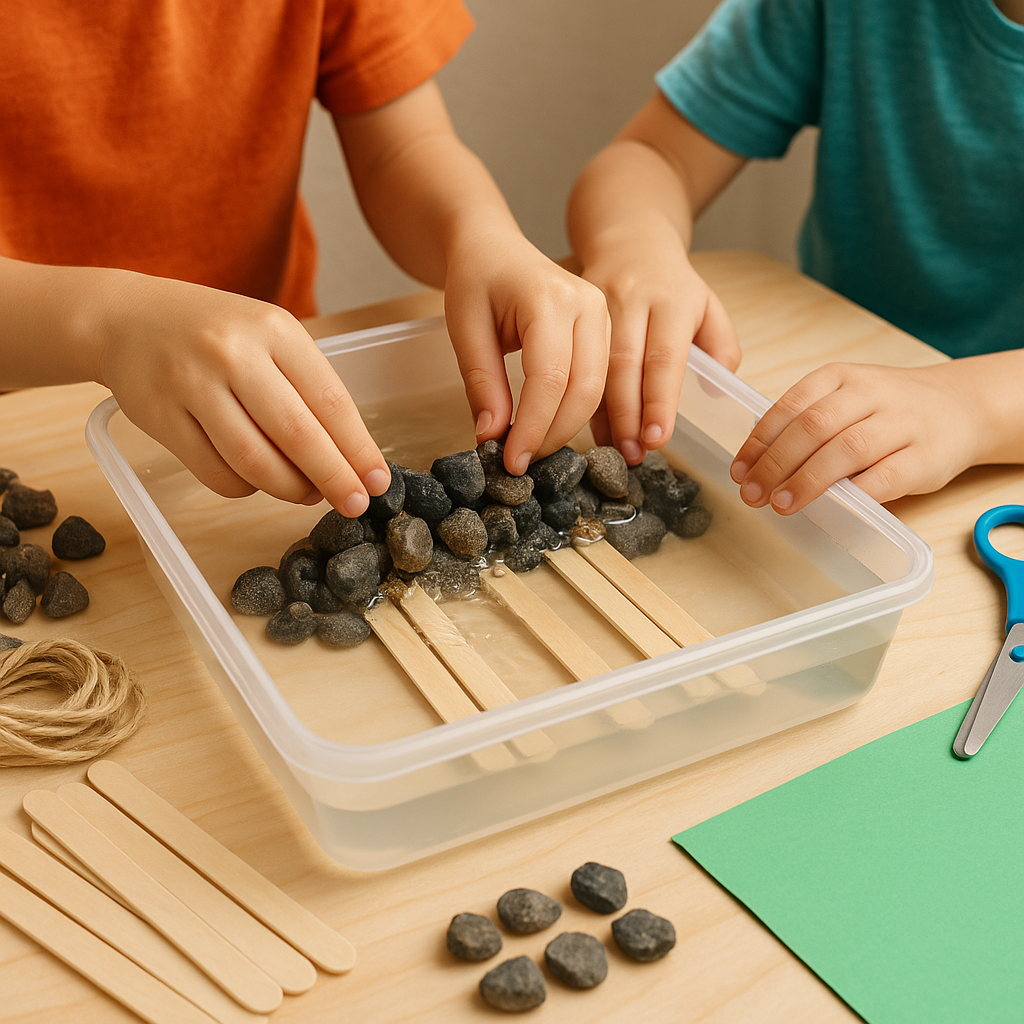
Gather all the materials and bring them to your workspace.
Step 2
Put the shallow tray on a flat table.
Step 3
Place the towel under the tray to catch spills.
Step 4
Spread a thin layer of sand in the middle of the tray to make a riverbed.
Step 5
Roll clay into a long log shape using your hands.
Step 6
Press the clay log across the middle of the sand to form a dam wall.
Step 7
Push small rocks into the front of the clay wall to make it stronger.
Step 8
Push sticks into the back of the clay wall to help hold the shape.
Step 9
Pack extra clay around the sides and base of the wall to seal gaps.
Step 10
Slope more sand behind the dam to build a small reservoir area.
Step 11
Carve a small channel through the top of the dam with your finger to make a spillway.
Step 12
Slowly pour a small cup of water into the reservoir behind the dam.
Step 13
Watch carefully for one minute and notice where water leaks or flows through the spillway.
Step 14
Share your finished model dam and what you learned on DIY.org.
Help!?
What can I use instead of modelling clay or a shallow tray if I can't find them?
If you don't have modelling clay, use playdough or wet sand packed into a log for the 'clay log' step and substitute a baking sheet or pie tin for the shallow tray.
What should I do if the dam leaks or collapses when I pour the cup of water?
If water leaks or the wall collapses during the step to slowly pour a small cup of water, press extra clay around the sides and base, push more small rocks into the front, and pour even more slowly into the reservoir behind the dam.
How can I adapt this dam activity for younger or older kids?
For younger children, pre-roll the clay log and let them press in sticks and rocks and pour water with close supervision, while older kids can carve multiple spillways, vary the sand slope behind the dam, and time how long the dam holds before sharing results on DIY.org.
How can we extend or personalize the finished model dam?
To extend the activity, experiment with different dam shapes and materials by adding a taller packed clay wall, extra rocks and sticks for strength, changing the sand reservoir slope, and recording which combination best prevents leaks to share on DIY.org.
Watch videos on how to make a small model dam
DAM WORKING MODEL for school science project exhibition - diy at home - simple and easy | DIY pandit
4 Videos
DAM WORKING MODEL for school science project exhibition - diy at home - simple and easy | DIY pandit
Easy! Dam model for science projects | Water dam model making | Science fair model | Diyas funplay
How to Make Dam Model at home/ Water Dam Model for school/ Water Dam TLM / TLM Dam Project

dam working model (3d) for science exhibition project - diy at home in simple and easy | DIY pandit
Facts about dams and erosion control
🏞️ Dams are built to store water, control floods, irrigate land, and generate hydroelectric power—your mini dam is a tiny version of big engineering projects.
🧱 People have been building simple dams from stone and clay for over 4,000 years—ancient engineers used the same basic ideas you'll try.
💧 Even a tiny leak can let flowing water carve through soil and cause erosion—watch how your model changes when water finds a weak spot.
🌊 Real reservoirs often trap sediment (sand and silt), which can change how rivers behave downstream—using sand in your model shows this in action.
🐟 Dams can block migrating fish, so many real dams include fish ladders or bypass channels—try adding a small passage in your model to see how it helps.
How do I build a small model dam with my child to test water flow?
What materials do I need to build a model dam?
What ages is this dam-building activity suitable for?
What are the benefits of building a model dam with my child?
