How to draw snow - a free snow drawing guide
Draw a snowy landscape with varied snowflakes using pencil and watercolor, practicing texture, shading, and composition, adding depth and contrast. Download the PDF for complete instructions.

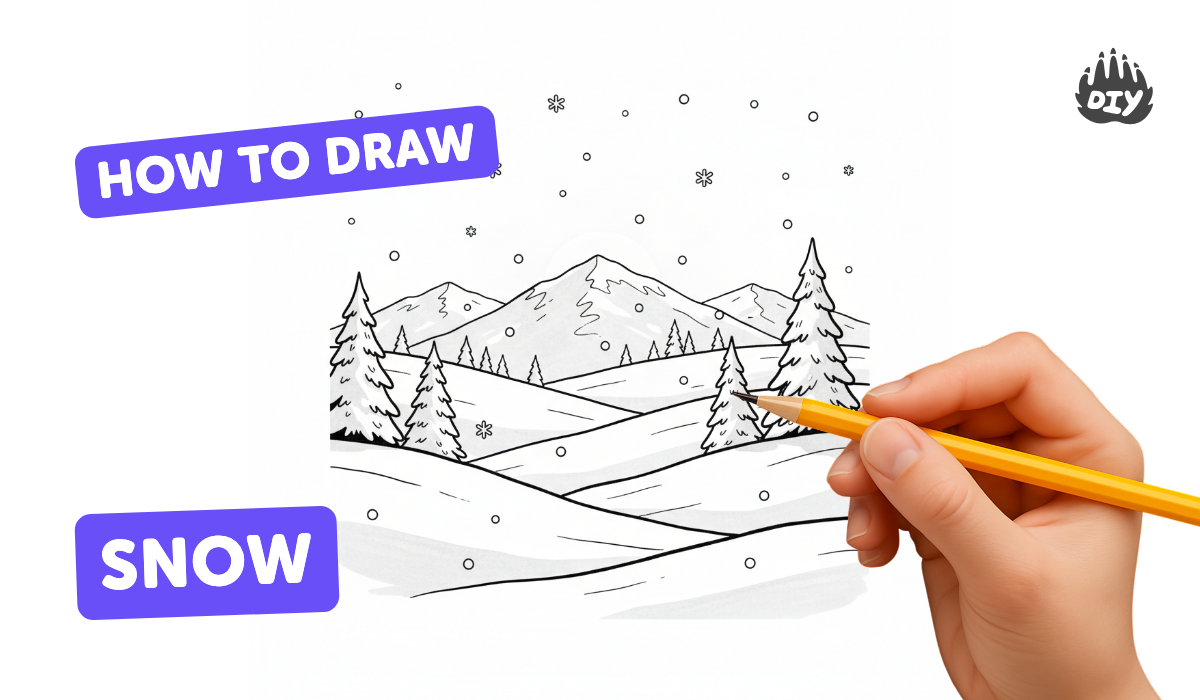

Step-by-step guide to draw a snowy landscape
How to Draw a Snowflake: Simple Step-by-Step Tutorial for Beginners and Kids
Step 1
Place your watercolor paper on a flat surface.
Step 2
Arrange your paintbrushes paint palette water cup paper towel pencil and eraser within reach.
Step 3
Lightly draw a horizon line and simple hill shapes with your pencil.
Step 4
Sketch the main foreground and midground shapes like a tree or a little house with light pencil lines.
Step 5
Draw different snowflake shapes and sizes across the sky and on the ground with light pencil marks.
Step 6
Choose a direction for the light (for example top-left) and make a little pencil shading on the sides of objects that face away from that light.
Step 7
Mix a pale blue-gray wash on your palette by diluting blue paint with plenty of water.
Step 8
Paint the sky with the pale wash starting at the top and fading toward the horizon.
Step 9
Paint distant hills with an even lighter wash so they appear farther away.
Step 10
Paint foreground snow areas with a slightly darker blue-gray to create shadows and form.
Step 11
Use a smaller brush to add darker accents for tree trunks and stronger shadows to increase contrast.
Step 12
Lift pigment by dabbing a clean damp brush or a bit of paper towel on painted areas to create bright snow highlights and varied snowflake shapes.
Step 13
Allow your whole painting to dry completely.
Step 14
Gently erase any remaining visible pencil lines.
Step 15
Share your finished snowy landscape on DIY.org.
Help!?
What can I use if I don't have watercolor paper or watercolor paint listed in the materials?
If you don't have watercolor paper use heavyweight mixed-media paper or thick cardstock and if you lack watercolor paint try diluted acrylic or washable tempera on your paint palette with the same water cup and paper towel to control washes.
My sky wash looks blotchy and my snow highlights aren't lifting—what should I do?
If the pale blue-gray wash goes blotchy, remix it with more water and repaint from the top down while it's still damp, then immediately lift excess pigment by dabbing with a clean damp brush or a bit of paper towel as instructed in the 'Lift pigment' step.
How can I adapt this activity for different ages or skill levels?
For preschoolers, pre-draw the horizon, hills, and large snowflake shapes and give them a large brush to apply a simple wash, while older kids can refine the light-direction pencil shading, mix the pale blue-gray wash themselves, and use a small brush for darker accents and details.
What are some ways to extend or personalize the snowy landscape after finishing the basic steps?
To enhance the painting, apply masking fluid before painting to preserve crisp snowflakes, sprinkle coarse salt on wet foreground snow areas for texture, add warm window light to the little house with a small brush, and sign and share your finished snowy landscape on DIY.org.
Watch videos on how to draw a snowy landscape
How To Draw A Snowflake
4 Videos
How To Draw A Snowflake
How to Draw a Cute Snowflake | Easy Winter Drawing for Kids
How to draw a snowflake - easy step-by-step tutorial

Snowflake Drawing: How to Draw A Snowflake ❄️|EASY| Step by step drawing | Super Easy Drawing
Photos of snowy landscape examples


Facts about drawing and watercolor techniques for kids
❄️ Snowflakes form as ice crystals around tiny particles (like dust or pollen) and grow into six-sided, branching patterns.
🎨 Watercolor paint is usually applied from light to dark so the white of the paper stays the brightest highlight—ideal for snowy scenes.
✏️ Different pencil grades (H = lighter, B = darker) help you make soft snow mounds, crisp edges, and realistic shadows.
🌨️ Fresh snow can reflect about 80–90% of sunlight, which is why snowy landscapes look super bright and often have cool blue shadows.
🖼️ Artists create depth by overlapping shapes, making distant objects smaller and lighter, and using stronger contrast in the foreground.
How do I help my child draw a snowy landscape with varied snowflakes using pencil and watercolor?
What materials do I need to draw a snowy landscape with pencil and watercolor?
What ages is drawing a snowy landscape with pencil and watercolor suitable for?
What are the benefits, safety tips, and creative variations for this snowy landscape art activity?
