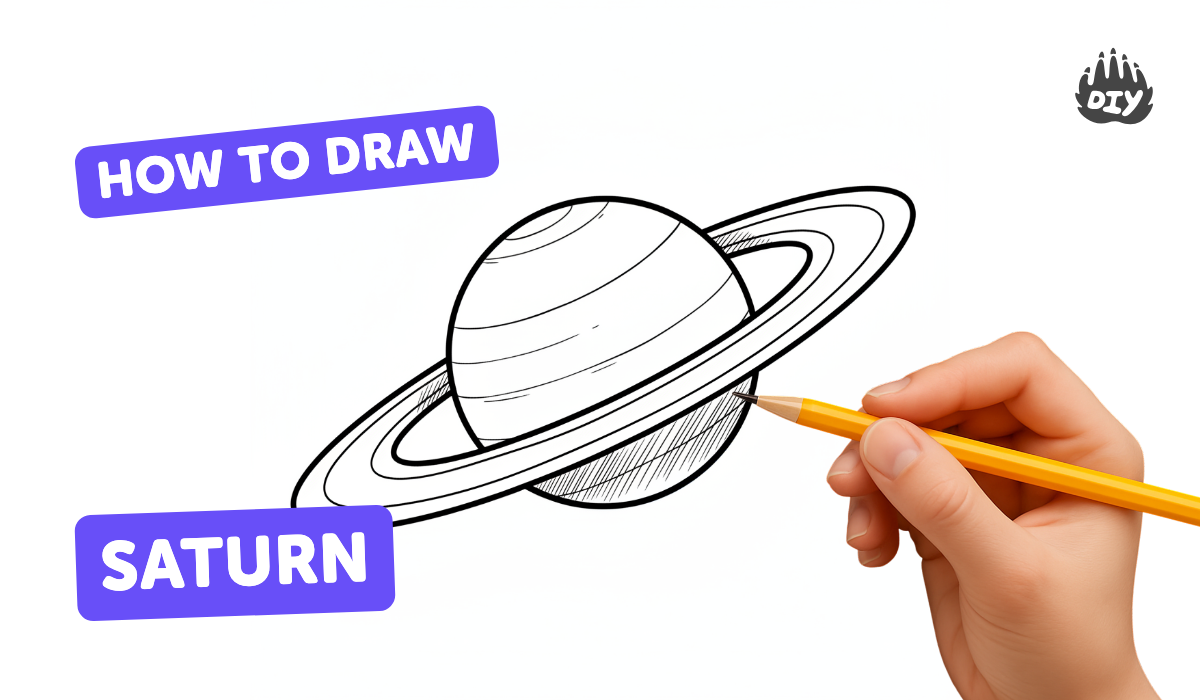
How to draw saturn - a free saturn drawing guide
Draw Saturn with rings using pencil and colored pencils, adding shading and ring perspective. Practice proportions, texture, and simple space-themed details.

Drawing Apps
Get inspired with these


Instructions
How To Draw Simple Drawing Of Showing Planets For Beginners
Step 1
Lightly draw a neat circle in the center of your paper to make Saturn's planet body.
Step 2
Draw two wide horizontal ellipses around the circle to make the rings so they stretch farther left and right than the planet.
Step 3
Erase the parts of the inner ellipse that should appear behind the planet so the rings look like they wrap around Saturn.
Step 4
Mark a tiny dot outside the planet to show where the light is coming from.
Step 5
Lightly sketch several gentle curved horizontal guide lines across the circle to map Saturn's bands.
Step 6
Shade the planet with pencil using curved strokes darker on the side away from the light dot to make it look round.
Step 7
Darken some of the guide lines to create visible bands and vary the pencil pressure so some bands look stronger than others.
Step 8
Color the bands with colored pencils using pale yellows creams and light browns to match Saturn's tones.
Step 9
Add darker colored pencil strokes to the shadowed side of the planet to deepen the shading.
Step 10
Gently blend the darker areas with your blending stump or a tissue to smooth the shadow transitions.
Step 11
Draw a thin shadow along the ring edge where the rings cross in front of the planet to show depth.
Step 12
Create small highlights on the lit side by gently lifting graphite or color with your eraser.
Step 13
Clean up stray marks and sharpen important edges with the eraser so your drawing looks neat.
Step 14
Add tidy arrow labels pointing to the planet and the rings and write a short proportion note like "ring width ≈ half planet radius."
Step 15
Share your finished Saturn drawing on DIY.org.
Help!?
I don't have a blending stump or colored pencils — what can I use instead?
Use a clean tissue, cotton swab, or fingertip to blend the pencil shading and substitute crayons, watercolor pencils, or soft pastels for the colored-pencil bands.
My rings don't look like they're wrapping around Saturn — how can I fix them?
Lightly erase the parts of the inner ellipse behind the circle as instructed, redraw the ellipses with light strokes (or trace a coin/oval template for symmetry), and add the thin shadow where the rings cross in front of the planet to emphasize depth.
How can I adapt this activity for different age groups?
For ages 3–6, use a pre-cut circle, chunky crayons, and skip band shading; for 7–11 follow all pencil, band, and colored-pencil steps using a tissue to blend; for teens add finer shading with a blending stump, vary pencil pressure for stronger bands, and include the proportion note before sharing on DIY.org.
How can we make the Saturn drawing more advanced or personal?
Add small labeled moons and background stars, experiment with different color palettes for the bands, deepen the shadowed side and lift highlights with your eraser, and finish with tidy arrow labels and the "ring width ≈ half planet radius" note before posting on DIY.org.
Related videos
How To Draw Earth (for young artists)
4 Videos

How To Draw Earth (for young artists)
How To Draw A Rocket (Young Artists)

How to Draw Earth Easy and Cute
How To Draw The Sun
Fun Facts
🪐 Saturn is the second-largest planet and would float in water because its average density is lower than water.
💍 Saturn's rings are mostly ice and rock, stretch over 280,000 km across, but are surprisingly thin—about 10 meters thick in many places.
🖍️ Layering with colored pencils and using light pressure builds rich color; a final burnish can make the surface look smooth and bright.
✏️ Shading tricks like cross-hatching, circular shading, and careful erasing help show Saturn's round shape and the shadow of its rings.
🚀 The Cassini spacecraft explored Saturn for 13 years and sent back detailed photos that artists use to draw realistic rings and textures.
How to draw Saturn with rings step-by-step
Materials needed to draw Saturn with rings
What ages is this Saturn drawing activity suitable for?
Benefits of drawing Saturn with rings
