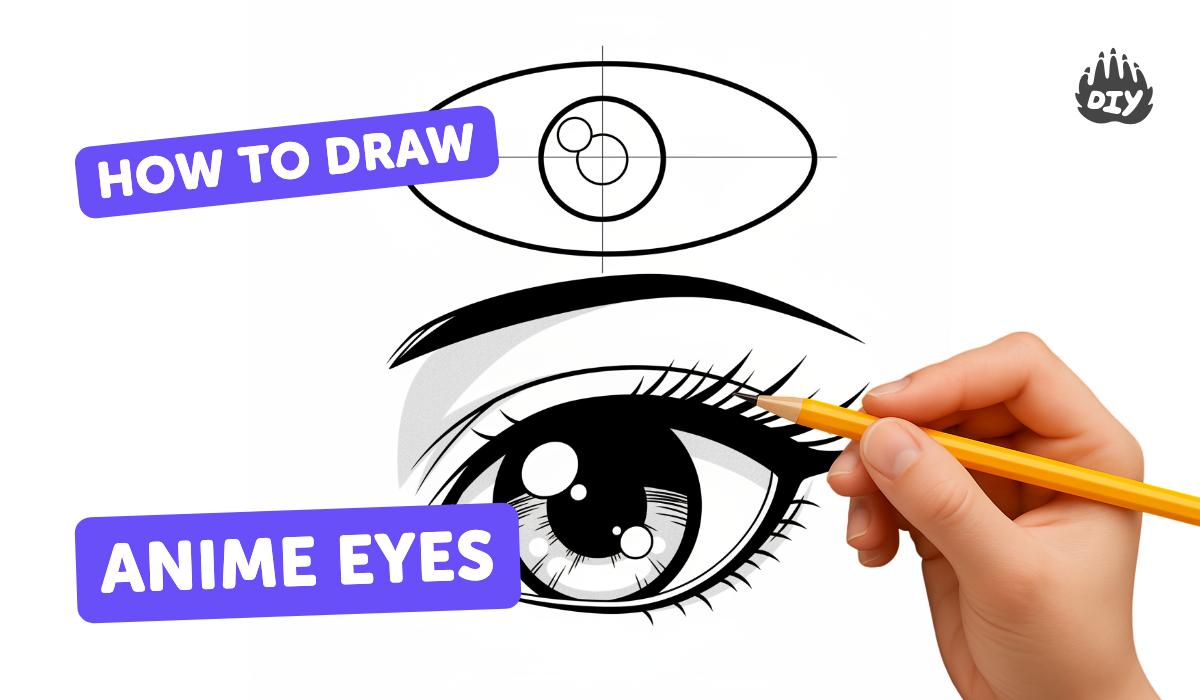
How to draw anime eyes - a free anime eyes drawing guide
Draw expressive anime eyes step by step using pencil and eraser. Practice shaping pupils, highlights, and simple shading to create character expression.


Instructions
How To Illustrate Anime Eyes
Step 1
Sit at a table and place your paper and pencil in front of you so you are ready to draw.
Step 2
Lightly draw a horizontal guideline across the paper where the middle of both eyes will sit.
Step 3
Draw two almond or oval eye outlines on the guideline using light pencil strokes.
Step 4
Inside each eye outline draw a circle for the iris centered left-to-right in the eye.
Step 5
Place and draw the pupil inside each iris where you want the character to look.
Step 6
Add one or two small rounded shapes touching the iris edge to mark highlights and leave them blank.
Step 7
Draw a thin curved line just above each eye for the upper eyelid.
Step 8
Add a few short angled strokes along the upper lid to make simple eyelashes.
Step 9
Draw eyebrow shapes above each eye to show an expression like happy surprised or angry by changing their angle.
Step 10
Shade the pupils fully with your pencil while keeping the highlights white.
Step 11
Shade the iris using short radial strokes outward from the pupil to make texture and depth.
Step 12
Erase the horizontal guideline and any stray sketch lines to tidy your drawing.
Step 13
Take a photo or scan your finished anime eyes and share your creation on DIY.org.
Help!?
What can we use if we don't have a pencil or drawing paper?
Use a mechanical pencil or an HB/#2 pencil and plain printer paper or a notebook page as your paper substitute, and keep a kneaded or regular eraser handy to remove the horizontal guideline later.
My two eyes look uneven or the irises aren't lined up—how do I fix that?
Make the horizontal guideline lighter or redraw it, use light pencil strokes to adjust the almond/oval eye outlines until the circle for each iris sits centered left-to-right on the guideline, then erase stray lines.
How can I adapt this activity for different ages and skill levels?
For younger kids, pre-draw the horizontal guideline and almond eye shapes for tracing and use markers for bolder marks, while older kids can refine short angled eyelash strokes and practice radial shading of the iris for depth.
How can we extend or personalize our finished anime eyes?
Add colored pencils or ink to the shaded iris with extra small rounded highlights left blank, vary eyebrow angles and eyelid curves for different expressions, and then photograph or scan your finished anime eyes to share on DIY.org as the instructions suggest.
Related videos
How To Sketch Eyes
4 Videos
How To Sketch Eyes
How To Draw Perfect Eyes | DIY Course
HOW TO DRAW EYES | All styles | Drawlikeasir
How To Sketch Anime Faces
Get inspired with these


Fun Facts
🎨 Anime eyes became iconic after animator Osamu Tezuka popularized big expressive eyes, inspired in part by Western cartoons.
👀 In manga and anime, changing pupil size and highlight placement can instantly switch a character’s mood (surprised, sleepy, angry).
✏️ Many manga artists start with pencil-and-eraser sketches and redraw eyes dozens of times before finalizing them.
✨ A single tiny white highlight (catchlight) can make an eye look glossy and alive — remove it and the eye looks flat.
🧑🎨 Different eye shapes act as quick character cues: wide round eyes feel innocent, narrow angled eyes feel sly or mature.
How do I draw expressive anime eyes step by step using pencil and eraser?
What materials do I need to draw anime eyes with a pencil?
What ages is drawing anime eyes suitable for?
What are the benefits of practicing drawing anime eyes with a pencil?


