How to draw a wave - a free wave drawing guide
Draw a realistic ocean wave using simple curved lines, contour strokes, and shading. Practice observation, proportion, and texture creation with color.

Drawing Apps
Get inspired with these


Instructions
How To Sketch Waves
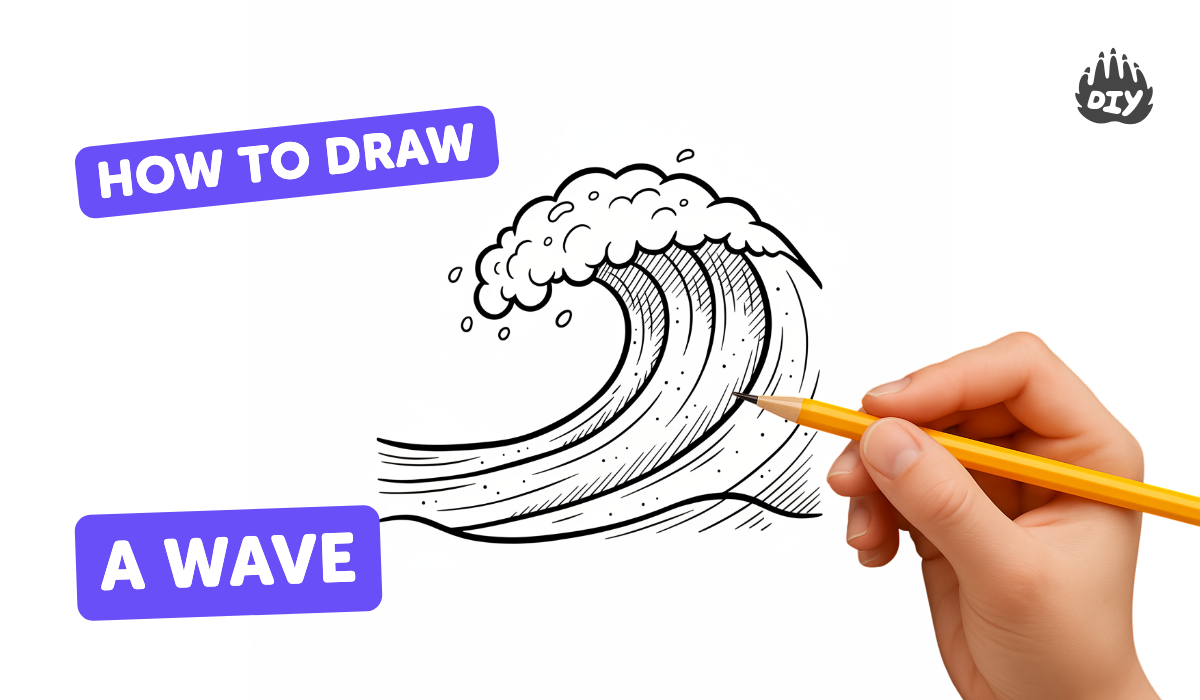
Step 1
Gather your materials and place your photo reference where you can see it clearly.
Step 2
Lightly draw a straight horizon line across the top third of your paper.
Step 3
Sketch the large curved outline of the wave with one smooth sweeping line for the crest.
Step 4
Add an inner curved line that follows the crest to show the barrel or curl of the wave.
Step 5
Draw several long gentle contour lines down the face of the wave to show the water’s flow.
Step 6
Add foam and splash shapes with short curved and jagged strokes along the crest and where the wave breaks.
Step 7
Lightly mark where the brightest highlights will be on the crest and the barrel.
Step 8
Shade the deeper shadow areas of the wave with your pencil using strokes that follow the curve.
Step 9
Blend those shaded areas gently with a blending stump or tissue to smooth the tones.
Step 10
Color the wave by layering darker blues in shadow areas and lighter blues toward the highlights.
Step 11
Add white highlights with a white colored pencil or by leaving small areas of paper untouched.
Step 12
Erase any unwanted construction lines so the drawing looks clean.
Step 13
Write your name neatly on the page to sign your artwork.
Step 14
Take a photo of your finished wave and share your creation on DIY.org
Help!?
What can I use instead of a blending stump or a white colored pencil if I don't have them?
If you don't have a blending stump, use a folded tissue or cotton swab to blend the shaded areas as in 'Blend those shaded areas gently with a blending stump or tissue to smooth the tones,' and for white highlights either lift graphite with a kneaded eraser, use white paint or a gel pen, or leave small areas of paper untouched per the instructions.
My crest line looks wobbly and the shading doesn't follow the wave—how can I fix that?
Practice the 'large curved outline of the wave with one smooth sweeping line for the crest' on scrap paper to build a confident stroke, then apply the 'deeper shadow areas' with pencil strokes that follow the curve and blend along those same curves to keep the face of the wave flowing naturally.
How can I adapt this drawing for younger or older kids?
For younger children simplify to one bold curved crest to color with crayons and skip detailed shading, while older kids should follow all steps including 'layering darker blues in shadow areas' and 'adding white highlights' and add extra texture to the foam and barrel.
What are easy ways to extend or personalize the finished wave drawing?
Personalize the piece by adding a sky above the 'horizon line,' paint wet-sand reflections below the wave, embellish foam with a white gel pen or lifted paper highlights, neatly 'write your name' as a signature, and then take a photo to share on DIY.org as the instructions suggest.
Related videos
Painting waves: a guide
4 Videos

Painting waves: a guide

How to Make a Wave Painting | Tate Kids
Wave Basics

Fun & Easy Drawing Tutorial For Beginners
Fun Facts
🌊 Ocean swells can travel across entire oceans — a single wave can move thousands of miles before reaching a shore.
🎨 Hokusai's 'The Great Wave off Kanagawa' helped popularize dramatic, stylized waves and inspired artists worldwide.
🖌️ Short, curved contour strokes and layered lines are a simple trick artists use to suggest foam and motion.
👀 Watching how light hits a wave (bright crest, darker trough) is the easiest way to figure out where to shade.
🎯 Drawing tip: waves often have a wide, heavy-looking base and a thinner, curling crest — that proportion makes them feel powerful.
How do you draw a realistic ocean wave?
What materials do I need to draw a realistic wave?
What ages is wave drawing suitable for?
What are the benefits of drawing ocean waves?
