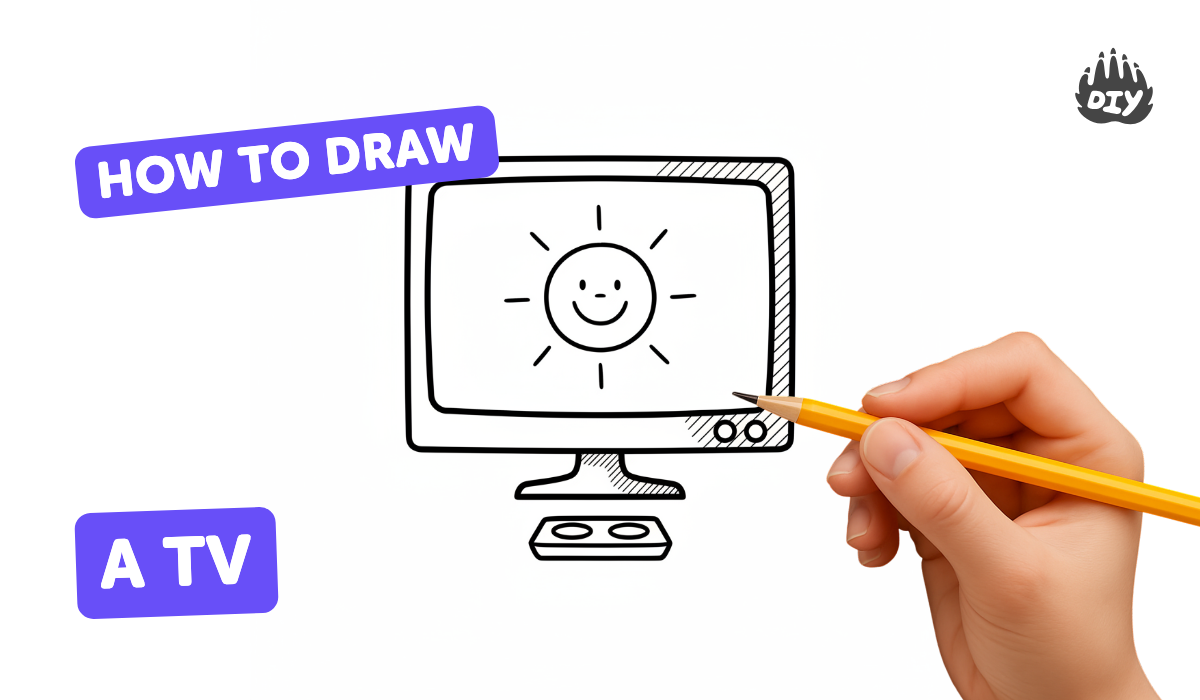
How to draw a tv - a free tv drawing guide
Draw a retro television step-by-step using rectangles, circles, antenna, and shading. Label parts and color the finished TV with markers.

Drawing Apps
Photos of retro television examples


Step-by-step guide to draw a retro television
📺 Quick and Easy TV Drawing for Beginners! || TV Drawing for Kids 🎨 ✍️
Step 1
Lay one sheet of paper on a flat surface so you have space to draw.
Step 2
Use your pencil and ruler to draw a large rectangle with slightly rounded corners in the middle of the paper to make the TV body.
Step 3
Draw a smaller rectangle centered inside the big rectangle to make the screen.
Step 4
Draw two small circles beside the screen for the TV knobs.
Step 5
Draw a vertical rectangle or column of tiny dots next to the knobs to make the speaker area.
Step 6
Draw two thin lines upwards from the top center of the TV and add a small circle at each tip to make the antenna.
Step 7
Draw two short angled lines or a small rectangle under the TV to make the legs or base.
Step 8
Lightly erase any extra pencil construction lines so the TV outline looks clean.
Step 9
Trace over your final pencil lines with a fine-tip black pen or marker to make the drawing bold.
Step 10
Write labels with your pen pointing to each part: Screen; Knobs; Speaker; Antenna; Legs.
Step 11
Decide where the light is coming from and add pencil shading on the side away from the light using light diagonal strokes.
Step 12
Color the TV with your markers or crayons using different colors for the body screen knobs and speaker.
Step 13
Share your finished retro TV drawing on DIY.org.
Help!?
What can we use if we don't have a ruler or a fine-tip black pen for the drawing?
Use the straight edge of a book or a piece of cardboard as a ruler to draw the TV and screen, and trace your final pencil lines with a dark crayon, ballpoint pen, or felt-tip marker when you reach the 'Trace over your final pencil lines with a fine-tip black pen or marker' step.
My lines look crooked and the inner screen isn't centered—how can I fix that?
Lightly mark the page center with a tiny pencil dot, use your ruler or book edge to measure equal margins before drawing the smaller rectangle for the screen, draw with light pencil construction lines, and let any ink dry fully before erasing extra lines as the instructions say.
How can I adapt the activity for different ages?
For younger children have an adult pre-draw the large rectangle and screen so they can place knobs, speaker dots, antenna and color, while older kids can follow all steps and add perspective, detailed cross-hatching shading on the 'side away from the light', and more precise labels.
What are some ways to enhance or personalize the retro TV drawing after coloring?
After coloring you can draw a favorite show or a reflection on the 'Screen', glue sequins to the 'Knobs', use patterned tape around the TV body, fold cardboard legs for a 3D base, and then photograph and share your finished retro TV on DIY.org.
Watch videos on how to draw a retro television
Television drawing for kids || Easy television drawing for kids || Television drawing step by step
4 Videos
Television drawing for kids || Easy television drawing for kids || Television drawing step by step
Television Drawing Easy | Step By Step Television Drawing|#drawing #easy

How to draw a television easy and very simple | Simple Drawing | TV Drawing | Television Drawing

How to draw Television easy step by step | T.V drawing easy |
Facts about drawing for kids
📺 The first mechanical TVs appeared in the 1920s, but electronic televisions became common in homes in the 1950s.
🐰 "Rabbit ears" antennas got their nickname from their twin-stick look and helped older TVs pick up signals from distant stations.
⚫ Old CRT screens are curved and heavy because they used electron beams to light phosphors instead of tiny pixels like modern displays.
🎨 Mid-century modern TV designs often featured wooden cabinets, rounded corners, and angled legs — great inspiration for retro drawings.
✏️ Labeling parts like "screen," "knob," and "antenna" is a fun way to practice observation and handwriting while you draw.
How do you draw a retro TV step-by-step?
What materials do I need to draw a retro television?
What ages is this retro TV drawing activity suitable for?
What are the benefits of drawing a retro TV?
