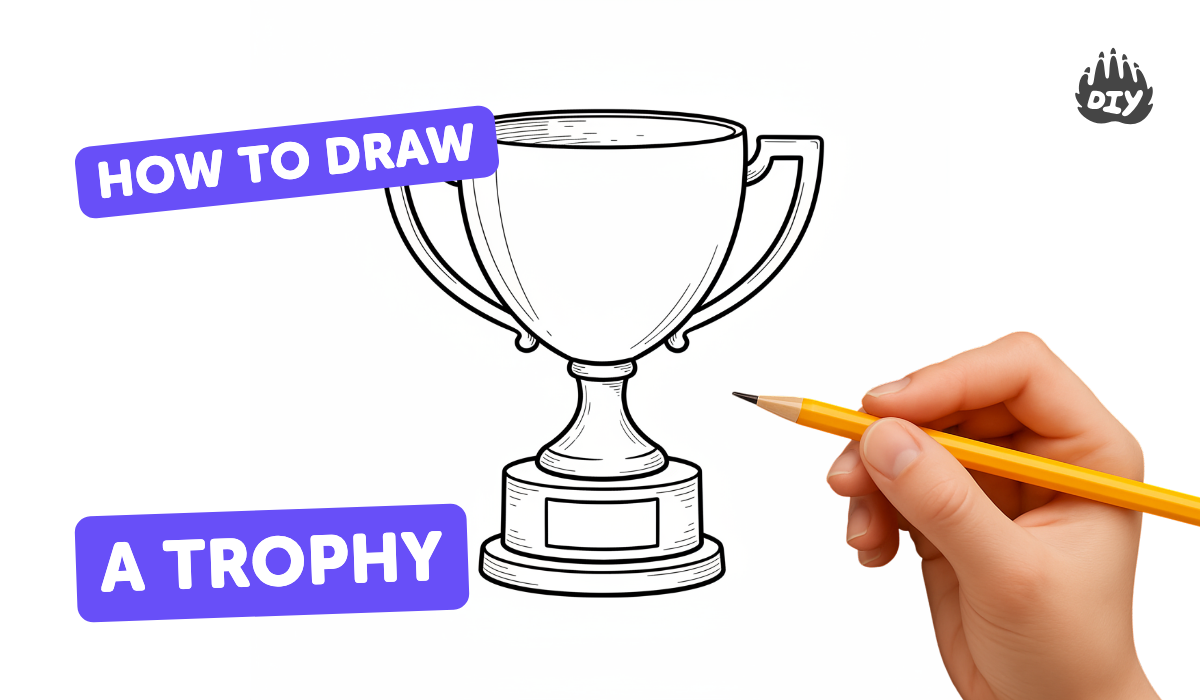
How to draw a trophy - a free trophy drawing guide
Draw a trophy step by step using simple shapes, shading, and patterns. Learn measurement, symmetry, and proportion while creating a colored, polished trophy illustration.

Drawing Apps
Photos of trophy drawing examples


Step-by-step guide to draw a trophy
How to Draw a Trophy step by step for kids tutorial
Step 1
Place your paper in portrait orientation on a flat surface.
Step 2
Use your ruler and pencil to draw a light vertical centerline down the middle of the paper.
Step 3
Measure with your ruler and mark a top point and a bottom point on the centerline to set the trophy height.
Step 4
Draw a wide horizontal rectangle centered on the bottom point to make the trophy base.
Step 5
Draw a smaller rectangle or trapezoid centered above the base to make the pedestal.
Step 6
Use your compass or a round object to draw an oval centered above the pedestal for the rim of the cup.
Step 7
Draw two curved lines from the oval down to the pedestal to form the cup body and connect them at the pedestal.
Step 8
Draw a C-shaped handle on the left side of the cup connecting the rim and the body.
Step 9
Draw a matching C-shaped handle on the right side using the centerline to help keep them symmetric.
Step 10
Draw a small circle or star in the center of the cup front for a medal detail.
Step 11
Add simple patterns like stripes dots or laurel lines to decorate the cup and base.
Step 12
Lightly shade one side of the cup with your pencil leaving a thin white highlight strip to show shine.
Step 13
Gently erase any construction lines so your trophy looks neat and clean.
Step 14
Color your trophy using gold tones and darker shades for shadows and color the base and decorations neatly.
Step 15
Share your finished trophy illustration on DIY.org.
Help!?
If we don't have a compass or ruler, what can we use instead?
Trace the rim of a jar or lid for the oval and use a book edge or any straight object as a ruler while marking trophy height with equal finger-widths along your pencil centerline.
My cup looks lopsided or the handles don't match—how can I fix that?
Use the light vertical centerline to mirror the C-shaped handles, measure equal distances from the centerline to each handle, lightly adjust the curved lines, and then gently erase construction lines to clean up the cup body.
How can I adapt this drawing activity for younger or older kids?
For younger children, pre-draw the base, pedestal, and oval rim so they can trace and color, while older kids can add precise measurements, refined pencil shading for the shine, and intricate laurel lines or patterns.
What are some ways to personalize or enhance the finished trophy?
Write a name or award on the small circle or star, add extra decorations like stripes or laurel lines, use metallic gold tones and darker shading for depth, or cut out and mount the colored trophy on cardboard to make a stand-up award.
Watch videos on how to draw a trophy
How To Draw A Trophy For Beginners
4 Videos
How To Draw A Trophy For Beginners
#557 How to Draw a Trophy - Easy Drawing Tutorial
How to Draw The WORLD CUP TROPHY easy! (step by step)

Draw a Trophy with Soccer Ball Easy Football Cup Drawing | @ArtKidsFinger
Facts about drawing and illustration
🏆 Trophies trace back to ancient Greece, where winners were honored with captured weapons and armor.
✏️ Artists often start drawings with simple shapes—circles, squares, and triangles—to build complex objects.
🎨 Chiaroscuro is the art term for strong shading that turns flat sketches into lifelike, 3D-looking forms.
📏 Many trophies are designed with left-right symmetry because symmetry makes objects look balanced and pleasing.
🔢 The golden ratio (~1.618) is a famous proportion artists use to make designs feel naturally attractive.
How do I draw a trophy step by step with my child?
What materials do I need to draw a trophy with kids?
What ages is drawing a trophy suitable for?
What are the benefits of drawing a trophy for kids?
