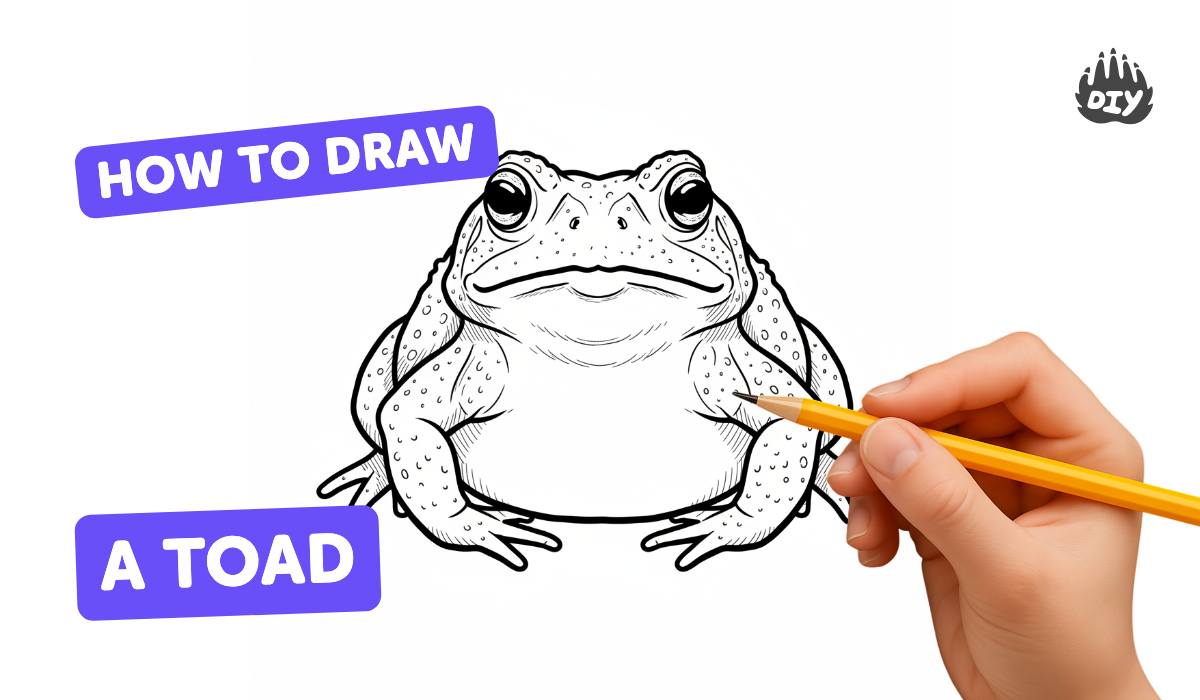
How to draw a toad - a free toad drawing guide
Draw a realistic toad step by step using pencil, eraser, and color. Practice observation, proportions, composition, and shading to improve drawing techniques and skills.

Drawing Apps
Photos of realistic toad drawings


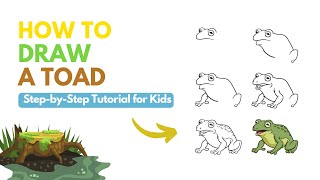
Step-by-step guide to draw a realistic toad
How To Draw Toad From Mario (With Body)
Step 1
Place a clear reference photo of a toad next to your paper so you can look at it while you draw.
Step 2
Lightly sketch the toad’s basic shapes by drawing a large oval for the body and a smaller oval for the head.
Step 3
Draw a centerline down the body and a horizontal guideline where the eyes sit to help with placement.
Step 4
Sketch two eye circles on the eye guideline to mark the eyes’ positions.
Step 5
Draw a short curved line for the mouth to show the mouth placement.
Step 6
Sketch the front and back legs as simple shapes attached to the body to map their positions.
Step 7
Smooth the simple shapes into the toad’s outer contour to create a natural body outline.
Step 8
Gently erase extra construction lines so the main toad shape is clear.
Step 9
Add skin texture by drawing bumps and folds on the body following your reference.
Step 10
Decide the direction of your light source so shadows and highlights will be consistent.
Step 11
Shade the main shadow areas with light pencil strokes where the toad is in shadow.
Step 12
Deepen the darkest shadows and add midtones to build the toad’s roundness and volume.
Step 13
Blend the shaded areas with a tissue or blending stump to make smooth transitions.
Step 14
Color the toad by layering colored pencils or crayons to match the tones and shading from your reference.
Step 15
Share your finished toad drawing on DIY.org
Help!?
I don't have a blending stump or tissues—what can I use to blend the shaded areas?
Use a clean finger, a cotton swab, a folded tissue or a bit of paper towel to gently blend shaded areas in place of a blending stump as suggested in 'Blend the shaded areas with a tissue or blending stump.'
My toad's eyes and mouth look off—how can I fix their placement using the guidelines?
Recheck the centerline and the horizontal eye guideline, lightly adjust the two eye circles and the short curved mouth, then erase extra construction lines so the features sit in the correct positions.
How can I adapt this activity for younger children or older kids?
For younger children, simplify to the large body oval, smaller head oval, eye circles and a mouth and skip detailed texture and shading, while older kids can add 'skin texture', deepen 'the darkest shadows' and layer color with colored pencils for realism.
How can we personalize or extend the finished toad drawing before sharing it on DIY.org?
Add a pond or leaf background, label your toad, try different color palettes by layering colored pencils or crayons from the 'Color the toad' step, or make a before-and-after sketch collage to show progress before you share on DIY.org.
Watch videos on how to draw a realistic toad
How to Draw a Cute Toad - Step by Step Drawings for Beginners - Easy Pictures to Draw Now
4 Videos
How to Draw a Cute Toad - Step by Step Drawings for Beginners - Easy Pictures to Draw Now
How to draw a toad step by step | Easy animals to draw
How To Draw Toad | Super Mario Bros | Cute Easy Step By Step Drawing Tutorial
Toad Drawing Tutorial - Learn to Sketch This Warty Cutie in 6 Easy Steps!
Facts about animal drawing and shading
🐸 Toads usually have dry, bumpy skin and many species can puff up to look larger when scared.
🔎 Toad eye placement and size are great landmarks — artists use them to measure head proportions and angles.
✏️ Using different pencil grades (hard H for light lines, soft B for dark shadows) helps make a toad look three-dimensional.
🖌️ Realistic color on a toad comes from layering subtle hues and speckles, not one flat color — build tones slowly.
📏 Artists often use a simple measuring trick (hold your pencil at arm’s length) to compare sizes and keep proportions accurate.
How do you draw a realistic toad step by step?
What materials do I need to draw a realistic toad?
What ages is drawing a realistic toad suitable for?
What are the benefits of drawing a realistic toad?
