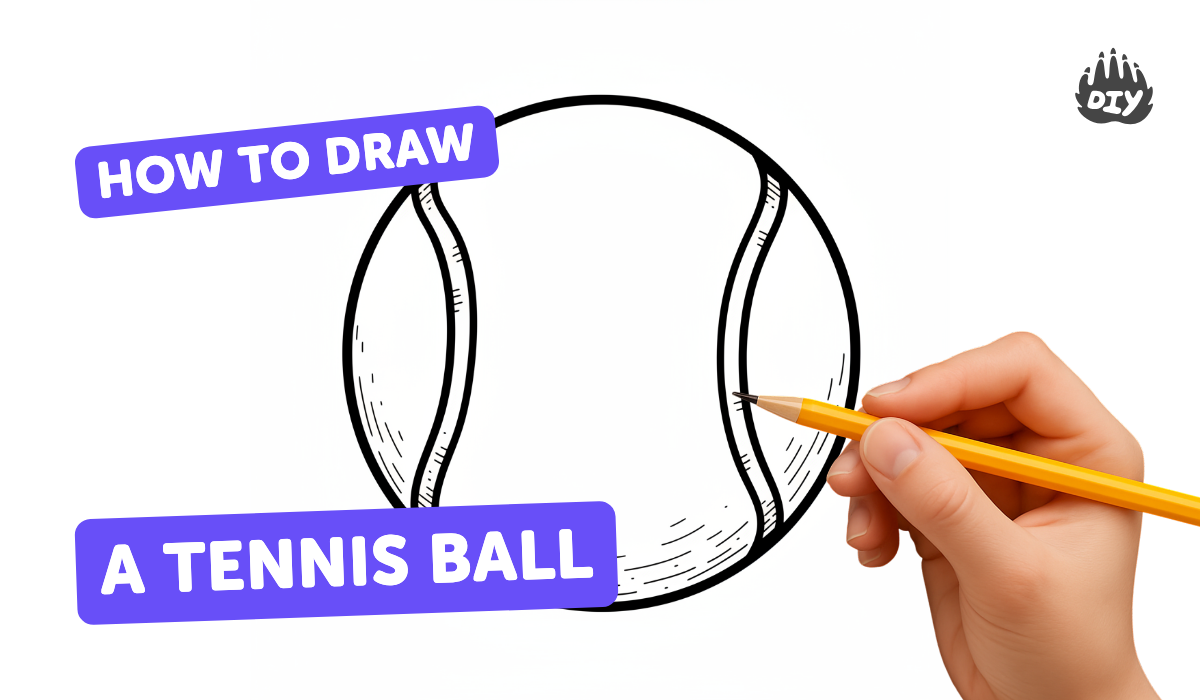
How to draw a tennis ball - a free tennis ball drawing guide
Draw a realistic tennis ball using simple shapes, curved seams, and shading to show light. Practice observation and shading techniques.

Drawing Apps
Photos of tennis ball drawing examples


Step-by-step guide to draw a tennis ball
How to Draw a Tennis Ball 🎾 | Easy Step-by-Step for Kids
Step 1
Find a real tennis ball or a clear picture of one to look at while you draw.
Step 2
Place your paper and lightly trace a round object or draw a neat circle the size you want your tennis ball.
Step 3
Decide where the light is coming from and lightly mark a small oval on the circle where the brightest highlight will stay white.
Step 4
Draw two curved S-shaped seam lines across the circle so they meet near the top and bottom like a stretched figure-eight.
Step 5
Draw a thin parallel curve along each seam line to show the white seam edges.
Step 6
Erase extra sketch marks so the circle and seams look clean and ready to shade.
Step 7
Lightly shade the side opposite the highlight with your pencil to start making the ball look round.
Step 8
Darken the shading near the outer edge and close to the seams to deepen the shadow and add roundness.
Step 9
Gently blend the pencil shading with a tissue or cotton bud so the tones look smooth.
Step 10
Colour the ball with yellow and green, keeping the highlight area white and adding darker layers where you shaded.
Step 11
Draw a soft shadow beneath the ball with your pencil to make it sit on the page.
Step 12
Share your finished tennis ball drawing on DIY.org.
Help!?
What can we use if we don't have a real tennis ball, a round object to trace, or a cotton bud for blending?
Use a clear photo of a tennis ball from the internet instead of a real ball, trace any round object like a cup or lid for the circle, and blend shading with a clean fingertip or a soft piece of tissue in place of a cotton bud.
My seams look uneven and the ball appears flat—what should I check or redo?
Check that the two S-shaped seam lines meet near the top and bottom (step 4), erase extra sketch marks (step 6), darken shading near the outer edge and seams (steps 7–8), and gently blend with tissue to smooth transitions while keeping the highlight area white.
How can I adapt this activity for younger children or make it more challenging for older kids?
For younger kids, simplify by tracing a circle, using crayons and a sticker to mark the highlight, and letting them color flat, while older kids can add layered colored-pencil washes, stronger graphite values, and short pencil strokes to simulate the fuzzy texture following steps 6–9.
What are simple ways to enhance or personalize the finished tennis ball drawing?
Add a soft shadow beneath the ball (step 10), paint short curved pencil strokes for fuzz, draw a tennis-court background, or sign and share the finished drawing on DIY.org as suggested.
Watch videos on how to draw a tennis ball
How To Draw A Tennis Racket And Ball
4 Videos
How To Draw A Tennis Racket And Ball
How to Draw a Tennis Ball - VERY EASY | FOR KIDS

How to draw a tennis ball step-by-step tutorial
How to Draw a Tennis Racket and Ball in a Few Easy Steps: Drawing Tutorial for Beginner Artists
Facts about drawing and shading techniques
🎾 Tennis balls have a fuzzy felt covering that changes how they bounce and how the seams look when you draw them.
🟡 Tennis balls were commonly white until the 1970s, when yellow‑green became popular because it's easier to see on TV.
✏️ To draw a realistic sphere, place a bright highlight where the light hits, blend midtones, add a core shadow, and paint a cast shadow on the surface.
💡 The curved seams on a tennis ball come from two interlocking pieces of felt shaped like a figure‑eight.
🎨 Artists often start with a simple circle and just three tones—highlight, midtone, core shadow—plus a cast shadow to make a ball look 3D.
How do I teach my child to draw a realistic tennis ball?
What materials do I need to draw a realistic tennis ball with my child?
What ages is drawing a realistic tennis ball suitable for?
What are the benefits of drawing a tennis ball and creative variations to try?
