How to draw a kid - a free kid drawing guide
Draw a kid step by step using simple shapes and proportions. Practice facial features, body posture, clothing, and basic shading to create a complete portrait.


Drawing Apps
Photos of kid drawing examples


Step-by-step guide to draw a kid
How to draw a child | IN-DEPTH BEGINNER TUTORIAL
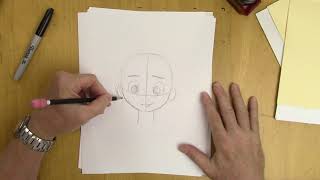
Step 1
Draw a light vertical line down the middle of your paper to help balance your kid drawing.
Step 2
Near the top of the paper draw a medium-sized oval for the head.
Step 3
Draw a light horizontal line across the middle of the oval to mark the eye level.
Step 4
Draw two eyes on that line with pupils and tiny highlights to make them sparkle.
Step 5
Draw a simple nose halfway between the eye line and the chin.
Step 6
Draw a mouth a little below the nose using a curved line to show expression.
Step 7
Draw small curved ears on each side of the head aligned with the eyes.
Step 8
Draw the hair outline around the top of the head to show the hairstyle you want.
Step 9
Draw two short vertical lines under the head for the neck.
Step 10
Draw the shoulders and a torso shape under the neck to make the body.
Step 11
Draw the arms and hands using simple long shapes and circles for joints.
Step 12
Draw the legs and feet with long shapes and simple shoe outlines.
Step 13
Erase any light guidelines and smooth your final outlines so your drawing looks clean.
Step 14
Add basic shading and color to finish your portrait and make it pop.
Step 15
Share your finished creation on DIY.org
Help!?
What can I use if I don't have drawing paper, pencils, or coloring supplies?
If you don't have artists' paper or special pencils, use plain printer paper and an HB/No.2 pencil to draw the light vertical guideline, oval, and facial lines, and use crayons or colored pencils for the final shading and color step.
My kid's eyes or head look lopsided—how can we fix that?
If the eyes look uneven or the head is off-center, recheck the light vertical line and the eye-level horizontal line, then gently erase and redraw the oval and eye placements with light pencil strokes before smoothing your final outlines.
How can I adapt this drawing activity for younger or older kids?
For younger children simplify by tracing a large oval, using stickers for eyes and pre-cut hair shapes after drawing the light vertical guideline, while older kids can add neck and torso shapes, joint circles for arms, and more advanced shading and color before sharing on DIY.org.
How can we personalize or extend the finished portrait before sharing it?
After erasing guidelines and smoothing outlines, personalize by drawing a unique hairstyle outline, patterned clothing and small accessories, add basic shading under the chin and on the torso for depth, and write the character's name before posting to DIY.org.
Watch videos on how to draw a kid
How to draw a Child or Boy Step by Step | Boy Child Drawing Lesson
4 Videos

How to draw a Child or Boy Step by Step | Boy Child Drawing Lesson
How to Draw Children (Cartoons) - Easy to Follow Tutorial

I'll teach you to draw! How to Draw #1: The Essential First Steps Most Beginners Miss
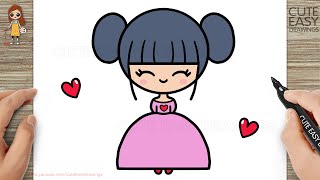
How to Draw a Cute Girl Easy Step by Step for Kids and Beginners
Facts about figure drawing for kids
🧒 A child's head is proportionally larger—about one-quarter of their body—while an adult's head is closer to one-seventh, which changes how you draw kids vs. grown-ups.
✏️ Many artists start portraits with simple shapes (circles, ovals) and cross guidelines to place eyes, nose, and mouth accurately.
👀 A useful rule: the eyes usually sit roughly halfway down the head, and the distance between the eyes is about the width of one eye.
👕 Fabric folds and shading follow body movement—wrinkles gather at joints and creases, helping show posture and motion.
🎨 Even basic two-tone shading (light and shadow) can make a flat drawing look 3D—consistently choose a light source and stick with it.
How do I draw a kid step by step using simple shapes and proportions?
What materials do I need to draw a kid?
What ages is this step-by-step kid drawing activity suitable for?
What are the benefits, safety tips, and variations for this drawing activity?
