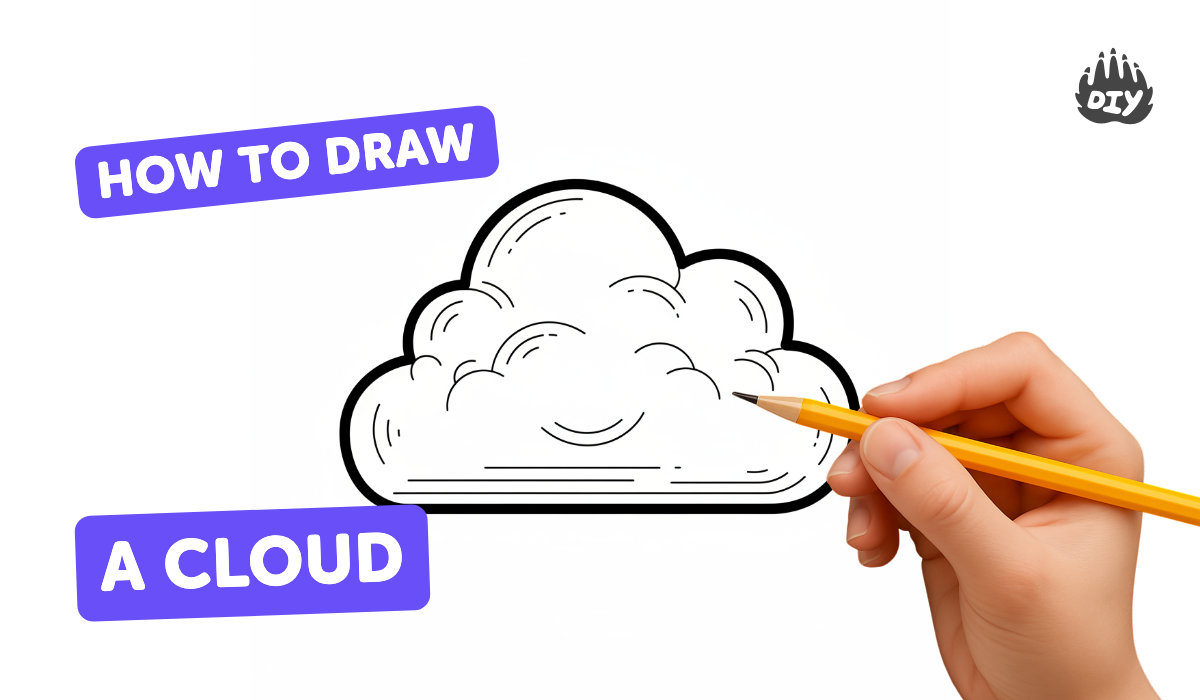
How to draw a cloud - a free cloud drawing guide
Draw fluffy clouds step by step using simple shapes, pencil shading, and outlines; practice proportions and add sky details to finish your picture.

Drawing Apps
Photos of fluffy cloud drawings


Step-by-step guide to draw a fluffy cloud
How to Draw Clouds Step-by-Step! ☁️✏️ Easy Cloud Drawing Tutorial for Beginners
Step 1
Place your paper flat on the table.
Step 2
Put your pencil and eraser within easy reach.
Step 3
Draw a light horizontal line low on the paper to mark the horizon.
Step 4
Sketch three overlapping ovals and circles above the horizon to plan cloud shapes.
Step 5
Connect the tops of the overlapping shapes with soft bumpy lines to make fluffy cloud outlines.
Step 6
Erase the inside construction lines so only the fluffy cloud outlines remain.
Step 7
Draw a few smaller cloud shapes farther away to practice size and proportion.
Step 8
Shade gently along the bottom of each cloud with light pencil strokes.
Step 9
Use a tissue to softly smudge the shaded areas to make smooth, soft shadows.
Step 10
Trace the final cloud outlines with a black marker to make them stand out.
Step 11
Draw a simple sun in a corner using a circle and short rays.
Step 12
Add two small V-shaped birds or thin lines to show distant sky details.
Step 13
Lightly colour the sky with blue, keeping the areas near the clouds paler.
Step 14
Use your eraser to lift tiny bits of graphite from the top of each cloud to create highlights.
Step 15
Share your finished cloud drawing on DIY.org.
Help!?
I don't have a tissue or a black marker—what can I use instead for smudging and tracing?
If you don’t have a tissue, use a cotton ball, your fingertip, or a folded paper towel to softly smudge the shaded areas in the step that says 'Use a tissue to softly smudge the shaded areas,' and if you lack a black marker, trace the final cloud outlines with a dark pencil or a fine-tip pen as in 'Trace the final cloud outlines with a black marker.'
My cloud looks messy after erasing the construction lines and smudging—how can I fix it?
If erasing and smudging make the cloud messy, go back with light, short pencil strokes to redefine the fluffy outline (steps 'Connect the tops...' and 'Erase the inside construction lines'), gently re-smudge where needed, then carefully lift highlights from the top of each cloud with your eraser (step 'Use your eraser to lift tiny bits of graphite').
How can I change the activity for younger kids or make it more challenging for older kids?
For younger children, simplify by skipping the overlapping ovals and letting them draw or glue one big cotton-ball cloud after placing the horizon (steps 'Draw a light horizontal line' and 'Sketch three overlapping ovals'), while older kids can add detailed shading gradients (steps 'Shade gently...' and 'Use a tissue to softly smudge'), use a blending stump, and practice proportion by drawing many distant clouds (step 'Draw a few smaller cloud shapes farther away').
What are some creative ways to extend or personalize this cloud drawing activity?
Personalize it by turning the sky into a sunrise or sunset with layered color when you 'Lightly colour the sky with blue' (use pinks and oranges too), add stormy shading or rain under a cloud, or make a series of labeled cloud types to photograph and share on DIY.org (step 'Share your finished cloud drawing on DIY.org').
Watch videos on how to draw a fluffy cloud
☁️ How to Draw a Cloud Step by Step for Kids || Quick Cloud Drawing for Kids 🎨 ✍️
4 Videos
☁️ How to Draw a Cloud Step by Step for Kids || Quick Cloud Drawing for Kids 🎨 ✍️
☀️How to Draw Clouds ☁️☁️for Kids - Easy Step-by-Step Cloud Drawing Tutorial☀️#drawing #kids

How to draw a Cloud Step by Step | Cloud Drawing Lesson
Cloud drawing // How to draw a Cloud // Toodlers art and painting
Facts about drawing and sketching for kids
☁️ A single cumulus cloud can weigh more than a million pounds because of all the tiny water droplets it holds.
🌬️ Winds high in the sky can push clouds across hundreds of miles—so cloud shapes can change fast while you draw!
✍️ Artists use soft shading, blended edges, and darker undersides to make clouds look three-dimensional and fluffy.
🔵 The sky appears bluer higher up due to Rayleigh scattering—use a gradient from deep to pale blue for a realistic background.
🔁 Building clouds from overlapping circles or ovals helps create natural, bouncy cloud shapes kids can copy.
How do I teach my child to draw a fluffy cloud step by step?
What materials do I need to draw fluffy clouds with my child?
What ages is drawing fluffy clouds suitable for?
What are the benefits and fun variations of drawing clouds?
