How to draw a cliff - a free cliff drawing guide
Learn step by step to draw a rocky cliff with shading, texture, and simple perspective; practice sketching layers, rocks, and a dramatic edge.

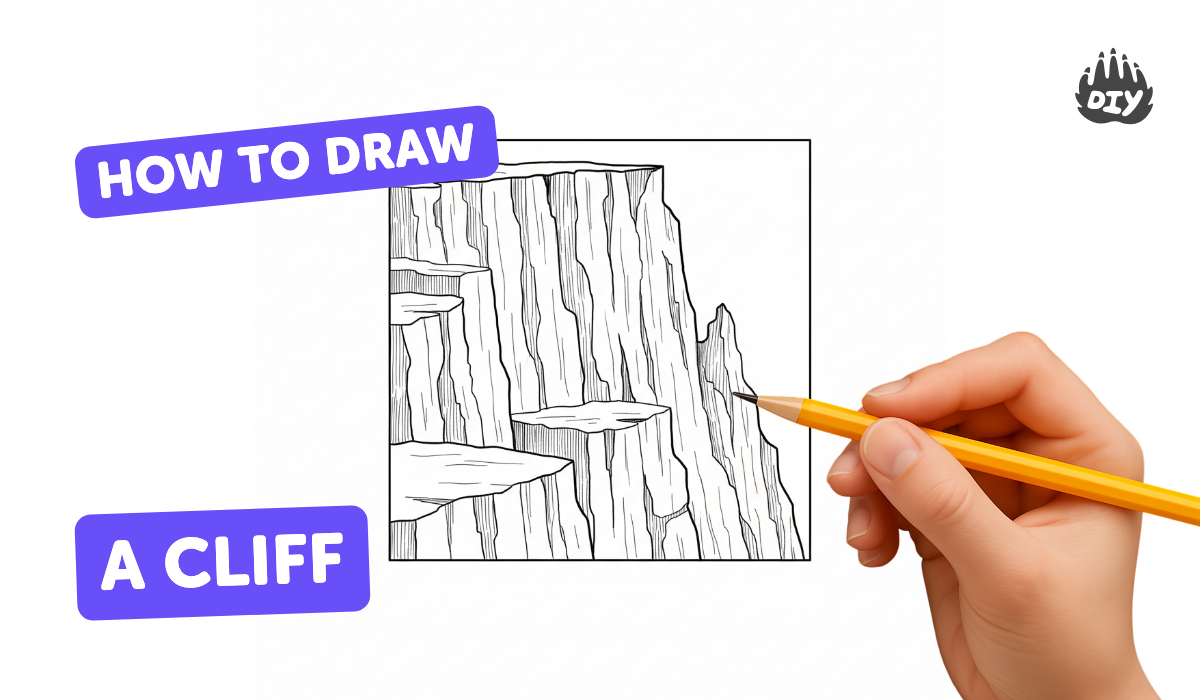
Step-by-step guide to draw a rocky cliff
EASY CLIFF DRAWING, How to Draw Cliff Scenery, Easy Pencil Drawing Tutorials
Step 1
Place your paper in portrait orientation on a flat surface.
Step 2
Lightly draw a horizontal horizon line about one-third from the top of the paper.
Step 3
Mark a small vanishing point on the horizon where the cliff edge will seem to disappear.
Step 4
Sketch a jagged cliff silhouette from near the vanishing point down to the bottom edge of the paper.
Step 5
Draw several horizontal slightly curved lines across the silhouette to show rock layers.
Step 6
Add big irregular shapes inside the cliff for boulders and ledges.
Step 7
Draw short angled lines and small cracks across the layers to create rock texture.
Step 8
Choose which side the light is coming from and lightly mark the direction with an arrow beside the drawing.
Step 9
Shade the side away from the light using a 2B pencil with strokes that follow the rock forms.
Step 10
Add darker shadows into crevices and under ledges with a 4B pencil.
Step 11
Gently blend the shaded areas with a blending stump or tissue to soften tones.
Step 12
Erase thin lines along outer edges to lift small highlights on the rock faces.
Step 13
Use the pencil to add tiny scratches dots and rough marks for final rock texture.
Step 14
Share your finished cliff drawing on DIY.org.
Help!?
What can I use if I don't have a blending stump or a 4B pencil listed in the instructions?
If you don't have a blending stump, gently rub shaded areas with a clean tissue or fingertip, and if you lack a 4B pencil, deepen shadows by layering and pressing a 2B pencil more firmly or using a soft charcoal pencil to mimic the darker tones.
My cliff looks flat after I blend—what step can fix the lost texture?
Restore texture by erasing thin lines along outer edges to lift highlights, redraw short angled lines and small cracks with your 2B, and add darker crevice shadows with a 4B as described in the shading steps.
How can I adapt this cliff drawing for younger children or make it harder for older kids?
For younger children simplify by drawing a bold jagged silhouette and using crayons or a 2B for basic curved layer lines and blending with a tissue, while older kids can refine the vanishing point, add more rock layers, use both 2B and 4B for nuanced shading, and finish tiny scratches and dots for realism.
How can we extend or personalize the activity after finishing the basic cliff drawing?
Extend the drawing by adding a tiny figure or tree on the cliff edge, sketching a sea or sky along the horizon line and adding color with colored pencils or watercolor, or inkening final edges before sharing the finished cliff on DIY.org.
Watch videos on how to draw a rocky cliff
How to Draw a Cliff in a Few Easy Steps: Drawing Tutorial for Beginner Artists
4 Videos
How to Draw a Cliff in a Few Easy Steps: Drawing Tutorial for Beginner Artists
HOW TO DRAW CLIFF, Easy Cliff and Boy Drawing, Easy Sketch Drawing
HOW TO DRAWING A CLIFF WITH PENCIL SKETCH EASY

How Do You Draw Cliffs? - Drawing and Painting Academy
Facts about landscape drawing
🪨 Many cliffs form where hard rock meets water or softer rock — some sea cliffs rise over 1,000 meters high!
🎨 Chiaroscuro (strong light and dark) is a classic art trick that makes flat drawings look like real, chunky rock.
✏️ Cross-hatching with pencils is a quick way to build up rough rock texture and different shadow depths.
📐 Using linear perspective (like a low vanishing point) can make a cliff edge feel dramatic and close to the viewer.
🌊 Coastal cliffs can move inland over time — in some places erosion eats away several meters each year.
How do I teach a child to draw a rocky cliff step by step?
What materials do I need to draw a cliff with my child?
What ages is this cliff drawing activity suitable for?
How can I adapt the cliff drawing activity for different skill levels or add variations?
