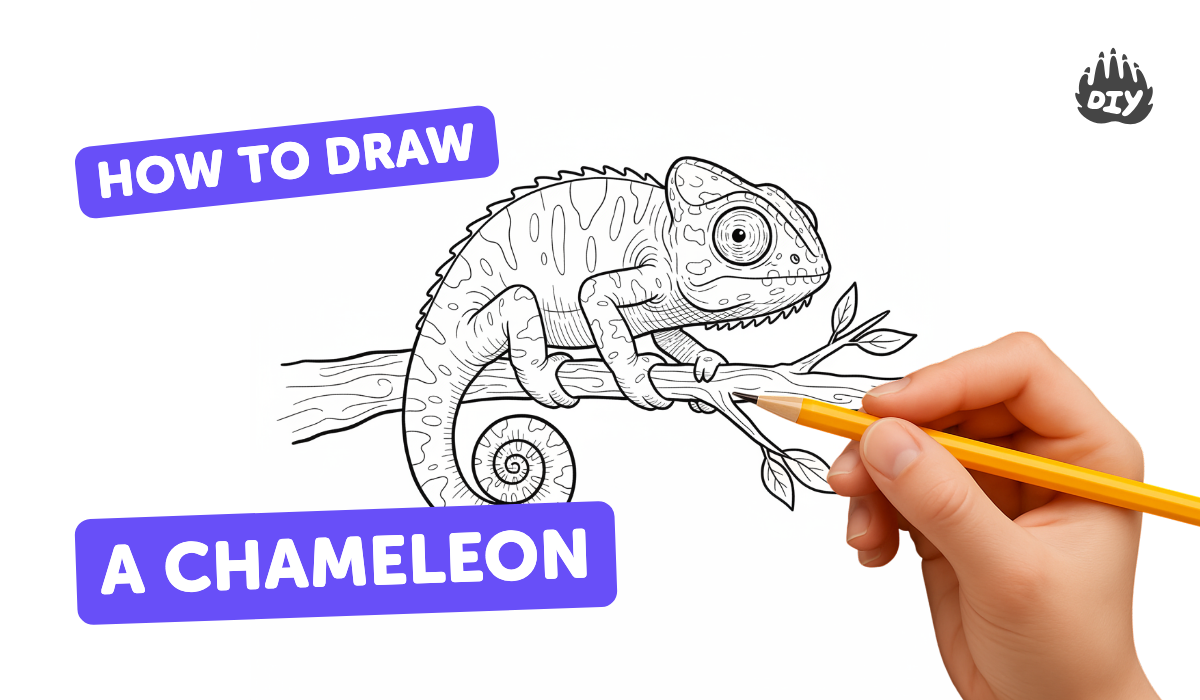
How to draw a chameleon - a free chameleon drawing guide
Draw a chameleon using basic shapes, pencils, and colored pencils to create texture and pattern. Practice observing color blending and posture from photos.

Drawing Apps
Photos of chameleon drawing examples


Step-by-step guide to draw a chameleon
How To Draw A Chameleon - Preschool
Step 1
Find a clear reference photo of a chameleon that shows its posture and colors.
Step 2
Study the photo and look for the chameleon’s main shapes and how it holds its body.
Step 3
Lightly draw an oval for the body a small circle for the head and a curved line for the tail.
Step 4
Connect the shapes with smooth lines to make the chameleon’s outer body outline.
Step 5
Draw four simple tube shapes for the legs positioned like your reference photo.
Step 6
Add the curled tail by thickening the curved line into a tapered spiral shape.
Step 7
Draw a round bulging eye and a small curved mouth on the head.
Step 8
Sketch a few large pattern shapes like stripes spots or bands across the body.
Step 9
Choose two or three main colored pencils to match your photo and test blending on scrap paper.
Step 10
Apply a light base layer of color over the whole chameleon using the lightest chosen color.
Step 11
Add darker colors to the edges and shadow areas and gently layer to blend the colors.
Step 12
Use a sharp colored pencil to add small scale marks texture lines and pattern details.
Step 13
Erase any stray pencil construction lines and gently darken the final outlines.
Step 14
Share your finished chameleon drawing on DIY.org
Help!?
What can we use instead of colored pencils if we don't have them?
You can use crayons, soft pastel sticks, or watercolor pencils instead of colored pencils and still follow the instructions to test blending on scrap paper before applying a light base layer.
My chameleon’s tail looks stiff — how can I fix it?
Soften the tail by erasing the initial curved line and re-drawing it as a smoother tapered spiral as described in the 'thickening the curved line into a tapered spiral shape' step, then blend it into the outer body outline with smooth connecting lines.
How do we adapt the steps for a 4-year-old or a 12-year-old?
For a 4-year-old, simplify to a big oval body, circle head and chunky tube legs drawn with crayons and skip fine scale marks, while a 12-year-old can follow all steps including layering colors, testing blends on scrap paper, and adding small scale texture with a sharp colored pencil.
How can we make the drawing more unique or advanced?
Make it more unique by adding a leafy branch background, experimenting with an under-wash before the 'light base layer', using metallic or watercolor pencils for highlights, varying the stripes and spots you sketched, and darkening the final outlines before sharing on DIY.org.
Watch videos on how to draw a chameleon
How to Draw a Chameleon Easy
4 Videos

How to Draw a Chameleon Easy
How To Draw A Halloween Chameleon
How to Draw Pokemon Leafeon Easy
How To Draw A Tiger - Preschool
Facts about drawing animals and color blending
🦎 Chameleons change color using pigment cells (chromatophores) and tiny skin nanocrystals that reflect light — it's more science than paint!
👀 Each chameleon eye can move independently, so they can look two different ways at the same time.
🌈 Color changes are used for communication, temperature regulation, and camouflage — not just hiding from predators.
🎨 Colored pencils blend best by layering and gentle burnishing, which makes smooth gradients perfect for a chameleon's skin.
📷 Studying photos helps capture posture: chameleons use prehensile tails and zygodactyl feet to grip branches while posing.
How do I draw a chameleon step-by-step using basic shapes?
What materials do I need to draw a chameleon?
What ages is this chameleon drawing activity suitable for?
What are the benefits and safe tips for doing this chameleon drawing activity?
