How to draw a building - a free building drawing guide
Draw a simple building step-by-step: sketch basic shapes, add windows, doors, roof, perspective lines, texture, and color to create a realistic building drawing.

Step-by-step guide to draw a simple building
How to draw a Building Step by Step | Building Drawing Lesson
Step 1
Gather all your materials and find a flat table to work on.
Step 2
Choose whether your paper will be portrait or landscape and place it in front of you.
Step 3
Decide where the light is coming from (left right or above) and remember that spot.
Step 4
Draw a light pencil line across the page for the horizon and put a small dot on it for the vanishing point.
Step 5
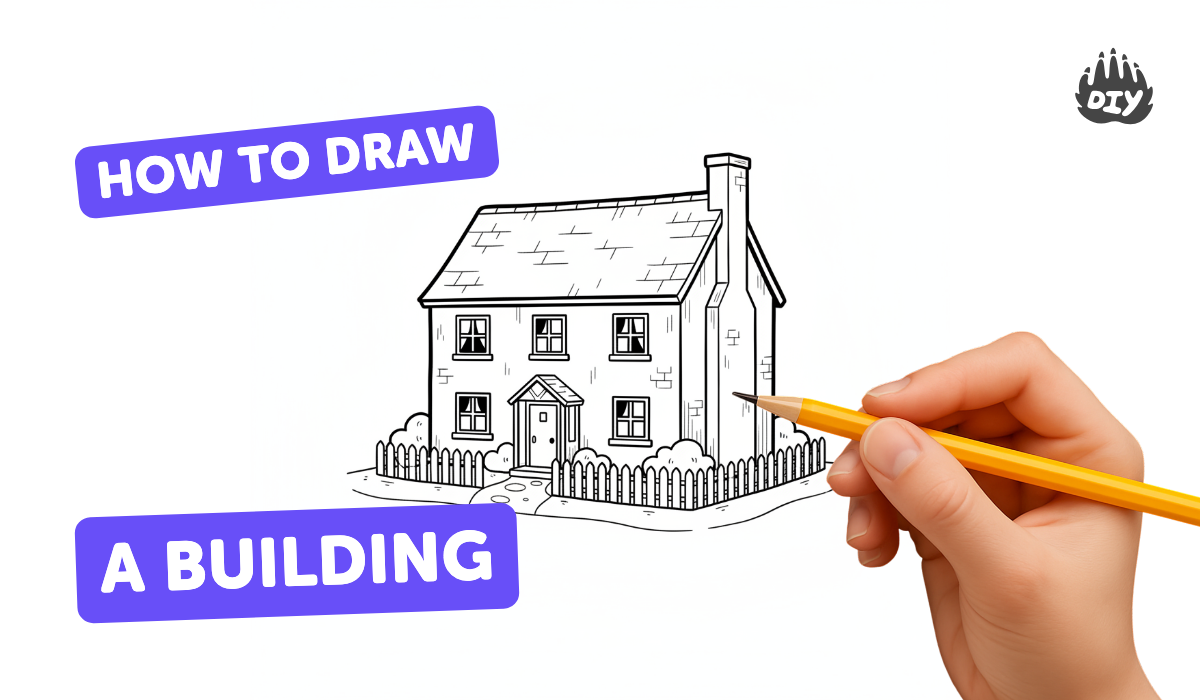
Sketch a simple rectangle in the middle of the page for the front face of the building.
Step 6
Use your ruler to draw straight lines from the rectangle’s side corners toward the vanishing point to show the building’s depth.
Step 7
Put a vertical line at the end of those depth lines to close the back edge and make a 3D box shape.
Step 8
Draw a triangle on top of the front face to make a pitched roof on the front.
Step 9
Draw lines from the roof triangle’s back corners to the vanishing point and close the back roof edge to show roof depth.
Step 10
Draw a door on the front face and add a small circle or dot for the doorknob.
Step 11
Draw windows on the front and side faces and add lines inside each window to make window panes.
Step 12
Add texture like bricks or siding by drawing short horizontal or staggered lines on the walls.
Step 13
Erase extra guide lines lightly and darken the building’s final outlines with your pencil.
Step 14
Shade the side away from the light with soft pencil strokes and then colour your building with the colouring materials.
Step 15
Sign your name on your drawing and share your finished creation on DIY.org
Help!?
What can we use if we don't have a ruler or colouring materials?
If you don't have a ruler, use the straight edge of a book or cereal box to draw the depth lines from the rectangle’s side corners toward the vanishing point, and if you lack colouring materials use crayons, markers, coloured magazine pieces, or diluted tea for light washes to colour the building.
My building looks skewed because the lines don't meet the vanishing point — how do I fix it?
Lightly extend the depth guide lines with a pencil and straight edge so they all aim at the small dot on the horizon and then erase extra guide lines and redraw any misaligned corners before darkening the final outlines.
How can I adapt this drawing activity for younger or older kids?
For younger kids simplify to drawing the front rectangle, a triangle roof, and basic windows and door with parental help using the ruler, while older kids can add a second vanishing point, more detailed brick or siding texture, and advanced shading on the side away from the light.
How can we extend or personalize the finished building drawing?
After erasing guides and darkening the outlines, personalize by adding nearby buildings from the same vanishing point, a street, trees, signs, varied roof shapes, patterned bricks or siding, then shade the side away from the light, colour with your materials, sign your name, and share on DIY.org.
Watch videos on how to draw a simple building
Easy HOUSE Drawing for Kids! Step by Step Lessons
4 Videos
Easy HOUSE Drawing for Kids! Step by Step Lessons

How to Draw a School Building Step by Step | Easy School Drawing for Beginners (easy drawing).

How To Draw A House Step By Step | House Drawing For Kids | Super Easy Drawing Tutorials
How to Draw a Simple Building using One-Point Perspective for Beginners
Facts about drawing and sketching for kids
🏛️ One-point perspective uses a single vanishing point on the horizon — perfect for drawing a building straight-on.
📐 Filippo Brunelleschi demonstrated linear perspective in the early 1400s, which helped artists draw buildings more realistically.
🚪 A typical door is about 2 meters (6.5 feet) tall — use it to keep the rest of your building in scale.
🎨 Adding simple shadows and 2–3 colors makes a flat sketch pop into a realistic-looking building.
🏗️ Frank Lloyd Wright designed over 1,000 projects (about 532 were built) — architects make many sketches before final designs.
How do I teach my child to draw a simple building step-by-step?
What materials do I need to draw a building with my child?
What ages is drawing a building appropriate for?
What are the benefits and variations of drawing buildings with kids?
