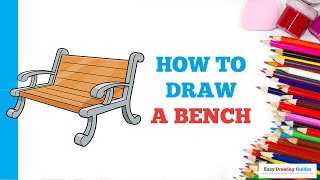
How to draw a bench - a free bench drawing guide
Draw a wooden park bench using simple shapes, perspective, and shading. Practice step by step techniques to create a realistic finished drawing.


Drawing Apps
Photos of wooden park bench drawings


Step-by-step guide to draw a wooden park bench
Bench Drawing Tutorial for Preschoolers
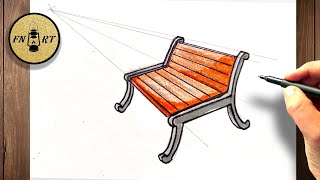
Step 1
Gather all materials and sit at a comfortable table to start your drawing.
Step 2
Lightly draw a horizontal horizon line and place one vanishing point on it to set the bench angle.
Step 3
Sketch the seat top as a rectangle in perspective by drawing two lines from the front edge to the vanishing point and connecting the ends.
Step 4
Draw evenly spaced slats across the seat using lines that follow the seat’s perspective lines.
Step 5
Draw the front legs as vertical lines under the front corners of the seat.
Step 6
Extend slats up from the rear edge of the seat to form the backrest boards in the same perspective.
Step 7
Draw armrests on each side by sketching a curved or straight top piece that connects the backrest area to the front leg.
Step 8
Add wood grain details with short curved lines along each slat and small circles or short dashes for bolts or screws.
Step 9
Lightly erase the horizon and construction lines that you no longer need to clean up the drawing.
Step 10
Choose a light source direction and mark it with a small arrow outside the drawing so you know where shadows will fall.
Step 11
Shade the bench by darkening the surfaces that face away from the light and blend gently with your tissue or cotton swab.
Step 12
Draw a simple ground shadow under the bench to anchor it and add small highlights with the eraser for shiny spots.
Step 13
Share your finished wooden park bench drawing on DIY.org
Help!?
What can we use if we don't have a tissue or cotton swab for blending the shading?
Use a clean fingertip, a folded paper towel, or a cheap blending stump in place of the tissue or cotton swab when shading the bench surfaces.
My slats don't look like they're in perspective—how can I fix that part of the drawing?
Lightly redraw the two guide lines from the seat's front edge to the vanishing point and make each slat end meet those perspective lines before darkening them.
How can I adapt this bench drawing for different ages or skill levels?
For younger kids simplify by tracing a pre-drawn horizon and vanishing point and having them add seat slats and wood grain, while older kids can measure slat spacing, draw precise bolts, and refine shading with the eraser and blending tools.
What are easy ways to enhance or personalize the bench drawing once the basic steps are done?
Change the wood grain pattern and bolt placement on the slats, add a park background with trees and a ground shadow aligned to your chosen light-source arrow, and then share the finished drawing on DIY.org.
Watch videos on how to draw a wooden park bench
How to draw a bench step by step easy
4 Videos
How to draw a bench step by step easy
How to Draw a Bench in a Few Easy Steps: Drawing Tutorial for Beginner Artists

How to Draw a Park Bench for Kids
How to draw Easy Bench in park drawing | Step by step for beginners | Drawing | Painting #33
Facts about drawing and perspective
🪑 Benches have been used in public spaces for thousands of years — Roman towns often had stone benches for people to sit and chat.
🎨 Drawing is one of humanity’s oldest art forms; some cave sketches are over 30,000 years old!
📐 Linear perspective, popularized in the Renaissance by Filippo Brunelleschi, uses vanishing points to make flat drawings look three-dimensional.
🌓 Chiaroscuro is a dramatic shading technique (used by artists like Caravaggio) that makes subjects pop with light and shadow.
🌳 The grain and growth rings in wood can tell how a tree grew — artists pick stable wood to avoid warped bench boards.
How do you draw a wooden park bench step by step?
What materials do I need to draw a wooden park bench with my child?
What ages is drawing a wooden park bench suitable for?
What are the benefits of drawing a wooden park bench for children?
