#GroomYourRoom Day 5 : Storage hacks
Organize a shelf and make simple DIY storage containers from shoeboxes, jars, and labels to declutter and learn measuring and creativity.


Step-by-step guide to #GroomYourRoom Day 5: Storage hacks
Photosynthesis 🌷 | What is photosynthesis? | Step-by-step process
Step 1
Gather all the materials from the list and bring them to your shelf workspace.
Step 2
Empty the shelf by taking every item off and placing them on a table or the floor.
Step 3
Sort the items into groups like books toys craft supplies and small accessories.
Step 4
Use the ruler to measure the shelf width and height so you know how much space you have.
Step 5
Measure the shoeboxes and jars to see which ones will fit best on the shelf.
Step 6
Cut decorative paper to the size of one shoebox using the scissors.
Step 7
Wrap the cut paper around the shoebox and secure it with tape or glue.
Step 8
Repeat cutting and wrapping for any other shoeboxes or jars you want to decorate.
Step 9
Write clear names for each container on labels with the marker.
Step 10
Stick the labels onto the front of each decorated shoebox and jar.
Step 11
Put each sorted group of items into the matching labeled container.
Step 12
Arrange the labeled containers back on the shelf neatly and leave space for taller items.
Step 13
Share your finished organized shelf and DIY storage containers on DIY.org.
Help!?
What can we use instead of shoeboxes, jars, decorative paper, or labels if we don't have them?
Use cleaned cereal or pasta boxes cut to size instead of shoeboxes, empty plastic food containers instead of jars, printer or magazine pages for decorative paper, and sticky notes or masking tape with a marker for labels.
What should we do if the decorative paper doesn't fit a shoebox or the labels won't stick?
If the paper is too small, re-measure the shoebox with the ruler and overlap two strips of paper before taping or gluing, and if labels won't stick clean the container front and use double-sided tape or a dab of glue and press firmly.
How can this activity be adapted for younger children or older kids?
For younger kids, have an adult measure the shelf and cut paper then let them sort items and stick labels, while older kids can use the ruler to measure shelf and shoeboxes themselves, cut and wrap paper, and design more detailed labels before arranging the shelf.
What are simple ways to improve or personalize the DIY storage containers and shelf layout?
Add cardboard dividers inside shoeboxes to separate small accessories, laminate labels with clear tape for durability, decorate with washi tape or drawings on the paper, and leave a labeled gap for taller items when arranging the shelf.
Watch videos on how to organize a shelf and make simple DIY storage containers (#GroomYourRoom Day 5: Storage hacks)
Photosynthesis
4 Videos
Photosynthesis

Photosynthesis: Crash Course Biology #8
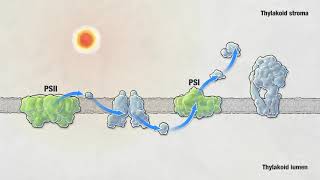
Photosynthesis | HHMI BioInteractive Video

Photosynthesis - Light Dependent Reactions and the Calvin Cycle
Facts about storage and organization for kids
📦 Shoeboxes make awesome instant organizers—stack, cut, and label them to create drawers, dividers, or mini-shelves.
🏺 Mason jars were patented by John Landis Mason in 1858 and are still popular for storing snacks, buttons, and craft supplies.
🧹 Marie Kondo’s KonMari method helped millions rethink clutter by asking whether an item “sparks joy” before keeping it.
📏 Building DIY storage is a sneaky way to practice measuring—kids use rulers, mark lengths, and learn fractions while cutting and fitting.
♻️ Upcycling old boxes and jars into storage reduces waste and turns trash into a creative treasure chest.
How do I organize a shelf and make simple DIY storage containers for #GroomYourRoom Day 5?
What materials do I need to make storage containers from shoeboxes, jars, and labels?
What ages is the #GroomYourRoom Day 5 storage-hacks activity suitable for?
What are the benefits, safety tips, and creative variations for this storage-hack activity?
