Fight Club : Iron Golem
Build a cardboard Iron Golem with moving arms using rubber bands and straws, then hold friendly push matches to explore simple machines and balance.

Step-by-step guide to build a cardboard Iron Golem
Step 1
Gather all the materials listed and find a clear workspace you can use.
Step 2
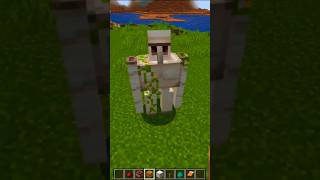
Cut a rectangle of cardboard about the size of a book to be the Iron Golem’s torso.
Step 3
Fold a 2 cm flap along the bottom of the rectangle to make a flat base so the Golem can stand.
Step 4
Cut two long arm shapes from cardboard about as long as the ruler for the Golem’s arms.
Step 5
Use the pencil to mark two small holes on opposite sides of the top part of the torso where the shoulders will go.
Step 6
Carefully poke a hole through each mark using the pencil tip or ask an adult to help make the holes with scissors.
Step 7
Thread one drinking straw straight through both shoulder holes so the straw crosses the torso like a sleeve.
Step 8
Slide the pencil through the straw so the pencil sits inside the straw and can act like a rotating axle.
Step 9
Tape one cardboard arm to each side of the pencil so the arms are attached and can swing when the pencil turns.
Step 10
Tape one rubber band from the middle of each arm to the back of the torso so the rubber bands pull the arms back to center.
Step 11
Decorate your Iron Golem with markers and adjust tape or rubber bands until the arms swing smoothly.
Step 12
Line up two Golems and hold friendly push matches by gently using the arms or a small ruler lever to test balance and see which Golem stays standing—be very gentle and fair.
Step 13
Share a photo and a short description of your finished Iron Golem and your friendly push match results on DIY.org.
Help!?
What can I use instead of a drinking straw or pencil if those are hard to find?
If you don't have a drinking straw or a pencil, substitute a straight wooden skewer or thin dowel threaded through the shoulder holes (or a short paper-towel tube) so it acts as the rotating axle inside the straw sleeve.
My arms won't swing or the pencil keeps slipping—what should I check and fix?
If the arms don't swing or the pencil slips, tighten the shoulder holes so the straw fits snugly, loosen or re-tape the arm attachments so they can rotate on the axle, and add a small spacer (a short straw piece or bead) inside the straw to center the pencil.
How can I adapt this Iron Golem activity for different ages?
For younger children, have an adult pre-cut the cardboard torso and poke the shoulder holes and use wide straws and stickers for decorating, while older kids can add cardboard armor, extra rubber bands for stronger recoil, and adjustable spacers to fine-tune arm swing.
What are simple ways to improve or personalize the Iron Golem and the friendly push matches?
To enhance the project, tape coins or washers to the 2 cm base flap for better balance, try different arm shapes and lengths from cardboard to change match outcomes, and decorate with markers or glued-on craft foam before testing friendly push matches.
Watch videos on how to build a cardboard Iron Golem
How to Make/Spawn IRON GOLEM in Minecraft (Bedrock/PE/Java)
4 Videos
How to Make/Spawn IRON GOLEM in Minecraft (Bedrock/PE/Java)
HOW TO MAKE AN IRON GOLEM!! (simple guide)
How to make an iron golem in Minecraft 1.21
CREATE Your Own POWERFUL IRON GOLEM in Minecraft RIGHT NOW
Facts about simple machines and basic mechanics for kids
🤖 In Minecraft, Iron Golems protect villages and can be built by players to defend against hostile mobs.
🧱 In folklore, golems were often made from clay or mud and animated by magical words or rituals.
📦 Corrugated cardboard is highly recyclable and many boxes are made from recycled fibers — eco-friendly and perfect for crafts!
🪢 Rubber bands store elastic energy, which can be used to make moving arms snap back or launch simple motions in toys.
⚖️ Levers are one of the six simple machines — they let you trade travel distance for extra force, great for friendly push-match advantages.
How do I build a cardboard Iron Golem with moving arms for friendly push matches?
What materials do I need to make a cardboard Iron Golem with moving arms?
What ages is the Fight Club: Iron Golem activity suitable for?
What are the benefits and safety tips for the cardboard Iron Golem activity?
