Express Yourself on Paper through Cartoons
Draw simple cartoon characters and short comic panels to express emotions, practice facial expressions and storytelling, and create your own personal cartoon scene.


Step-by-step guide to Express Yourself on Paper through Cartoons
How to Teach Drawing to Kids | Basic Drawing Tricks!
Step 1
Gather all the materials from the list and put them on your workspace.
Step 2
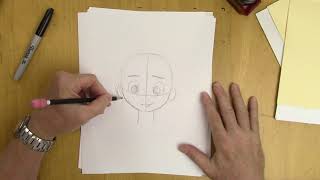
Draw six small circles in a row across the top of your paper to make head guides.
Step 3
Inside each circle draw different eye shapes and eyebrows to show six different emotions.
Step 4
Add a different mouth to each circle to complete each facial expression.
Step 5
Choose three of your favorite expressions and draw quick simple cartoon bodies under those head circles.
Step 6
Use your ruler to draw three panels side by side on a new sheet of paper.
Step 7
Lightly sketch which of your three characters goes in each panel and show one action for each.
Step 8
Draw a few simple background details in each panel to set the scene.
Step 9
Draw a speech or thought bubble in each panel and write a short sentence or sound for your characters.
Step 10
Carefully trace your final pencil lines with your black marker or pen and wait for the ink to dry.
Step 11
Gently erase the pencil lines so only the inked cartoon remains.
Step 12
Colour your characters and backgrounds using your colouring materials.
Step 13
Share your finished cartoon scene on DIY.org and tell which emotion or story you practiced.
Final steps
You're almost there! Complete all the steps, bring your creation to life, post it, and conquer the challenge!


Help!?
What can we use instead of a ruler, black marker, or special colouring materials?
If you don't have a ruler, black marker, or special colouring materials, use a straight book edge or a strip of cardboard to draw the three panels, trace final lines with a dark ballpoint pen or fine-tip felt pen, and color with crayons, watercolors, or colored pencils.
My ink smudged and pencil lines didn't erase cleanly—how do I fix that?
Prevent smudging by testing your pen on scrap paper, waiting until the ink is completely dry after you 'Carefully trace your final pencil lines', then gently erase pencil marks with a soft eraser and use light pencil strokes when sketching the six head guides and panel layouts.
How can I adapt this activity for different ages?
For younger kids, pre-draw the six head guides and panels and let them add simple eyes, mouths, and color with chunky crayons, while older kids can draw more detailed bodies, add measured backgrounds with a ruler, and write longer dialogue in the speech bubbles to build a story.
What are fun ways to extend or personalize our finished cartoon scene?
Extend it by creating more panels on extra sheets to make a longer comic, personalize characters with unique costumes and consistent color schemes during 'Colour your characters', scan the inked pages for digital lettering or simple animation, and then share the story and practiced emotions on DIY.org as suggested.
Watch videos on how to Express Yourself on Paper through Cartoons
How to Draw Children (Cartoons) - Easy to Follow Tutorial
4 Videos
How to Draw Children (Cartoons) - Easy to Follow Tutorial
"Creative Cartoon Art Hacks: From Basic to Brilliant! ✨🖌️"

Disney Artist Teaches Animation - How to Flip Paper + "Inbetween"
"Quick & Easy Cartoon Drawing Tricks! 🎨"
Facts about cartooning and visual storytelling for kids
🖼️ The word "cartoon" originally described a full-size preparatory drawing for a painting or tapestry — not just funny pictures!
😊 Psychologist Paul Ekman identified six basic facial emotions (happiness, sadness, anger, fear, surprise, disgust) that cartoonists often exaggerate.
✏️ The comic strip "Peanuts" ran from 1950 to 2000, showing how simple, expressive drawings can tell powerful stories for decades.
📚 Comics use panels and the "gutter" (the space between panels) to control pacing and how readers imagine action between frames.
🎭 Cartoonists boost emotions by exaggerating features—big eyes, wide mouths, or tilted eyebrows make feelings read instantly.
How do I do the "Express Yourself on Paper through Cartoons" activity?
What materials do I need for Express Yourself on Paper through Cartoons?
What ages is the cartoon drawing activity suitable for?
What are the benefits and safe variations of making emotion cartoons?


